 Create a lovely wallhanging to warm your décor for the month of February. Inspired by those cute little boxes of sweet candy hearts to celebrate Valentine’s Day, this focal piece is sure to get lots of attention in your home.
Enjoy the exact piecing you can attain with the Horizon Memory Craft 8900QCP Special Edition and show off your quilting with ease using matchstick quilting in free motion. See how easy it is to switch from precise piecing with AcuFeed to free motion quilting with this smooth machine.
QST=quarter square triangles, HST=half square triangles, FQ=fat quarter (18″ x 21″), all seam allowances are 1/4″ unless otherwise specified.
Skill Level: Intermediate
Sewing Time: 8 hours
Finished Size: 9″ x 30″
Click here to download a PDF of these instructions
Janome Supplies Required:
Horizon Memory Craft 8900QCP SE
1/4″ Seam foot O
QBS Foot for free motion quilting
AcuFeed Foot AD
Blue Tip Needle
Pre-wound Bobbin
Empty Bobbin
Fabrics/Notions Required:
Refer to this color diagram:
1/2 yd. Black yard dyed Essex Linen (Fabric A) sub cut into:
Tip: If you aren’t an experienced quilter, the Essex linen adds a little more bulk than regular quilting cotton when piecing. You may choose a regular weight quilting cotton as the background fabric.
(4) 2.5″ squares for QST
(5) 4″ squares
(10) 1.5″ squares
(6) 1.5″ squares
(1) 2″ square
(2) 2.5” x 6″ (side borders)
(2) 2.5″ x 31″ (top and bottom borders)
1 FQ Red tone-on-tone cotton fabric (Fabric B) sub cut into:
(1) 4″ square for HST
(1) 1.5″ square
(2) 3.5″ x 1.5″
(1) 2.5″ x 3.5″
(1) 2.5″ square for QST
1 FQ Red-pink tone-on-tone cotton fabric (Fabric C) sub cut into:
(1) 4″ square for HST
(1) 1.5″ square
(2) 3.5″ x 1.5″
(1) 2.5″ x 3.5″
(1) 2.5″ square for QST
(1) 2 1/4″ square for HST portion of QST
1 FQ Light pink tone-on-tone cotton fabric (Fabric D) sub cut into:
(1) 4″ square for HST
(1) 1.5″ square
(2) 3.5″ x 1.5″
(1) 2.5″ x 3.5″
(1) 2.5″ square for QST
(1) 2 1/4″ square for HST portion of QST
(1) 2.5″ wide binding totaling 94” from remainder of fat quarter
1 FQ Lavender tone-on-tone cotton fabric (Fabric E) sub cut into:
(1) 4″ square for HST
(1) 1.5″ square
(2) 3.5″ x 1.5″
(1) 2.5″ x 3.5″
(1) 2.5″ square for QST
(1) 2 1/4″ square for HST portion of QST
1 FQ Dark Purple tone-on-tone cotton fabric (Fabric F) sub cut into:
(1) 4″ square for HST
(2) 1.5″ square
(2) 3.5″ x 1.5″
(1) 2.5″ x 3.5″
(1) 2 1/4″ square for HST portion of QST
1/2 yd backing fabric sub cut into:
14″ x 36″
14″ X 36″ piece of batting (loft is up to you)
Coordinating all-purpose sewing thread
6 spools of thread for quilting in colors that coordinate with each fabric
Student Supplies Required:
Marking pen/tailors chalk
Rotary cutter/ruler/mat
Safety Pins
Spray baste (optional)
Supreme Slider quilting mat
Piecing the HST units
1. Attach 1/4″ seam foot O.

2. Take the 4″ square of Fabric D and (1) 4″ square of fabric A. Place right sides together and pin in place. Using a ruler and a water soluble marking pen, draw 2 diagonal lines, corner to corner so you have a large “X” marked on the wrong side of one fabric.

3. Sew a 1/4″ away from both sides of each diagonal line.

4. Cut the sewn square in half vertically.
5. Make another cut perpendicular to that.
6. Then cut on the diagonal lines that were drawn.
7. Open the 8 HST units that were created and press seams open.
8. Repeat steps 1-6 four more times, using each of the remaining colors (Fabrics B, C, E, and F) with one square of fabric A (Essex).
9. Trim all completed units to 1.5″ square
10. Set aside until ready to piece the wall hanging together.
Piecing the QST/HST Mix Units

1. Take the 2.5″ square of fabric B (red) and one 2.5″ square of fabric A (Essex).

Mark a diagonal line down the wrong side of fabric B.
2. Place both pieces of fabric right sides together and pin in place. Sew 1/4″ away from both sides of the diagonal line.

3. Using a ruler and rotary cutter, cut on the diagonal line.
4. You will only need one of the HST units just created. Set the other aside. Press seam open.
5. Take the 2 1/4″ square of the next color fabric (in this case, fabric C) in the layout diagram, and the HST unit just created and draw a diagonal line corner to corner (the opposite corner to corner of the made HST) on the wrong side of fabric C.
6. Place right sides together and pin in place. Make sure the new line you sew is not parallel with the HST seam on the bottom fabric.

7. Sew 1/4″ seam from both sides of the drawn diagonal line. Using a ruler and rotary cutter, cut on the diagonal line.

8. Press seams open. You will need both squares created.

9. Repeat steps 1-4 three more times, using the following fabrics for your pairs to create the HST units: A-C, A-D, A-E. You will not need to complete this with fabric F.
10. Complete steps 5-8 by taking the completed unit you created in the previous step and pairing it with the next colored heart on the fabric diagram.
You will take one HST unit A-C and pair it with a 2 1/4″ square of fabric D. You will take one HST unit A-D and pair with a 2 1/4″square of fabric E. Take one HST unit A-E and pair with a 2 1/4″ square F.

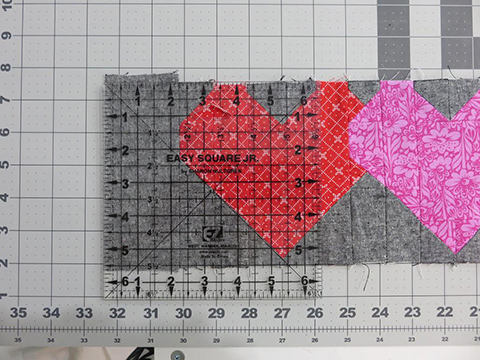
11. Trim all completed units to 1.5″ square, being certain to line up the ruler mark at .75″ with the center of what will be the finished unit.
Piecing the Wall hanging

1. Begin by laying out all of the pieces for the red heart (Fabric B heart), following the letter labels.
2. A=HST fabric A-B; B= 1.5″ square fabric B; C=1.5″ x 2.5″ fabric A; D= 1.5″ x 3.5″ fabric B; E=1.5″ square fabric A; F=2.5″ x 3.5″ fabric B; G=QST/HST fabric A-B/C; H=1.5″ square fabric C

3. You will piece columns 1, 2, 4, and 5 together using the pieces indicated in the previous two steps and complete column 3 by piecing the two HST units together prior to attaching them to the 2.5″ x 3.5″ piece of fabric in the middle of column 3
4. Lay out the rest of the pieces of the remaining hearts and background fabric prior to piecing them together by column. You will follow the same layout as in step 2, just replacing fabrics B and C with fabrics C and D, respectively, and so on until you’ve placed all the pieces.
5. Refer to the diagram in step three for placement. Pin pieces right sides together, then sew with a 1/4″ seam allowance. Be sure to match and pin all intersecting seams for correct placement.
6. Press all seams open.
7. Take the two 2.5″ x 6″ border pieces of fabric A and pin right sides together on each of the side ends of the pieced top. There will be some remaining fabric at the beginning and end. Don’t pull or stretch the border fabric while sewing, as this may result in way borders. Sew with 1/4″ seam allowance. Trim excess fabric and press seams open.
8. Take the two 2.5″ x 31″ border pieces of fabric A and pin right sides together on the bottom and top of the pieced top. There will be some excess fabric. Sew with 1/4″ seam allowance and press seams open. Trim excess fabric away.
Quilting it All Together
1. Layer the wall hanging top on top of batting and the backing fabric.
2. Pin the layers together, making sure to keep all of the layers flat (you can also use spray baste).
3. The batting and backing fabric will be slightly larger than the pieced top.

4. Attach QBS foot for free motion. Lower the feed dogs. Adjust the presser foot pressure to “5” and set the machine to “D4” “D4S”.
5. Wind bobbin with quilting thread that coordinates with Fabric B. Thread machine with matching thread.

6. Quilt the layers together with a fun design. The hearts were quilted with tear drop-shaped pebbling, but play with different motifs inside each heart, if you choose.
Tip: When free motion quilting, try to keep your quilting stitches a uniform length—not too small, and not too large. You may want to practice the quilting motif before starting on the wall hanging.
7. Repeat steps 5 and 6, changing thread colors for each different colored heart.
8. Wind the bobbin with quilting thread that coordinates with Fabric A (Essex Linen). Thread machine with matching thread.

Optional: Use the 5 colored threads that coordinate with fabrics B-F to complete the matchstick quilting, changing as you approach each different colored heart.
9. Still using free motion quilting, quilt organic straight lines for matchstick quilting, no further than 1/4″ apart from each other on the Fabric A only (don’t carry the straight lines onto the heart). When approaching a heart, stitch in the ditch to go around and continue the straight lines. Organic straight lines refers to semi-straight lines without the use of a ruler. It’s okay if they are a little wavy, as that adds to the texture of the finished quilting.
10. Trim the sides of the wall hanging when quilting is complete to square up.
Binding
1. With the remaining fabric (D) cut 2.5″ strips across the grain or cut bias strips, cutting enough to create 94″ in length.
2. When the length is complete, press the strips in half lengthwise, wrong sides together.
3. Attach the binding around the wall hanging, mitering the corners.
 American Quilter Magazine January 2010 Digital
1 × $6.99
American Quilter Magazine January 2010 Digital
1 × $6.99  American Quilter Magazine January 2023 Digital
1 × $6.99
American Quilter Magazine January 2023 Digital
1 × $6.99  American Quilter Magazine January 2021 Digital
1 × $6.99
American Quilter Magazine January 2021 Digital
1 × $6.99  American Quilter Magazine July 2011 Digital
1 × $6.99
American Quilter Magazine July 2011 Digital
1 × $6.99