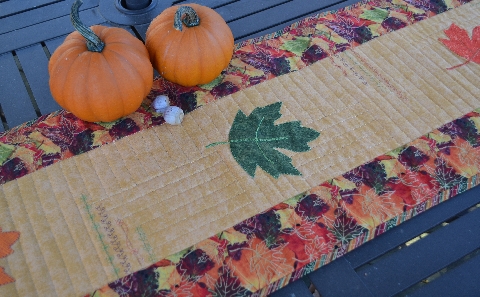
Inspired by an indecisive fall season, this whimsical table runner from Janome highlights some of the most fun features of the Horizon Memory Craft 8900QCP Special Edition. Take time to sample some of the amazing 9mm decorative stitches. See how easy appliqué is when using the knee lift and, as always, simply enjoy sewing on this amazingly smooth, powerhouse of a machine.
Skill Level: Beginner to Intermediate
Sewing Time: 3 hours
Janome Supplies Required:
HMC8900QCP SE
Open Toe Satin Stitch foot F
¼” Seam foot O
Darning foot PD-H
AcuFeed foot AD
Knee Lift
Blue Tip Needle
Pre-wound bobbin
Empty Bobbin
Fabrics/Notions Required:
½” yd. solid or tone-on-tone cotton fabric (A) sub cut into:
8″ X WOF strip (center of tablerunner)
(14) 2 7/8″ squares (flying geese)
¼” yd. autumn cotton print (B) sub cut into:
(2) 4″ X WOF strips
¼” yd. coordinating tone-on-tone autumn print (C) sub cut into:
5” square (leaf appliqué)
(2) 5¼” squares (flying geese)
¼” yd. of two coordinating tone-on-tone autumn prints (D and E) sub cut into:
5” square (leaf appliqué)
5 ¼” square (flying geese)
1¾ yds. autumn print (F) sub cut into:
15″ X 55″ piece (backing)
18″ square (binding)
15″ X 55″ piece of thin batting
5″ X 15″ piece of fusible webbing
Coordinating all-purpose sewing thread
3 spools of coordinating decorative thread
½ yd. lightweight tear-away stabilizer
Other Supplies Required:
Marking pen/tailors chalk
Rotary cutter/ruler/mat
Safety Pins
Decorative Stitching
1. Trim selvages from 7½” X WOF fabric strip (A). Place fabric on table, positioning one 7½” end of fabric facing you.
2. Using ruler and marking pen, measure ¾” in from the right side and mark a 6″ line.
3. Move the ruler over ½” and mark a 5″ line.
4. Repeat two more times, staggering the lines 1″ less each time. Your fourth line will measure 3″.

5. Repeat on the other 7½” side of the fabric.
6. Position one of the long sides (WOF) of the fabric facing you and measure 15″ in from the 7½” side.
7. Repeat marking the four staggered lines, working your way toward the center.

8. Flip the fabric around, so that the other long side is facing you and repeat steps 6 and 7.
9. Insert Blue Tip needle and prewound bobbin. Thread machine with decorative thread.
10. Attach Open Toe Satin Stitch foot F2.
11. Place a piece of tear-away stabilizer under the fabric, under the first section of marked rows.
12. Starting at the top of the first line, align the marking so that it sits in the center of the foot.
13. Select a decorative stitch and sew toward the cut edge of the fabric.

14. So you don’t have to change thread for every row of stitches, count forward every three lines and sew a different decorative stitch for each row.
15. Change the thread color and continue to randomly pick rows, sewing different decorative stitches until all the lines have been sewn.
16. Remember to always place stabilizer under the fabric before sewing and start at the top of the line, sewing toward the cut edge.
Leaf Appliqués
1. Press a 4½” square of fusible webbing to the wrong side of the three 5″ squares of coordinating fabric (C, D and E).
2. Trace the leaf template (click HERE for the 5″ leaf template) on the web liner.
Optional: Copy the template and change the size to make the three leaves slightly different in size.
3. Cut the leaves out and remove the web liner.
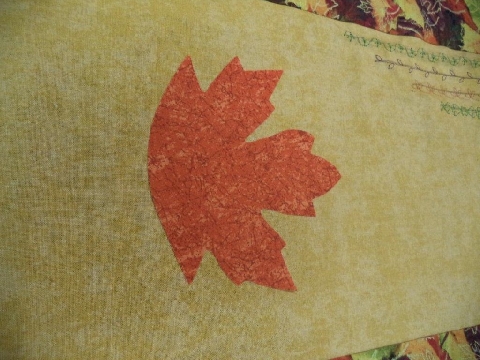
4. Place the three leaves on the center fabric strip (A). Space them out between the previously sewn decorative stitches. Play with different positions until you like their placement. Press in place.
5. Attach Knee Lift.
6. Go to the appliqué stitches and select stitch 45 or 46.
7. Place a square of stabilizer under the leaf and the fabric.

8. Starting at a bottom corner of a leaf, align the edge of the appliqué leaf fabric with the needle drop.
9. When you reach a corner or need to adjust the fabric to accommodate curves, use the Knee Lift to raise the presser foot. The needle will automatically stop in the down position, allowing you to easily pivot.
10. As you approach corners, keep track of where the stitch is, making sure to pivot with the needle on the right side of the stitch.

11. Placing a piece of tear-away stabilizer under the fabric and appliqué fabric, sew around all three leaves, appliquéing them in place.
12. You have two options for sewing the stem and leaf accents. First trace the stem and accent design onto the leaf and background fabric. Read both options and pick the one you feel more confident doing.
Option A
13. Select stitch #9. Increase stitch width 3.4. Reduce stitch length to .25.
14. Align the design marking under the foot, positioning it in the center.
15. Sew a satin stitch on top of the markings, doing the accents first and the center stem last.
Option B
16. Attach Darning PD-H foot. Lower feed dogs. Select stitch #9. Increase stitch width to 3.4.
17. Sewing free-motion, sew on top of the marked design.

18. Start at the bottom of the stem and work your way up to the accents. If you’re stitch is not dense enough, you can go over your stitches a second time to fill in the stem.
Piecing the Tablerunner
1. Select stitch D95S from the direct stitch mode on the screen.
2. Attach ¼” Seam foot O.
3. Attach the 4″ X WOF strips (B) to each side of the tablerunner center.
4. Press the seams toward the strips. Trim the strip ends to be flush with the center fabric.
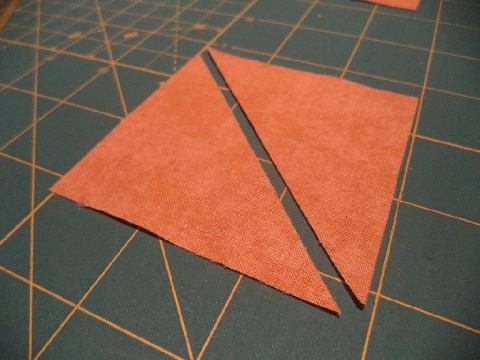
5. Select the four 5¼” squares of fabric for the flying geese (C, D and E)

6. Cut the squares diagonally twice, creating four triangles per block. Set aside.
7. Select the fourteen 2 7/8″ squares (A) and cut in half diagonally, creating 28 triangles.
8. Align the long edge of a small (A) triangle to one of the short sides of a larger triangle (C, D or E). Make sure the fabrics are lined up at the bottom.

9. Sew a ¼” seam.
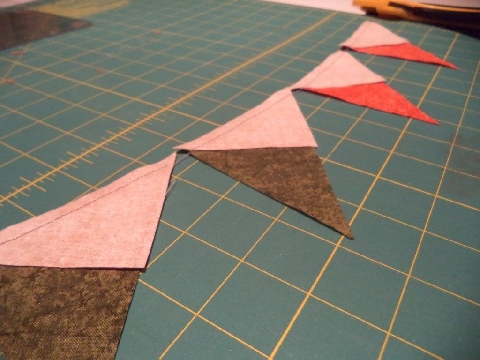
Tip: Try sewing the small triangle to the larger one in an assembly line. This will speed up your piecing process.
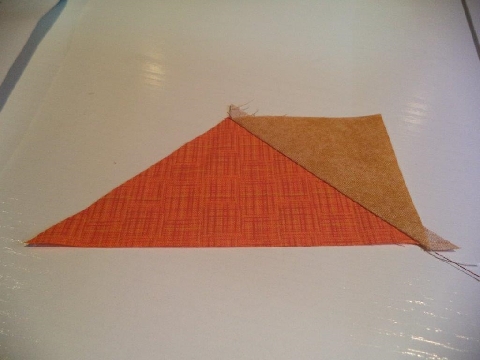
10. Press the seam open.
11. Attach another small triangle (A) to the other side of the large triangle. Press the seam open.

12. Trim the block and set aside.
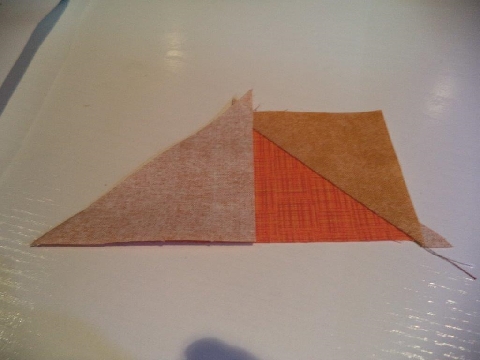
13. Repeat until you have a total of 14 blocks made. You will have two large triangles (C) left over.
14. Sew seven blocks together, in the following order: AC, AD, AE, AC, AD, AE, AC.
Hint: When sewing the blocks together, place the block with the top of the triangle on the top so that you can make sure you are not going to sew through the peak of the triangle.
15. Press the seams toward the bottom of the larger triangle.
16. Repeat step 14 for the second strip of flying geese.
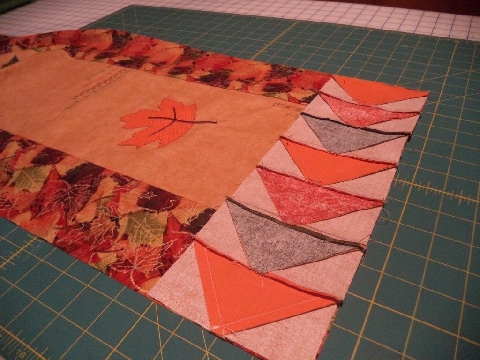
17. Trim the strips if necessary and attach a strip to each end of the tablerunner.
18. Press seams.
Quilting it All Together
1. Layer the tablerunner top on top of batting and the backing fabric (F).
2. Pin the layers together, making sure to keep all of the layers flat.
3. The batting and backing fabric will be slightly larger than the pieced top.
4. Attach AcuFeed foot AD.
5. Wind bobbin with all purpose sewing or quilting thread. Thread machine with matching thread.
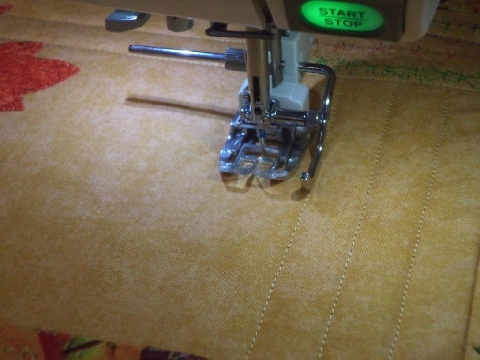
6. Quilt the layers together, playing with different stitch directions in order to highlight the embellishments on the tablerunner.
7. Trim the sides of the tablerunner when quilting is complete.
Binding
1. With the remaining fabric (F) cut 2½” strips across the grain or cut bias strips, cutting enough to create a three yard length.
2. When the length is complete, press the strips in half lengthwise, wrong sides together.
3. Attach the binding around the tablerunner, mitering the corners.
