Who’s ready for a little sewing fun? If you’ve never tried free motion quilting (FMQ) on your domestic sewing machine, here’s a little challenge to give you a taste of it.
Last week, I mentioned seven quick steps for getting ready to FMQ. If you missed that article, it’s a good idea to review it HERE. Machine ready to go? Don’t worry if it’s not new or fancy, just be sure you have a darning foot and your feed dogs are down. Rule #1: Fun, not perfection, is the goal!
Let’s jump in and try it! The goal? A Vase Quilt that you can use!
I’m as proud of it as if it were perfect!
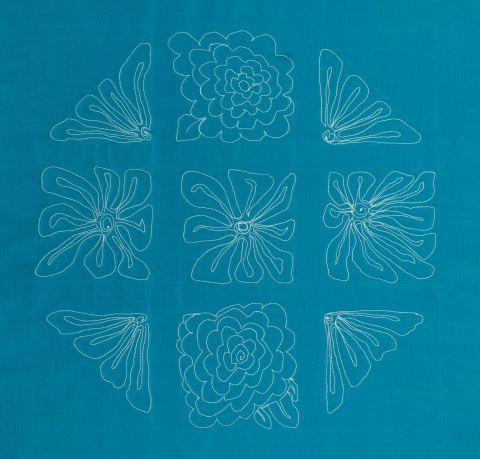
You’ll need a 20” x 20” square of fabric, and matching sizes of batting and backing. Before you begin, draw nine squares on the fabric with your favorite fabric marking tool, whether washable pen, chalk, or fine-line mechanical pencil. My squares were each 4”, with 1” in between.
I found the middle spot of the fabric, marked a 4” square at that spot with chalk, and measured outward from there. Leave a wide, unmarked outside margin for this project.
Mark and Sandwich
The 1″ margin around each square is important. You’ll be filling each square with a design you like, and you’ll need a little breathing room. Since Lori Kennedy of The Inbox Jaunt introduced me to this challenge, I used some of her designs HERE. (Yes. Some of my flowers are SUPPOSED to have off-center centers!) You can pick designs from any resource. Kent Mick’s Free Motion Quilting on Your Home Sewing Machine is another great source for beginner FMQ information and quilting designs. (It’s a brand new book from AQS; his step-by-step photos are fabulous for learners!) There’s a list of more references below. Of course you may prefer to just doodle in the squares to the rhythm of the designer in your head!
Make the “quilt sandwich,” and baste as you prefer. I used fabric adhesive (my first time for that, too!) on this step – wow, was I pleased with the results! It’s easy, and a little bit re-stickable when you get the urge to pull it up and tug out a wrinkle.
You can mark the quilting design if you feel insecure. But remember, this is “FREE MOTION” quilting! Keep the design picture handy, and the look you are aiming for can be achieved without stressing over following the lines. I’m choosing to sew “free!”
Preliminary Machine Adjustments
“Drop” or “disengage” the sewing machine’s feed dogs. You’ll have to see your owner’s manual if you don’t know how. Without feed dogs, the machine is incapable of moving the quilt – you’ll be moving the fabric to create the design, controlling the stitching speed with your foot and the fabric direction with your hands. I hear it gets easier as you go – and that sometimes, faster might be better? Can it be true?
A free-motion quilting or embroidery presser foot is normally used; your darning foot will do just as well for this exercise. You probably have one hanging around in your little sewing machine supply box. It’s the one with the little circle at the end. I’ve read that an open-toe regular foot will work, but when I tried that I found very frustrating results! The freedom of movement was simply not there. If you have a choice of needle plates, change from the zigzag one with the wider needle opening to a straight-stitch plate.
Set your stitch length to 0.
Are you sitting comfortably? And not like me, on the edge of my chair? You should be looking down at your stitching, so be sure your chair makes you tall. This will also help your arms to remain in a comfortable position, able to move the fabric around.
Here We Go!
Choose the area in which you’d like to quilt. If your adhesive or basting pulled all the parts snugly together, you shouldn’t HAVE TO start in the middle. Hmm. I think I will for this project, just to be safe.
Drop the lever on the presser foot. This will engage the stitching mechanism. Use the hand wheel to lower the needle, then raise it to draw the bobbin thread to the surface. Hold the two threads away from the needle and take several stitches in place to anchor the stitches. Go ahead and trim the tails to get them out of the way.

Spread your fingers wide, and center your thumbs and forefingers over the area in which you are quilting. You’ll be using your hands as a “hoop” and keeping them fairly close to the presser foot, firmly but gently. If you press too hard, you’ll stop the free motion!
With a gentle press of the foot pedal, off you go! You’re not going anywhere? Remember, your fingers AND foot are in charge here. A consistent, medium speed is good – move the quilt at the same speed that the needle is stitching. Jerky hands and uneven speed will make the stitches, you guessed it, jerky and uneven.
 You’re not rotating the quilt. Move toward the direction you want to go; sometimes that will mean stitching over previously stitched areas, and that’s fine. Just don’t allow the needle to stitch over and over in the same place – that will cause lumps and knots. Keep your eye on the design area ahead (and your fingers in view) for smoother moves.
You’re Doing It!
Glance at your planned design from time to time, keep your fingers out of the way, and relax! You’re doing FMQ!
To end the stitching, take five or six stitches in place, pull gently on the needle thread to bring up the bobbin thread, and clip both threads close to the surface.
Let me know what you think! How did you do? Do you have more tips for beginners? Comment below, or post comments and photos to the American Quilter’s Society Facebook page. I’ll be posting mine on Facebook – and I can’t wait to see how you’re doing!
Here are a few more resources for quilting designs:
Quilting Designs from Nature by Lone J. Minkkinen
Fabulous Feathers and Fillers by Sue Nickels
Add-a-Line Extreme Quilting Patterns by Janie Donaldson
Quilt Savvy: Gaudynski’s Machine Quilting Guidebook by Diane Gaudynski
-Ann@AQS
 American Quilter Magazine January 2019 Digital