
Have you collected Quilt Pins along your quilting journey? Maybe you have a stash of favorite buttons you’ve accumulated through the years. Whatever little treasure, why not put them in your Quilt Story Project? Here are two great blocks to incorporate your favorite memorabilia into your quilt.
At AQS we collect Quilt Show Pins! Here is our 2016 collection we designed this special block to display.
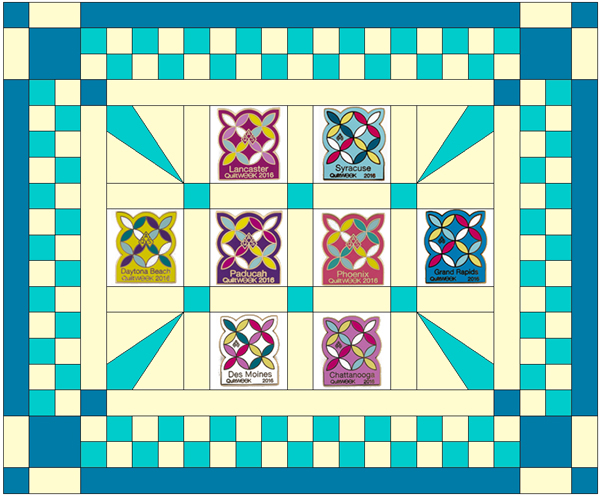
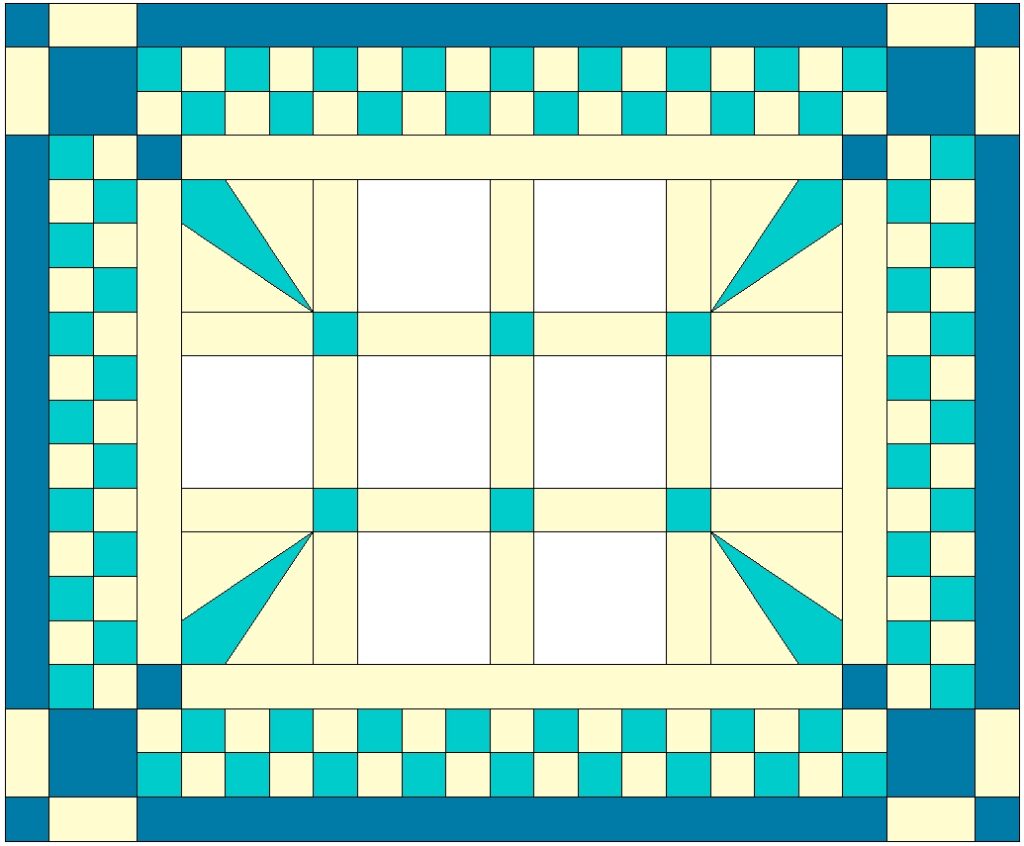
AQS Show Pin Block
11 1/2″ x 9″ finished size
by Betsey Langford
Fabric Requirements –
1/8 yard dark blue
1/8 yard light blue
1/8 yard yellow
1/8 yard white
Cutting Instructions –
From the dark blue fabric, cut:
(8) 1″ x 1″ squares for the borders
(2) 1″ x 9″ rectangles for the outer border top and bottom
(2) 1″ x 7″ rectangles for the outer border sides
(4) 1½” x 1½” squares for the checker border corner squares
From the light blue fabric, cut:
(1) 1″ x 6½” strip for strip piecing the sashing
(1) 1″ x 35″ strip for strip piecing the checker border top and bottom
(1) 1″ x 26″ strip for strip piecing the checker border sides
(4) 3″ x 3″ squares paper piecing
From the yellow fabric, cut:
(1) 1″ x 35″ strip for strip piecing the checker border top and bottom
(1) 1″ x 26″ strip for strip piecing the checker border sides
(2) 1″ x 8″ rectangles for the inner border top and bottom
(2) 1″ x 6″ rectangles for the inner border sides
(1) 2″ x 6½” rectangle for strip piecing the sashing
(11) 1″ x 2″ rectangles for sashing
(8) 3″ x 3″ squares for paper piecing
From the white fabric, cut:
(8) 2″ x 2″ squares for pin backgrounds
For the paper pieced corner patches, download the 2″ unfinished templates here.

Use the layout below to assemble the block:
Want little blocks to scatter throughout your Quilt Story Project?
Give this one a try:
Little Pin Block
4 1/2″ x 4 1/2″ finished size

Cutting Instructions for Little Pin block –
From the dark fabric, cut:
(4) 2″ x 2″ squares for the half square triangles
(4) 1″ x 1″ squares
From the medium fabric, cut:
(4) 1″ x 1 1/2″ rectangles
From the background fabric, cut:
(4) 1 1/2″ x 1 1/2″ squares
(4) 2″ x 2″ square for the half square triangles
From the light center fabric, cut:
(4) 2″ x 2″ squares
(4) 1″ x 2″ rectangles
Use the diagram above to assemble the block.
Want to take a look the My Quilt Story Project or need to catch up? Catch past project posts below:
My Quilt Story Project
Our quilting journey includes all the different techniques we’ve tried and played with to create quilts. Be sure to include samples of techniques you’ve tried in blocks for your quilt.
Because this project will take components of different shapes and sizes, don’t be afraid to create patches showing off your vast range of techniques. We will worry about the shapes and sizes later when we get to the putting-together part of this adventure!
At least show off your favorite quilt construction technique. Make us a sample patch showing off what you’ve learned.
Want to catch up on the rest of the project? Here are the details:
Between now and Fall Paducah in September, we invite you on a special creative adventure. Each week we will offer you ideas, techniques, blocks, and embellishments to help you tell your quilt story in stitches.
If you didn’t catch the beginning of the project, visit here for the quilt story worksheet.
Did you remake your first block? You can find some help here.
Have you decided on the monuments representing the moments that changed your quilt story? Here’s a look at how to start.
Are you building your town? See how we built a building.
Have you created a quilting garden? See some sample blocks here.
What quilt construction techniques have you learned along your journey? Take a look at our list.