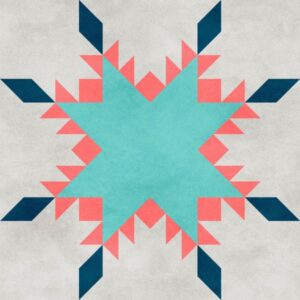
Welcome to Block 2019! We’re exploring classic quilt blocks all year, and the eleventh block is Feathered Star. Part of the challenge of Block 2019 is to try different techniques and construction methods to grow and hone our skills as quilters. This month’s block has three construction methods to choose from.
Fabric Requirements:
Gray (Includes quilt-as-you-go backing) — 3/8 yard
Aqua — 1/4 yard
Dark Blue — 1/8 yard
Coral — 1/8 yard
Batting — 12″ x 12″ (For quilt-as-you-go method only)
Cutting Instructions:
See the method instructions for specific instructions suited to each method.
Method 1: Patchwork
This is the most traditional way to make the Feathered Star block, but with inset or Y-seams, it can be one of the more difficult methods. See the notes at the end of the section for tips to help with construction.
Create durable templates from the Patchwork printable. Measure the 1″ square to ensure the page printed the correct size.
The templates do not include the seam allowances, so leave space for seam allowances between shapes. On the wrong side of the fabric, trace the template to create the sewing line.
Trace the following using the templates:
Gray:
(4) A
(4) B
(16) F
(24) H
Aqua:
(1) C
(8) E
Dark Teal:
(4) G
(4) I
Coral:
(4) D
(8) F
(16) H
(4) J
Block Construction
Add the seam allowances as you cut out the pieces.
To sew these seams, stitch only on the sewing lines and not into the seam allowances. Place 2 patches right sides together. Use pins to line up the end of the sewing lines on the 2 patches. Backstitch at the beginning and end, and take care not to stitch into the seam allowance.
Use the diagram below as a guide for template placement.

By hand:
This block dates back to when all quilt blocks were hand sewn, so the block is actually easier to construct by hand than by machine. Remember not to press until the very end of sewing the block together. This allows for increased accuracy.
By machine:
Take your time and try a few of these tricks to make the block easier to piece. Decrease the stitch length on your machine to about 1.8 mm. Start a few stitches in front of the true starting point, sew to the starting point, pivot and sew down to the end. Use your handwheel at the beginning and end of seams for increased accuracy.
Method 2: English Paper Piecing
This hand sewing method allows for accurate, beautiful results. If you enjoy EPP, this method is a great option for making the Feathered Star block.
Print the EPP templates onto sturdy paper like cardstock and cut out on the solid lines. Measure the 1″ square to ensure the page printed the correct size.
Cut out the following:
Gray:
(4) A
(4) B
(16) F
(24) H
Aqua:
(1) C
(8) E
Dark Teal:
(4) G
(4) I
Coral:
(4) D
(8) F
(16) H
(4) J
Block Construction
To brush up on your EPP basics, click here. Using the method of your choosing, baste the fabric to the EPP templates. Sew the pieces together to assemble the block.
Use the diagram below as a guide for construction.

Method 3: Foundation Paper Piecing
FPP is the easiest way to avoid stretching bias and to get accurate results for the block when machine piecing. This method uses no Y-seams.
Measure the 1″ square to ensure the page printed the correct size.
Cut fabric for the FPP templates as follows:
Gray:
(1) D7, H7, L7, P7 – 9″ x 9″ cut in half diagonally twice to make 4 triangles
(4) A6, E6, I6, M6 – 4″ x 4″
(24) A2, A3, A5, B2, B3, B5, C3, C5, C7, D1, D3, D5, E2, E3, E5, F2, F3, F5, G3, G5, G7, H1, H3, H5, I2, I3, I5, J2, J3, J5, K3, K5, K7, L1, L3, L5, M2, M3, M5, N2, N3, N5, O3, O5, O7, P1, P3, P5 – 2 1/4″ X 2 1/4″ cut in half diagonally once to make 48 triangles
Aqua:
(1) D6, H6, L6, P6 – 5″ x 5″ cut in half diagonally twice to make 4 triangles
(1) Q1 – 4 3/4″ X 4 3/4″
(2) C8, G8, K8, O8 – 3 1/4″ x 3 1/4″ cut in half diagonally once to make 4 triangles
(2) C2, G2, K2, O2 – 2 1/4″ x 2 1/4″ cut in half diagonally once to make 4 triangles
Dark Teal:
(8) A1, B1, E1, F1, I1, J1, M1, N1 – 2″ x 3″
Coral:
(4) B1 & D1 – 3″ x 3″ cut in half diagonally once to make 8 triangles
(12) A4, B4, C4, C6, D2, D4, E4, F4, G4, G6, H2, H4, I4, J4, K4, K6, L2, L4, M4, N4, O4, O6, P2, P4 – 2 1/4″ X 2 1/4″ cut in half diagonally twice to make 24 triangles
(8) B6, C2, F6, G1, J6, K1, N6, O1 – 2″ x 2″
Section Construction
To brush up on your FPP skills, click here. If you would like some tips on joining sections, click here.
Follow the numbers of the FPP templates to complete each section. Trim the sections to the seam allowance lines marked on the paper.
Block Construction
Refer to the FPP Assembly Guide to lay out all the sections.
Sew A and B together, C and D together, E and F together, and so on. With all the pairs sewn together, construct the block like a nine patch, sewing rows and then sewing the rows together.

Block measures 12 1/2″ x 12 1/2″ unfinished.
Finishing Touches
To prepare the block for quilt-as-you-go, sandwich the 12 1/2″ x 12 1/2″ backing square, 12″ x 12″ batting centered on the backing square, and your block. Baste using preferred method. Quilt as desired inside the 12″ finished size of the block.
Check back later in the month, when we’ll share ideas for quilting the block.
And you’re all set!
Check back next week for some fun variations on the Feathered Star block. You can always find links to all the previous Block 2019 blocks and see when the next installment is coming out in the main Block 2019 article, just click here.
As you finish your blocks, share them in the AQS Project Parade Facebook group, or use the hashtag #Block2019 and tag us @aqsonline because we can’t wait to see what you do!
 American Quilter Magazine January 2010 Digital
1 × $6.99
  American Quilter Magazine January 2023 Digital
1 × $6.99