At American Quilter’s Society, we’ve always got an eye on quilting trends. From innovative techniques to returning classics, there’s a trend for everyone. This month, we’re trying Big Stitch Quilting.

Big Stitch Quilting, also sometimes called utility quilting, is a hand quilting technique for stitching together all the layers of the quilt. Just as the name implies, a large stitch size sets this technique apart. Traditional hand quilting uses fine thread and as many small, even stitches per inch as one can manage for a delicate and detailed effect. With big stitch quilting, larger thread and stitches create definition and a chunky texture that brings lots of dimension to a quilt.
How to Try This Trend
Supplies
Only a few supplies are needed to get started.

A Quilting Hoop – This is the piece of equipment to invest some good money in. If you choose a wood hoop, select one with smooth edges and at least a 1″ width.
There are also frames made from PVC that can be used for quilting.

Quilting Thread – A perle cotton thread is typically used. The smaller the number, the thicker the thread. A perle cotton 8 or 12 are the most common to use for big stitch quilting. We use a Wonderfil Spagetti, a 12wt Egyptian cotton thread in the tutorial below.
A Thimble – There’s a whole world of thimbles to choose from and a variety of ways to wear them. Choose a thimble that fits comfortably on the middle or index finger of your dominant hand. Metal thimbles last the longest (potentially your entire quilting career!) but leather or other softer thimbles may bring you more comfort while quilting. Most thimbles run a few dollars, so if one isn’t working for you, try a different kind until you find what you like.

If you find the fingertips of your non-dominant hand are getting too sore from pinpricks, you can get a soft thimble pad or use a touch of masking tape for protection.

Needles – A Chenille size 24 or a Crewel (or Embroidery) size 8 are two of the more common needles for big stitch quilting. The smaller the number, the larger the needle. Generally, choose a needle that is as thick as the thread you’re working with for easy stitching.
Marking Tools – Starting out, use quilter’s tape or masking tape to mark out straight lines. From there you can experiment with different pens and marking tools.
Scissors – A pair of small scissors for thread cutting are handy, but you can even use something as simple as nail trimmers that fold away easily.
A Basted Quilt – Finally, before beginning to big stitch quilt, one needs a basted quilt, or a practice quilt sandwich of a piece of fabric, batting, and a second piece of fabric. Wool or cotton batting are popular choices for hand quilting.
Baste the layers together with sewing weight thread run in large (several inch) stitches or pinned with safety pins.

We thread basted a quilt sandwich from scraps for the tutorial.

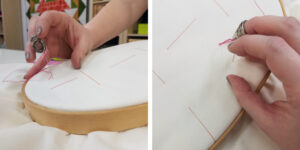
Hooping
Separate the inner and outer hoop.

Place the inner hoop on a flat surface and lay the quilt sandwich on top of it.
Place the out hoop over the quilt sandwich, align to the inner hoop, and press the outer hoop down so it is slightly lower than the inner hoop. Tighten the nut to secure, but do not over tighten.

To get the correct tension in the hoop, place the hooped quilt on a flat surface and gently press your fist into the center of the hooped material to produce a slight sag.
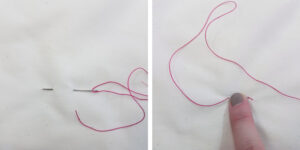
Starting: Burying the Knot
Cut a piece of quilting thread about the length of your forearm and thread your needle.

In the end of the thread, tie a single overhand knot and pull tight.

Run the threaded needle through the top layer of fabric and the batting, starting about 1/2″ from where you want to start stitching and coming up exactly where you wish the row of stitches to begin. Pull the thread through until the knot is sitting on top of the fabric.
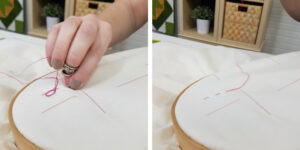
Place a finger on the fabric in between the knot and where the thread is coming up through the fabric. Apply light pressure with this fingertip.
With your other hand, grasp the length of the thread and give a quick tug to pull the knot through the fabric and batting.

Here we’ve pulled up the first two layers and see the knot buried in the batting. The knot is not attached to the back piece of fabric at all. This is exactly where we want to be.
Straight Stitching
Stitch Part 1: The Entry
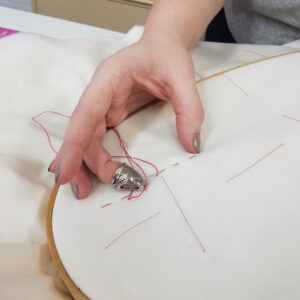
Put on your thimble(s) because it’s time for stitching!

Thimble on the middle or index finger of your dominant hand, optional thimble pad on the index or middle finger of your non-dominant hand.
Place the needle into the quilt sandwich one stitch length away from where the thread is coming up. 1/4″ is a typical stitch length for this style.
The needle is at a 90-degree angle to the fabric and your thimble is resting against it. Note how the dominant hand is shown above held like there is an invisible ball in the palm. This hand shape helps with even stitch formation and reducing muscle strain.
On the back of the fabric, feel for the tip of the needle with your non-dominant hand. The needle balances between your dominant thimble finger and non-dominant feeler finger.

Once you feel the needle with your feeler finger, it’s time to set up the next stitch.
Stitch Part 2: The Hill
To do this, rock your dominant hand so the needle, while still pushed through all three layers, is parallel to the quilt sandwich. Simultaneously, push up with your feeler finger at the needle point and push down with the thumb of your dominant hand in front of the non-dominant feeler finger. This creates a hill. The needle is through all three layers at this step but has not moved forward.

Once the hill is formed, push the needle through using the thimble. You want to come up a stitch length away from where you started the stitch. If the stitch is too long or short, pull the needle out of the quilt sandwich and try again.

Once the needle is through, release the hill and pull the thread through.
Repeat this to continue taking single stitches.
Stitch Part 3: Carry On
Once you get comfortable with taking one stitch at a time, you can take multiple stitches at once with the same motion, just delaying pulling the thread through.
When stitching, stitch towards yourself to reduce strain on your shoulder. It can feel easier to stitch towards our non-dominant side, but it causes your dominant shoulder to lift.
For good quilting posture sit upright, rest the hoop on a pillow in your lap to keep it around midriff level, and stitch towards yourself. Move the hoop to change directions, not your body.
Ending: Burying the Knot
When you reach the end of a row of stitches or the thread has only a few inches of slack left, bring the needle to the back on the final stitch.

Wrap the end of the thread around the needle once and slowly pull the needle through to form an overhand knot. Place the needle in the loop of the knot and hold the needle against the fabric while pulling the knot tight so the knot is formed right next to where the thread is pulled through the fabric. Back the needle out of the knot.
Create some tension on the end of the thread so you can see where the thread is coming out of the fabric, then put your needle down that same hole.

Take a stitch through the back and batting layers, but not the top layer, and bring the needle up about half an inch away.
This leaves the knot on top of the fabric.

Firmly grasping the tail of the thread, give a quick, sharp tug to pull the knot through the fabric and batting, just as you did when burying the knot to start.
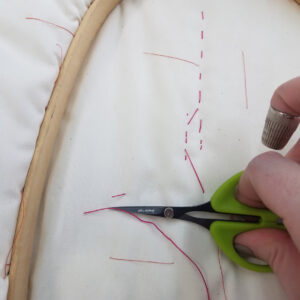
Trim the thread. If part of the tail is sticking up, use your needle to sweep it under the fabric.

Insert the needle between the fabric and the thread, with the edge of the needle going past the tail. Then use a sweeping motion to tuck in the tail.
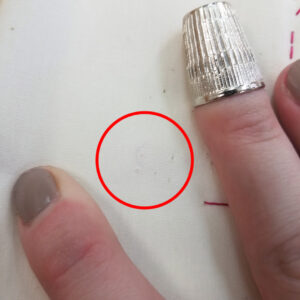
Here we can just see the tucked in tail through the light fabric. Take thread color into consideration when choosing a quilt backing fabric. The darker the thread, the darker the backing should be to prevent visible tails.
Members Get Even More
Over in our AQS Member Area, we have even more about hand quilting!
Check out the Ultimate Hand Quilting Guide and French-Knot Quilting to further your hand quilting adventure.
Ready for more inspiration?
Check out our Must-Try Pinterest board full of trendy eye-candy to get inspired, including big stitch quilting.
Have you tried this trend? Show us your creations in our Facebook group, AQS Quilting Project Parade. We can’t wait to see what you make!
 eBook 75 Quilting Patterns: The Best of Helen's Hints
1 × $18.95
eBook 75 Quilting Patterns: The Best of Helen's Hints
1 × $18.95  eBook 100 Things To Enjoy In Historic Paducah
1 × $9.95
eBook 100 Things To Enjoy In Historic Paducah
1 × $9.95