Autumn is officially here, and to celebrate the season, we’ve put together a quilt along celebrating all the things that go bump in the night. This week we’re making the pumpkin setting and finishing the quilt!

Midnight in the Pumpkin Patch by Emily Cross
30″ x 30″
This week, we’re making pumpkins! To find all the fabric requirements and more information about the quilt along Click Here to go to the main post.
Pumpkin Setting & Finishing Instructions
Fabric Requirements for Pumpkin Setting Blocks & Finishing
Pumpkins Setting Blocks
Background – 1⅛ yards
Pumpkins – ½ yard
Stems – ⅛ yard
Outer Border – ⅓ yard
Binding – ⅜ yard
Backing – 1⅛ yards
Batting – 36″ x 36″
Cutting Instructions*
*Everyone has their own amount of fabric they like to use when Foundation Paper Piecing. The cutting instructions note in the background fabric which pieces are for the setting squares, and the rest is use for FPP and are generalities to be used as a guide. Cut pieces for FPP from WOF strips using your best judgment.
From the background fabric, cut:
(1) 3 1/2″ x WOF strip, subcut into:
(9) 3 1/2″ x 3 1/2″ for setting squares
(1) 4″ x Width of Fabric (WOF) strip
(1) 3″ x WOF strip
(2) 2 1/2″ x WOF strips
(4) 2″ x WOF strips
(3) 1 1/2″ x WOF strips
From the pumpkin fabric, cut:
(3) 4″ x WOF strips
From the stem fabric, cut:
(1) 2″ x WOF strip
From the outer border fabric, cut:
(4) 1 1/2″ x WOF strips
(2) 1 1/2″ x 27 1/2″
(2) 1 1/2″ x 30 1/2″
From the binding fabric, cut:
(4) 2 1/2″ x WOF strips
Setting Pumpkin Assembly

Print 3 copies of the pattern for 12 pumpkins of each size, 36 total pumpkins. The units should measure 3 1/2″ wide from dashed line to dashed line when printed.
To brush up on your FPP skills, click here.
Section Assembly
Assemble the sections starting with section A and following the pattern in numerical order. Sew all the sections and trim the paper on the dashed line.
Sew the small pumpkin sections A and B together, and the same for the medium and large pumpkins.
Once the FPP patterns are assembled, remove the paper.
Arrange a small, medium and large pumpkin in a row horizontally, and sew together. Feel free to play with the order or the pumpkin sizes.
Make 6 horizontal pumpkin rows. Measures 9 1/2″ x 3 1/2″ unfinished.
Repeat vertically with a small, medium, and large pumpkin.

Make 6 vertical pumpkin rows. Measures 3 1/2″ x 9 1/2″ unfinished.
Quilt Assembly
Lay out the pumpkin setting rows with the background 3 1/2″ squares, and FPP blocks, as shown below.
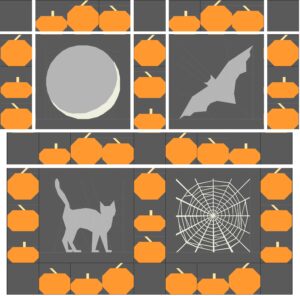
Sew the horizontal pumpkin rows to the setting squares. Then sew the vertical pumpkin rows to the FPP blocks. Sew the rows together to complete the quilt center. Measures 27 1/2″ x 27 1/2″ unfinished.
Sew the two 1 1/2″ x 27 1/2″ border strips to the sides of the quilt. Then sew the 1 1/2″ x 30 1/2″ strips to the top and bottom of the quilt center.
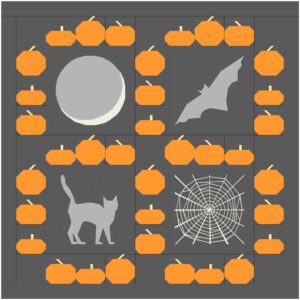
Quilt as desired and bind using your preferred method.
Thanks so much for taking part in the Midnight in the Pumpkin Patch Quilt Along and celebrating the spooky season with us.
Show off your creations, connect with other quilters, and get inspired!
Join us in the AQS Project Parade Facebook Group and piece along with us!
Members get even more…
AQS Members can access hundreds of patterns and digital issues of American Quilter at any time!
Find quilt along series like Forever & A Day, 30 Days of Birds and more.

Not a member? Join today!
 American Quilter Magazine January 2014 Digital