The start of a New Year means a fresh slate with lots of resolutions.
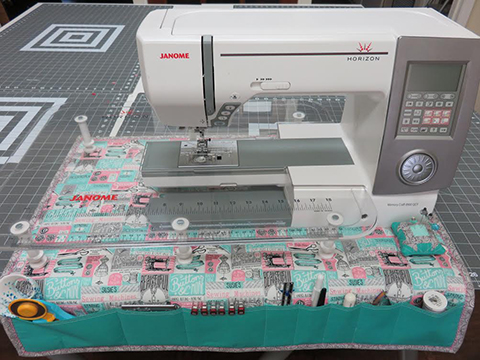
If you have organization in mind for your New Year’s resolution, this project is perfect for you! With this functional project, you can create something beautiful while keeping things orderly and close at hand. Take advantage of the Horizon Memory Craft 8900QCP Special Edition’s ability to quilt through thick material evenly and finish your project with a twist on your binding technique. Some machines may not be able to handle the thickness of the Soft and Stable, but the Horizon Memory Craft 8900QCP works with ease.
Skill Level: Beginner/intermediate
Sewing Time: 4-6 hours
Janome Supplies Required:
HMC8900QCP Special Edition
Satin Stitch foot F
¼” seam foot O
Dual feed foot AD
Quilting guide bar
Convertible free motion quilting foot QB-S
Blue Tip needle
Pre-wound bobbin
Empty bobbin
Fabrics/Notions Required:
1 yd. Timeless Treasures Vintage Sewing Patch White (A) sub cut into:
24” tall x 30” wide (sewing mat top)
1 yd. Mint polka dot (B) sub cut into:
26” tall x 32” wide (backing fabric)
(1) 1.5” x 1.5” (pin cushion front)
1/3 yd. Michael Miller Cotton Couture in Mermaid (C) sub cut into:
9” x 29” (pocket panel)
(1) 3.5” x 3.5” (pin cushion back)
(4) 1.5” x 1” (pin cushion front)
(2) 2-1/4” x 2-1/4” (pin cushion front)
1/3 yd. black/gray swirl (D) sub cut into:
(3) 2.5” x WOF strips (binding)
(4) 1.5” x 1” (pin cushion front)
(2) 2-1/4” x 2-1/4” (pin cushion front)
1 yd. Pellon 809 Décor Bond sub cut into:
(1) 4.5” x 29” (for pocket panel)
(2) 3.5” x 3.5” (pin cushion front and back)
1 package of By Annie’s Soft and Stable 36” x 58” white sub cut into:
(1) 26” x 32”
3.5” x 3.5” piece of thin batting
Poly-fil
Coordinating all-purpose sewing thread
Coordinating thread for quilting
Decorative thread for binding finish
2” strip of ¾” wide sew-on Velcro
Student Supplies Required:
Marking pen/tailors chalk
Rotary cutter/ruler/mat
Safety pins
Binding clips
Hand sewing needle (Pincushion only)
Iron
Pressing surface/ironing board
Distilled water for steam
Preparing the Sewing Machine Mat
Place the 26” x 32” (fabric B) piece with wrong side up.
If just opening the Soft and Stable, allow it to rest for a few hours in case the material is creased. Place the Soft and Stable 26” x 32” directly on top of the wrong side of fabric B. (The Soft and Stable will give the sewing mat more structure than just regular batting, but you could easily substitute a layer of batting or two for the soft and stable for less structure.)
Position the 24” x 30” (fabric A) piece with right side up centered on the soft and stable and pin or baste in place after smoothing the fabric free from wrinkles. Note: The fabric selected for fabric A was used as a cheater panel. It already had markings that could be used as a guide for quilting and have a patchwork appearance. You could choose a solid and quilt intricate free motion designs instead of selecting a print panel for the top of the sewing mat.
After assembling the quilt sandwich, quilt as desired. If straight line quilting: attach Janome Dual Feed Foot AD and attach the quilting guide bar to evenly space lines of quilting. Select pattern D1 and begin quilting. If free motion quilting, attach Janome free motion convertible quilting foot QB-S and select pattern D4-S. Be sure to lower the feed dogs when free motion quilting. In the photos, the lines printed on the fabric were followed for the quilting. Remove pins or safety pins as you quilt.  When quilting is completed, square up the quilt sandwich to 22” x 29”.
  Preparing the Pocket Panel
Place the 9” x 29” (fabric C) piece wrong side up on a pressing surface. Fold in half (hot dog style) so the right sides are facing out and press to 4.5” x 29”. This crease will be the guide for the strip of Pellon 809 Décor bond. Apply the 4.5” x 29” Décor Bond according to the manufacturer’s instructions to the wrong side of the fabric, starting at one raw edge and stopping at the pressed crease (this will leave half of the pocket panel without Décor Bond). This will give the pocket panel extra durability.  After the Décor Bond has been applied, fold the remaining material back over the Décor Bond and press for the semi-finished pocket panel (will measure 4.5” x 29”).
Using coordinating thread, topstitch 1/8” from the fold on the pocket panel, then again ¼” away from the fold. You could also choose one of the many decorative stitches offered by the Janome 8900 instead of plain topstitching. Then place the pocket panel at the bottom of the quilted sewing mat, aligning raw edges at the bottom, right, and left. Pin in place or use binding clips.  Divide the pocket panel using a water soluble marking pen by marking vertical lines on the pocket panel at the following measurements, from the left raw edge: 7”, 4”, 5”, 2”, 2”, 2”, 2.5”, and 4.5”. Note: Customize the pocket widths here to meet your specific needs. If wider or narrower pockets are needed, simply adjust the widths to your desires.
  Attach ¼” Seam foot O. Be certain the pocket panel is secured to the top of the sewing mat with the binding clips, then stitch with a ¼” seam allowance from the raw edge, beginning about 1” from the top of the pocket panel on the right side of the mat and stitching to 1” past the opposite side of the pocket panel, removing the binding clips as you stitch.
  Begin at the bottom raw edge of the sewing mat and line up the needle with the mark drawn for the first pocket divider. Sew a couple stitches and backstitch to secure the thread, then stitch on top of the line drawn on the pocket panel. When you approach the top folded edge of the pocket panel, slow the speed of the stitches and sew about ¼” past the folded top edge, onto the sewing mat. Backstitch 3-4 stitches before clipping the threads. Repeat this step for each line drawn for a pocket divider.
Prepare and Apply Binding
Place fabric D on the cutting mat, folded selvage to selvage (as it comes off the bolt). Cut 3 strips the width of fabric by 2.5” wide.  Trim the selvages off and stitch the strips together by placing the strips right sides together at a 90 degree angle to create one long strip.
  Press the entire long strip in half lengthwise, wrong sides together.
Machine stitch the binding to the wrong side of the sewing machine mat with a ¼” seam allowance.  Flip the folded edge of the binding towards the seam allowance just sewn, and press the folded edge out past the raw edges of the sewing mat to prepare to fold the binding to the other side.
Use binding clips to secure the folded edge of the binding to the right side of the sewing machine mat.  Attach Satin Stitch foot F. Thread machine with decorative thread.
  Select a decorative stitch. Stitch 82 was selected for this project. Center the middle of the decorative stitch on the folded edge of the binding and stitch all the way around to secure the binding in place. Miter the corners as you go.
Note: For most decorative stitching, a stabilizer would need to be placed under the fabric to ensure the stitches are clean and even, but with the thickness of the soft and stable, it isn’t necessary.
Mini Churn Dash Pin Cushion
Assemble the half square triangles. Take one 2-1/4” fabric C and one 2-1/4” fabric D. Place them right sides together and pin in place. Mark one diagonal line from corner to corner on the wrong side of one of the fabrics.  Sew a seam ¼” from the marked line on each side of the line.
  Cut on the marked line to separate the 2 half square triangle units. Press seams open.
  Repeat for remaining 2-1/4” squares of fabrics C and D to yield 4 finished half square triangle units. Trim finished half square triangle units to 1.5” x 1.5”, then set aside.
  Take one each of the 1.5” x 1” rectangles of fabrics C and D and place right sides together. Pin in place. Sew a ¼” seam down the 1.5” edge. Press seam open. Repeat three more times for four completed rectangle units.
  Arrange the pieced units just made, along with the 1.5” x 1.5” of fabric B, into the churn dash block prior to sewing.
  Sew the pieces in each row together with a ¼” seam allowance.
  Sew each row together with a ¼” seam allowance, press seams open.
  On the wrong side of the churn dash block and the wrong side of the 3.5” x 3.5” square of fabric C, apply the 3.5” x 3.5” piece of Pellon 809 according to the manufacturer’s instructions.
At this step you can choose to quilt the mini block, or leave unquilted. For the quilted pin cushion, place a layer of batting on the wrong side of the block and a scrap piece of fabric behind the batting (this piece won’t show in the finished pin cushion). Quilt as desired.  On the right side of the 3.5” x 3.5” square of Fabric C that will serve as the back of the pin cushion, mark the center of the square. Take one side of the 2” piece of sew-on Velcro and center it over the mark. Sew in place. Take the quilted (or unquilted) mini churn dash block square and square up to 3.5” x 3.5”.
  Place these two pieces right sides together and sew a ¼” seam on three of the four sides. Leave one side open for turning. Clip the corners, being careful not to clip the stitches. Carefully turn the pin cushion right side out and push out the corners.
  Fold in the unstitched edge and secure with binding clips. Use a hand sewing needle and a small whipstitch or ladder stitch to close the opening.
  Attach the final piece of sew-on Velcro to the sewing machine mat. Attach the Velcro where you would like your pin cushion to rest, or measure 2.5” in from the right edge of the mat and 8” up from the bottom edge and mark. Center the Velcro on this mark and sew to the sewing machine mat.
  Attach the pin cushion and set up the sewing mat to enjoy more organized sewing.
 eBook 75 Quilting Patterns: The Best of Helen's Hints