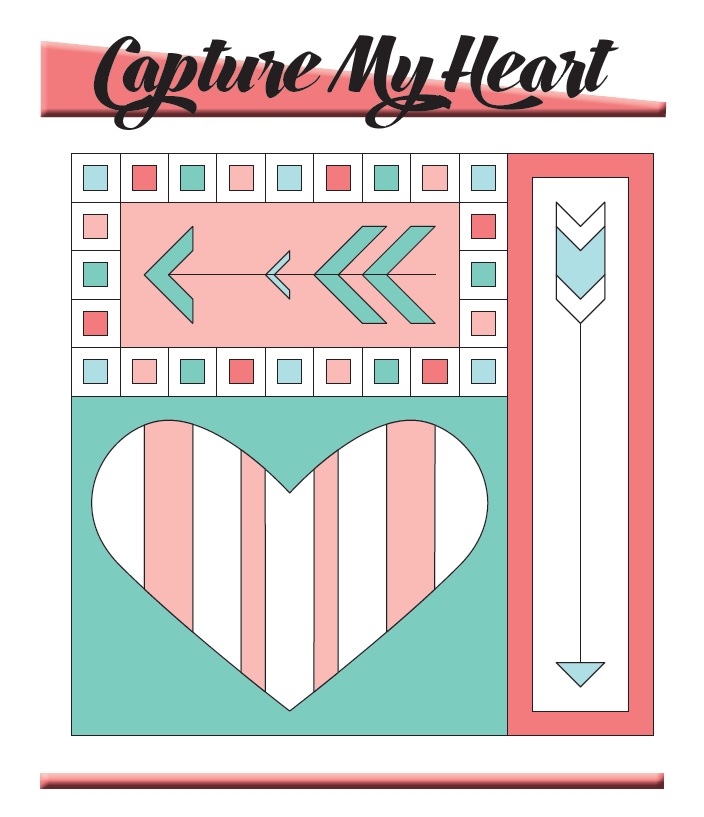
Capture My Heart
48″ x 48″
by Betsey Langford
Download the pattern here.
To print the pattern, use the Adobe print option to Tile Only Large Pages.
Fabric Requirements
White: 1 3/4 yards
Pink: 1/2 yard
Lt. Pink: 1 yard
Teal: 1/4 yard
Dk. Teal: 1 1/4 yards
Binding: 3/8 yard
Cutting Instructions
White:
(48) 4 1/2″ x 1 1/2″
(48) 2 1/2″ x 1 1/2″
(2) 6 1/2″ x 28 1/2″
(3) 4 1/2″ x 28 1/2″
(1) 8 1/2″ x 2 1/2″
(1) 8 1/2″ x 28 1/2″
(8) 3″ x 3″
(1) 9″ x 3″
(2) 3″ x 11″
Light Pink:
(6) 2 1/2″ x 2 1/2″
(2) 28 1/2″ x 2 1/2″
(3) 2 1/2″ x 8 1/2″
(1) 6 1/2″ x 8 1/2″
(6) 5″ x 5″
(2) 3″ x 3″
(2) 2″ x 2″
(2) 3″ x 5″
(2) 7″ x 5″
(2) 4 1/2″ x 28 1/2″
(2) 2 1/2″ x 28 1/2″
(4) 3″ x 5″
Pink:
(6) 2 1/2″ x 2 1/2″
(2) 12 1/2″ x 2 1/2″
(2) 2 1/2″ x 44 1/2″ (piece together from width of fabric strips)
Teal:
(6) 2 1/2″ x 2 1/2″
(2) 3″ x 3″
(2) 3″ x 7″
(1) 5″ x 3″
Dark Teal:
(6) 2 1/2″ x 2 1/2″
(2) 5″ x 5″
(4) 7″ x 5″
(1) 36 1/2″ x 28 1/2″
Top Arrow Block Assembly

To make the square units:
- Sew a 2 1/2″ x 1 1/2″ white rectangle to each side of a colored 2 1/2″ x 2 1/2″ square.
- Sew a 4 1/2″ x 1 1/2″ white rectangle to the top and bottom of each unit made in the previous step.
- Trim to 4 1/2″ x 4 1/2″ square.
Make 6 of each color.
Use the foundation paper piecing patterns for units A, B, C, D, E & F. Need help paper piecing? Try our tutorial.
Units A & B use two of each: 5″ x 5″ dark teal squares, 3″ x 3″ light pink squares, and 5″ x 5″ light pink squares.
Units C & D use two of each: 3″ x 3″ teal squares, 2″ x 2″ light pink squares, and 3″ x 5″ light pink rectangles.
Units E & F each use: (2) 5″ x 7″ dark teal squares, (2) 5″ x 5″ light pink squares, and (1) 7″ x 5″ light pink rectangle.
Use the (3) 2 1/2″ x 8 1/2″ light pink rectangles and the 6 1/2″ x 8 1/2″ light pink rectangle to finish the arrow unit.
Sew a 28 1/2″ x 2 1/2″ rectangle to the top and bottom of the arrow unit.
Use the block diagram above to complete the block.
Embroider the shaft of the arrow.
Side Arrow Block Assembly
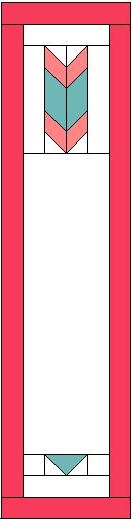
Use the foundation paper piecing patterns for units G, H & I.
Unit G uses (4) 3″ x 3″ white squares, the 5″ x 3″ teal rectangle, and the 9″ x 3″ white rectangle.
Unit H & I each use: (1) 3″ x 7″ teal rectangle, (2) 3″ x 5″ light pink rectangles, (2) 3″ x 3″ white squares, and (1) 3″ x 11″ white rectangles.
Use (2) 8 1/2″ x 2 1/2″ white rectangles and the 8 1/2″ x 28 1/2″ white rectangle to finish the arrow unit..
Sew a 2 1/2″ x 44 1/2″ pink rectangle to each side of the arrow unit.
Sew a 12 1/2″ x 2 1/2″ pink rectangle to the top and bottom to complete the block.
Embroider the shaft of the arrow.
Heart Block Assembly
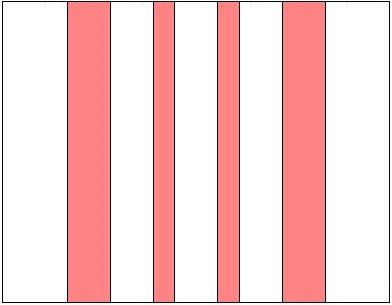
Using the block diagram above, piece together the following strips:
- (2) 6 1/2″ x 28 1/2″ white strips
- (2 ) 4 1/2″ x 28 1/2″ light pink strips
- (3) 4 1/2″ x 28 1/2″ white strips
- (2) 2 1/2″ x 28 1/2″ light pink strips.
This unit is the background for the heart block.
Assemble the heart diagram from the pattern.
Iron fusible interfacing to the back side of the 36 1/2″ x 28 1/2″ dark teal rectangle.
Trace the heart opening onto the front side of the rectangle.
Carefully cut the heart away.
Iron the dark teal fabric over the striped background.
Stitch along the edge of the heart to secure.
Quilt Assembly
Using the quilt diagram above, sew the blocks together.
Quilt as desired,
Bind.
Note: This quilt would make an adorable baby quilt. Instead of creating a stripe background behind the heart, use solid fabric and embroider the baby’s name and birth date.