
Baby Boxes Quilt
42″ x 42″
by Betsey Langford
Fabric Requirements:
White – 1 yards
Navy – 1 yard
Blue – 1/2 yard
Teal – 1/8 yard
Yellow – 3/4 yard
Binding – 1/2 yard
Backing – 2 1/4 yard
Cutting Instructions:
From the white fabric, cut:
(2) 27 1/2″ x 3 1/2″ rectangles
(2) 24 1/2″ x 3 1/2″ rectangles
(2) 21 1/2″ x 3 1/2″ rectangles
(2) 30 1/2″ x 3 1/2″ rectangles
(4) 9 1/2″ x 3 1/2″ rectangles
(2) 3 1/2″ x 3 1/2″ squares
From the navy fabric, cut:
(2) 18 1/2″ x 3 1/2″ rectangles
(2) 15 1/2″ x 3 1/2″ rectangles
(1) 15 1/2″ x 15 1/2″ square
(1) 3 1/2″ x 3 1/2″ square
(1) 6 1/2″ x 3 1/2″ rectangle
From the blue fabric, cut:
(2) 3 1/2″ x 3 1/2″
(1) 6 1/2″ x 3 1/2″
(1) 9 1/2″ x 6 1/2″
(1) 15 1/2″ x 9 1/2″
From the teal fabric, cut:
(2) 6 1/2″ x 3 1/2″
(2) 3 1/2″ x 3 1/2″
(1) 9 1/2″ x 3 1/2″
From the yellow fabric, cut:
(2) 9 1/2″ x 3 1/2″
(2) 12 1/2″ x 9 1/2″
From the binding, cut:
(5) 2 1/2″ x width of fabric strips
Quilt Assembly Instructions:
Sew a 3 1/2″ blue square to the end of a 27 1/2″ x 3 1/2″ white rectangle. Repeat using a 3 1/2″ navy square.
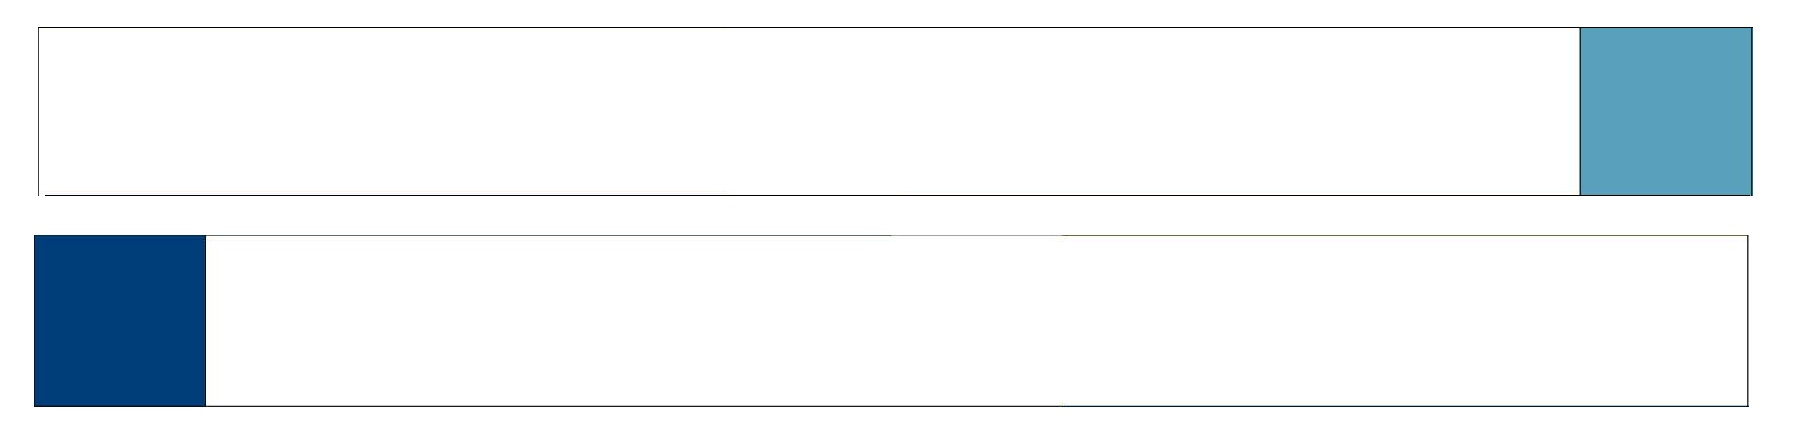
Sew a 6 1/2″ x 3 1/2″ blue rectangle to the end of a 30 1/2″ x 3 1/2″ white rectangle. Repeat using a 6 1/2″ x 3 1/2″ navy rectangle.
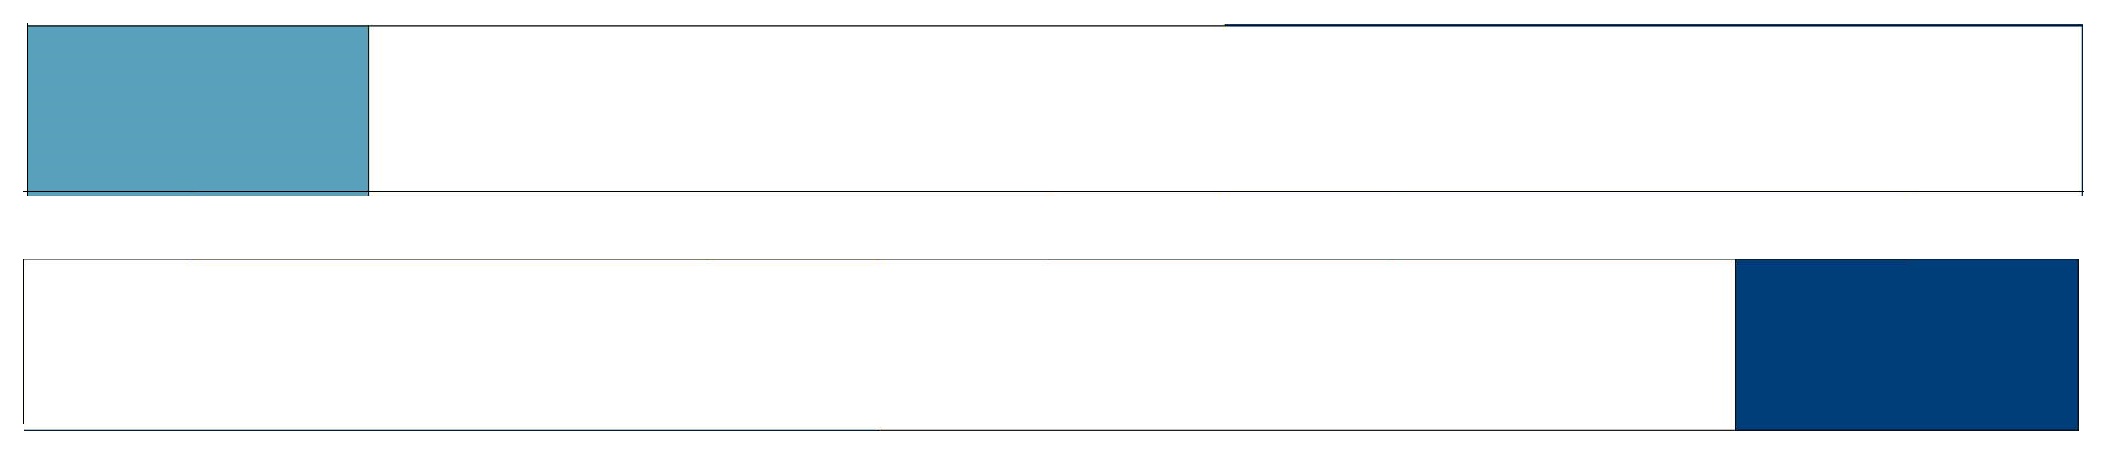
Sew a 15 1/2″ x 3 1/2″ navy rectangle to the end of a 21 1/2″ x 3 1/2″ white rectangle. Make 2.

Sew a 18 1/2″ x 3 1/2″ navy rectangle to the end of a 24 1/2″ x 3 1/2″ white rectangle. Make 2.

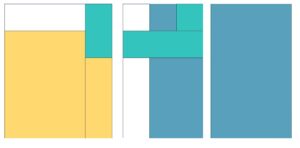
To make the center unit shown below, sew a 3 1/2″ teal square to a 3 1/2″ white square. Sew these to a 9 1/2″ x 3 1/2″ white rectangle. Next, sew a 6 1/2″ x 3 1/2″ blue rectangle to a 9 1/2″ x 3 1/2″ yellow rectangle. Sew the two parts together.
Sew a 15 1/2″ navy square to the left side of the center unit.
Sew a 9 1/2″ x 3 1/2″ white rectangle to a 12 1/2″ x 9 1/2″ yellow rectangle. Sew this to the right side of the center unit.

To make the center unit shown below, sew a 3 1/2″ white square and a 3 1/2″ teal square to each side of a 3 1/2″ blue square. Sew a 9 1/2″ x 3 1/2″ teal triangle to the bottom of the sewn squares. Next, sew a 9 1/2″ x 3 1/2″ white rectangle to a 9 1/2″ x 6 1/2″ blue rectangle. Sew the two parts together.
Sew a 9 1/2″ x 3 1/2″ white rectangle to the top of a 12 1/2″ x 9 1/2″ yellow rectangle. Next, sew a 6 1/2″ x 3 1/2″ teal rectangle to the top of a 9 1/2″ x 3 1/2″ yellow rectangle. Sew the two parts together. Sew this to the left side of the center unit.
Sew a 15 1/2″ x 9 1/2″ blue rectangle to the right side of the center unit.
Quilt Assembly:
Use the diagram below to assemble the quilt.

Quilt as desired and bind.