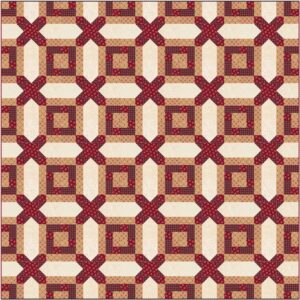
Check out the Boxwood Crossing quilt! Bust your stash with this precut-friendly quilt.

Boxwood Crossing
80″ x 80″
by Emily Cross
Fabric Requirements
Light Green, Assorted — 2 3/8 yards
Dark Green, Assorted — 1 1/2 yards
Red, Assorted — 1 7/8 yards
White, Assorted — 2 1/8 yards
Binding — 2/3 yards
Backing — 8 yards of 42″ wide fabric, or 2 5/8 yards of 108″ wide fabric
Batting — 90″ x 90″
Cutting Instructions
From the assorted light green fabrics, cut:
(4) 5″ x Width of Fabric (WOF) strips, and subcut into
(25) 5″ x 5″
(25) 2 1/2″ x WOF strips, and subcut into
(100) 2 1/2″ x 9″
From the assorted dark green fabrics, cut:
(20) 2 1/2″ x WOF strips, and subcut into
(50) 2 1/2″ x 9″
(50) 2 1/2″ x 5″
From the assorted red fabrics, cut:
(4) 4 1/2″ x WOF strips, and subcut into
(25) 4 1/2″ x 4 1/2″
(19) 2 1/2″ x WOF strips, and subcut into
(300) 2 1/2″ x 2 1/2″
From the assorted white fabrics, cut:
(17) 4 1/2″ x WOF strips, and subcut into
(100) 4 1/2″ x 6 1/2″
From the binding fabric, cut:
(9) 2 1/2″ x WOF strips
Unit Assembly
Mark the wrong side of 200 red 2 1/2″ squares in half diagonally once. Lay a marked red square right sides together with a white 4 1/2″ x 6 1/2″ rectangle on the corner as shown below. Sew across the marked line, and then trim 1/4″ from the seam and press.

Lay another marked square on the opposite corner so the reds overlap. Repeat the sewing, trimming and pressing steps.

Star Point unit measures 4 1/2″ x 6 1/2″ unfinished. Make 100 Star Point units.

Sew a dark green 2 1/2″ x 5″ strip to the top and bottom of a light green 5″ square, and press. Then sew a dark green 2 1/2″ x 9″ strip to the left and right sides, and press. The block should measure 9″ at this stage.

Sew a light green 2 1/2″ x 9″ strip to the left and right side of the block, and press towards the light green. Sew a red 2 1/2″ square to the left and right side of a light green 2 1/2″ x 9″ and press towards the light green. Make 2 rows. Sew the rows to the top and bottom of the block, and press.

The block should measure 13″ square. Cut the block into quarters as shown below to create 4 even squares measuring 6 1/2″ square.

Repeat to make 100 Corner Units. Arrange them into four stacks of 25 as they will be laid out in the quilt. For a scrappy look, break up matching sets now.

Block Assembly
Lay out the Corner Units, Star Point units, and a red 4 1/2″ square as shown below. Sew a Corner unit to either side of a Star Point unit and press towards the corner unit; make 2. Sew two Star Point units to the sides of the red square, and press towards the red square.

Sew the rows together to make a block, and press in towards the center row. Block measures 16 1/2″ x 16 1/2″ unfinished.

Make 25 blocks.
Quilt Assembly
Lay out the blocks in five rows of five. Arrange the blocks so the pressing alternates directions as shown below. This will help lock seams at the white fabric for more precision.

With the blocks arranged, sew the blocks into rows, and press the rows in alternating directions. Sew the rows together into the quilt and press. Quilt measures 80 1/2″ x 80 1/2″ unfinished.

Layer with batting and backing. Quilt as desired and bind using your preferred method.
Alternate Colorways
The Boxwood Crossing quilt is great for all sorts of color combinations!

Show off your progress, connect with other quilters, get ideas, motivation and more!
Join us in the AQS Project Parade Facebook Group, piece along with us, and show off your Boxwood Crossing quilt!
Members get even more…
AQS Members can access hundreds of patterns and digital issues of American Quilter at any time!
Find quilt along series like Forever & A Day, 30 Days of Birds and more.

Not a member? Join today!
 American Quilter Magazine January 2010 Digital
1 × $6.99
American Quilter Magazine January 2010 Digital
1 × $6.99  American Quilter Magazine January 2023 Digital
1 × $6.99
American Quilter Magazine January 2023 Digital
1 × $6.99  American Quilter Magazine January 2021 Digital
1 × $6.99
American Quilter Magazine January 2021 Digital
1 × $6.99  American Quilter Magazine July 2011 Digital
1 × $6.99
American Quilter Magazine July 2011 Digital
1 × $6.99