Finishing Instructions: Red, Black & White
 Looking for the Red & White finishing instructions? Click Here.
Cutting Instructions:
White:
(90) 2 1/2” x 2 1/2” squares, cut in half diagonally twice for 360 white quarter squares
(120) 1 3/4” x 1 3/4” squares, cut in half diagonally once for 240 white half squares
(120) 1 1/2” x 4 1/2” rectangles
(72) 1 1/2” x 3 1/2” rectangles
(72) 1 1/2” x 1 1/2” squares
(144) 1” x 1” squares
(2) 3 1/2″ x 40 1/2″ strips
(2) 3 1/2″ x 46 1/2″ strips
Red:
(240) 1 1/8” x 1 1/8” squares
(5) 2 1/2″ X Width of Fabric strips for binding
Black:
(36) 1 1/2″ x 1 1/2″ squares
(2) 1 1/2″ x 38 1/2″ strips
(2) 1 1/2″ x 40 1/2″ strips
Sashing Rectangle:

Assembly:
Center Row

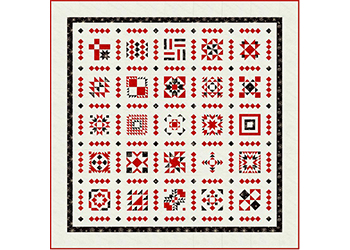
Lay out 4 red 1 1/8” squares on point and set 6 white 2 1/2” quarter squares between them, set 2 white 1 3/4” half squares at each end. It’s okay if they overlap at this time for visualizing.
Starting at the left end, center a white 1 3/4” half square over the top left side of the red square, right sides together. Sew and press towards the red. Lay a white 2 1/2” quarter square on the bottom right side of the red square, and line up the corners on the right, right sides together. Sew, press towards the red, and trim white flush to the red squares as marked with dashed lines in the diagram. Center a white 1 3/4” half square over the bottom left side of the red square, right sides together. Sew and press towards the red.

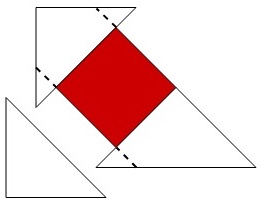
Lay a white 2 1/2” quarter square on the top left side of the red square, and line up the corners on the left, right sides together. Sew and press towards the red. Lay a white 2 1/2” quarter square on the bottom right side of the red square, and line up the corners on the right, right sides together. Sew, press towards the red, and trim white flush to the red squares as marked with dashed lines in the diagram. Make 2 per block.
At the right end, center a white 1 3/4” half square over the bottom right side of the red square, right sides together. Sew and press towards the red. Lay a white 2 1/2” quarter square on the top left side of the red square, and line up the corners on the left, right sides together. Sew, press towards the red, and trim white flush to the red squares as marked with dashed lines in the diagram. Center a white 1 3/4” half square over the top right side of the red square, right sides together. Sew and press towards the red.


Sew the left end, two center units, and a right end together to make a center row. Measure 3/4” from the center of the red on point squares and trim row to 1 1/2” x 4 1/2” rectangle. Make 60.
Sashing Square:

Assembly:
Square in a Square
Mark the wrong side of 120 white 1” squares diagonally once. Lay a marked square on the corner of a black 1 1/2” square and sew on the marked line. Trim a quarter inch from the marked line and press. Repeat on all four corners. Measures 1 1/2” unfinished, make 36.

Block Assembly
Sew white 1 1/2” x 1 1/2” squares to the left and right side of a Square in a Square. Sew white 1 1/2” x 3 1/2” rectangles to the top and bottom of the previous unit. Measures 3 1/2” x 3 1/2” unfinished, make 36.

Quilt Assembly:
Arrange in rows as shown using Christmas Countdown 2018 blocks, sashing rectangles and squares. Sew the blocks into rows and sew the rows together to make the quilt center. Measures 38 1/2″ x 38 1/2″ unfinished.

Sew the black 1 1/2″ x 38 1/2″ strips to the left and right side of the quilt center. Press to the black. Repeat on the top and bottom with the black 1 1/2″ x 40 1/2″ strips.

Sew the white 3 1/2″ x 40 1/2″ strips to the left and right side of the quilt. Press to the black. Repeat on the top and bottom with the white 3 1/2″ x 46 1/2″ strips.

Quilt as desired and bind using preferred method.
 American Quilter Magazine July 2010 Digital