
 Summer means more family time for camping, playing outdoors, and vacations! Whip up this cute bandage block first aid kit to stow away in the car for your outings. You can choose to use the bandage foundation paper pieced pattern for the front of your first aid kit, or you can opt to have a solid piece of fabric for the front for an even quicker make.
The new Horizon Memory Craft 9400QCP is great for foundation paper piecing and has multiple light sources, making it easier to see what you’re working on.

Janome Supplies Required:
HMC9400QCP
Standard Foot A
Zipper Foot E
Red Tip Needle
Foundation paper piecing will dull your needle quicker than sewing through fabric, so make sure you begin your next project with a new needle.
Pre-wound bobbin
Empty Bobbin
Fabrics/Notions Required:

Printed copy of the Foundation Paper Piecing Block, printed at 100%
1/2 yd Background & front and back of pouch fabric (Fabric #1) sub cut into:
For foundation paper piecing pattern
(2) 2” tall x 6” wide
(2) 1.5” tall x 6” wide
(6) 1.5” tall x 2” wide
(12) 1” x 1”
For front and back of pouch
(1) 2.5” tall x 5.5” wide
(2) 7.5” tall x 3.5” wide
(1) 4.5” tall x 11.5” wide
(1) 11.5” x 11.5” (back of the pouch)
(2) 2” x 3.5” (zip tabs)
Or for solid front and back zip pouch
(2) 11.5”x 11.5”
Charm square / fat quarter (Fabric #2) sub cut into:
(1) 1.5” x 1.5” (For center of band aid)
Charm square / fat quarter (Fabric #3) sub cut into:
(1) 1.5” x 1.5” (For center of band aid)
1/2 yd (Fabric #4) sub cut into:
(1) 1.5” x 1.5” (For center of band aid)
(1) 4” x 10” (for wristlet-optional)
(2) 11.5” x 11.5” (for lining)
Charm square / fat quarter (Fabric #5) sub cut into:
(2) 1.5” x 2” (For ends of band aid)
Charm square / fat quarter (Fabric #6) sub cut into:
(2) 1.5” x 2” (For ends of band aid)
Charm square / fat quarter (Fabric #7) sub cut into:
(2) 1.5” x 2” (For ends of band aid)
1 yd Pellon 809 Décor Bond sub cut into:
(4) 11.5” x 11.5” (for front and back exterior and both lining pieces)
(1) 4” x 10” (for wristlet)
9” zipper
Coordinating thread for piecing
Contrasting thread for topstitching
Student Supplies Required:
Light Box or other light source (window)
Iron and pressing mat
Frixion Pen
Binding Clips/pins
Rotary cutter/ruler/mat
Elmer’s School Glue
Elmer’s glue stick
Add-A-Quarter ruler
Scissors for cutting paper
Foundation Paper Piecing the Bandage Block
RST-Right sides together, RSD-Right Side Down, RSU-Right Side Up, WOF=Width of fabric, all seam allowances are 1/4” unless otherwise specified.
Tip: If you choose to have a solid front and back on your zip pouch, skip this section entirely.
- Place the foundation paper piecing pattern with markings RSD on top of the light box. Turn on the light box and you’ll be able to see the lines through the wrong side of the paper. Alternatively, you can use a brightly lit window to tape the paper to as a light source.
- Cut apart the pattern so you have each band aid section separated (use paper cutting scissors for this!) in between the printed lines.
- Begin with the top section. The top section is labeled with all letters “B”. Set aside the other 2 sections- labeled as “A” and “C”.
- Gather your fabrics for the top section. You’ll need:

- Start with the bandage center 1.5” square of fabric #2, designated as “B1” on the printed foundation pattern. Turn on the light box and flip the printed pattern so the wrong side is facing up. Trace “B1” square on the wrong side of the paper with a heat erasable pen (like a frixion pen). Take the 1.5” square of fabric #2 and center it over the box you traced with the fabric right side up and paper wrong side down. Put a small amount of glue stick glue on the wrong side of the fabric square to temporarily adhere the fabric to the paper. Flip the paper right side up and turn on the light box. You should be able to see if the fabric is positioned correctly-centered on “B1”. There should be at least 1/4″ of fabric from the 1” square overlapping all boundary lines of “B1”.
Tip: When foundation paper piecing, you will never place fabric on the side of the paper with the printed lines. The printed lines are your guidelines for sewing, and when you sew, the fabric will be face down.

- Flip the paper wrong side up again (fabric side up). Locate “B2” and trace the boundary line between “B1” and “B2”. Use the light source. Place a small amount of Elmer’s school glue just past the line you drew (to the right of the line-in what will be the seam allowance). Take one bandage end piece of fabric #3 and place it RST with the “B1” fabric piece, 1/4″ past the line you drew. Finger press on the glue line. Press with a hot iron on top of the glue line for 1-2 seconds to heat set the glue.
Tip: The use of the glue allows you to foundation paper piece without using pins. You may use pins if you choose.
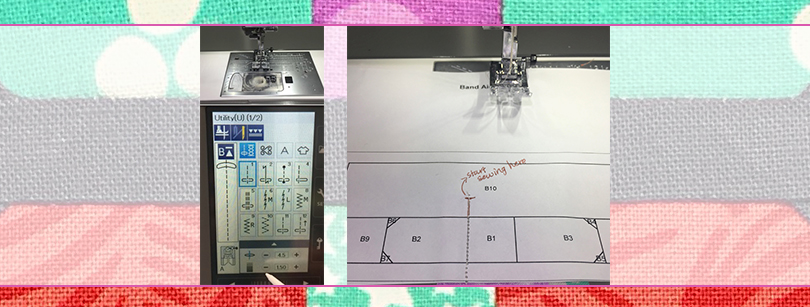
- Flip the paper RSU so you can see the printed lines. Take the paper to the MC9400. Use standard Foot A and select stitch #1 from the “Utility” menu. Decrease the stitch length from 2.4 to 1.5. Shorter stitches will perforate the paper more often, making the paper easier to tear away when the block is complete. Begin sewing at least 1/4″ before the top of the printed line between “B1” and “B2”. Sew all the way off the paper. Sew slowly to make sure you are sewing directly on the printed line dividing sections “B1” and “B2”.

- Fold the paper RST at the seam line so only the 1/4”-3/8” seam allowance is hanging past the folded paper edge. Position the Add-A-Quarter ruler lip up against the folded edge of the paper to accurately trim the excess seam allowance to 1/4″. Open the paper back up. Place a dot of glue stick glue over the “B2” box on the fabric side of the paper, and press the “B2” piece so the fabric is now RSU figure 6. The tiny dot of glue will keep the fabric down temporarily. Don’t over apply the glue or tearing the paper away at the end will be difficult. Repeat this step with the remaining 1.5” x 2” bandage end piece for “B3”.

- Trace the line between “B3” and “B4” onto the fabric side of the paper. Apply a thin line of glue just past the dividing line, within the “B4” box. Place the 1” square of fabric #1 RSD so that the diagonal of the square is on top of the “B3”/
B4” dividing line. Heat set with the iron for 1-2 seconds. Sew on the “B3”/”B4” line on the printed side of the paper. Fold the paper RST at the seam line so only the small piece of fabric is showing (not the rest of the block). Place the Add-A-Quarter ruler against the edge to trim the seam allowance to 1/4″. Always check to make sure you are trimming just the seam allowance and not the part of the block you need prior to trimming! Unfold the paper and put a small dot of glue stick glue past the seam line. Fold the fabric over RSU and press.

- Repeat step 9 with “B5, B6, B7”.

- Take the 1.5” x 2” “B8” fabric #1 piece. Use the light source to mark the dividing line between B3-B4-B5 and B8 on the fabric side, then apply a thin line of Elmer’s glue to the side of the line with the least amount of fabric. Place the fabric RSD with ¼” overlapping the marked edge. Heat set the glue for 1-2 seconds. Flip the paper to the printed side and sew directly on the dividing line. Fold the paper RST at the stitched line. Place the Add-A-Quarter ruler against the edge to trim the seam allowance to 1/4”. Place a small amount of glue stick glue on the paper and press the fabric. Repeat for “B9”.

- Take a 2” x 6” piece of fabric #1. Turn on the light box and trace the dividing line of B10 piece onto the fabric side of the paper. Place a thin line of flue 1/8” away from the line you marked on the side of the line with the least amount of fabric. Place fabric #1 piece RSD with 1/4″ overlapping the marked edge and the majority of the fabric piece RST with pieced portion of the block. Flip the paper to the printed side and begin sewing outside of the outer lines of the box of the block and end outside the outer lines of the box. Fold the paper RST at the stitched line. Place the Add-A-Quarter ruler against the edge to trim the seam allowance to 1/4”. Place a small amount of glue stick glue on the paper and fold the fabric at the seam line and press.

- Flip the paper over and use a ruler to trim off the paper surrounding the very outer box. Don’t cut off the 1/4″ seam allowance that is included within the hi-lighted portion. Set aside.
- Foundation paper piece the other two sections in the same way as you did section B. Follow the sections in order, beginning with A1, A2, A3, and so on until you’ve pieced all the sections. Below are the fabrics for each section that you need.

- Take sections A and B after trimming. Place a thin line of glue 1/8” from the bottom edge of B. Place section A on top of section B, RST, lining up the top edge of A with the bottom edge of B, on the glue line. Heat set the glue for 2-3 seconds. Section B will be RSU and A RSD. The print on the back of section A will be upside down as you look at it. Sew on the hi-lighted line. Tear away the 1/4″ seam paper only from both sides. Press the block open, with the seam towards section A. Repeat this step but with the bottom edge of A and the top edge of section C.
- Carefully tear away all paper from the back of the block. Use the tip of a seam ripper to pull up the edges of tiny papers if needed. Press flat
Finishing the front of the Zip Pouch and preparing the zip tabs and wristlet piece
Tip: If you choose to have a solid front and back for your zip pouch, skip to step #4 in this section.
1. Take the 2.5” x 5.5” piece of fabric #1. Place RST with the top of the bandage block. Pin in place. Sew together with 1/4″ seam allowance. Lengthen the stitch length back to 2.4. Press seam.
2. Take the two 3.5” x 7.5” pieces of fabric #1. Line up the raw edges RST with each side of the block and pin in place. Sew to the sides of the block.

3. Take the 4.5” x 11.5” piece of fabric #1 and place RST with the bottom edge of the block. Pin in place and sew. Press seams.

4. Take the two 2” x 3.5” zip tabs from fabric #1. On one 3” edge, measure and mark 1” in from the raw edge. Fold the raw edge in to meet this mark and press. Measure and mark on the two shorter sides opposite each other 3/4″ in from the raw edges and fold each raw edge in to meet this line. Press. Now fold in half, matching the folded edges and press. Do this for both zip tab pieces. Open the zip tab piece and place the zipper end inside, up to the starting metal part of the zipper head. Fully enclose the zipper end by opening the folded edges you made previously and pin in place. Repeat with the other end of the zipper. Don’t enclose the metal pieces of the zipper inside the fabric. Topstitch around the folded ends of the zip tabs.
5. Apply the fusible 809 Décor Bond to the wrong side of the pouch front and back and the wrong sides of the lining pieces (fabric #3) and wristlet piece (fabric #3), following the manufacturer’s instructions.

6. Take the 4” x 10” piece of fabric #3 for the wristlet attachment and fold it in half to measure 2” x 10”. Press. Unfold and fold the edges into the crease you just made and press. Then fold in half again so the entire piece is now 1” x 10” and the long raw edges are enclosed. Topstitch 1/8” from the long edges of the wristlet piece.
. Add extra rows of topstitching if desired. Set aside.
Installing the Zipper and finishing the pouch

- Change the Foot to the Zipper Foot E and select stitch #4 from the utility menu to change the needle position to the left. Find the top middle of the exterior and lining pieces. Mark the centers. Find and mark the center of the zipper. Place the zipper RST with one of the pouch exterior pieces. Match the center marks and line up the raw edges. Pin the zipper down. The zip tabs should slightly overhang the exterior piece. Sew with the zipper foot 1/4″ away from the zipper.
- Take one of the lining pieces (Fabric #3) and place it RST with the exterior of the pouch that you just sewed the zipper to. The zipper should be sandwiched between the exterior and lining. Match the center marks of the lining and zipper. The zipper will be RSD. Pin the top edge to the same edge you just sewed and sew directly on top of the seam you just sewed (using it as a guide). Stop and lift the presser foot to move the zipper head when needed.
- Place the two fabrics wrong sides together after you press the fabrics away from the zipper. Pin together and topstitch 1/8” away from the folded edge of the fabric.

- Repeat steps 7-9 with the remaining exterior and lining pieces, keeping the other lining and exterior pinned together and out of the way. Trim away the excess zipper tabs so they’re flush with the pouch edges.
- Measure and mark 6.5” from the bottom edge of the front of the zipper pouch, on the left side. Measure and mark 1” up from that mark. Place the wristlet piece, folded in half, between these two lines, lining up the raw edges of the wristlet piece with the raw edge of the left side of the zip pouch and pin in place. Change the zipper foot to standard foot A and select stitch #1. Baste in place with a ¼” seam allowance to the exterior only (not the lining).
- Open the zipper all the way.

- Separate the lining and exterior of each side and match both the exterior bottom and side edges, Fabric #1, RST. Do the same with the lining fabric #3 pieces. Pin all the way around.
- Sew all the way around with a 1/2″ seam allowance. Leave a 4” opening in the bottom of the lining piece for turning RSO later.
- Measure 2.5” square on a bottom corner of the lining and mark. Pinch the bottom corner together to make a point so the lines you drew make a straight line instead of a 90 degree angle. Pin flat and sew directly on the line you drew. Cut off the point, leaving a 1/4” seam allowance. Repeat for the three remaining corners.
- Turn the pouch RSO through the opening in the lining. Before pushing the lining down into the pouch, pin the opening closed and topstitch it shut.
- Push the lining down into the pouch and smooth all seams. Fill the pouch with your favorite first aid accessories and you’re ready to go!