Autumn is just around the corner. It’s a time for focusing on cozy comforts and the joys of time spent with friends and family. To help set the mood, make your own pillow using patchwork piecing to celebrate everything “home” means.
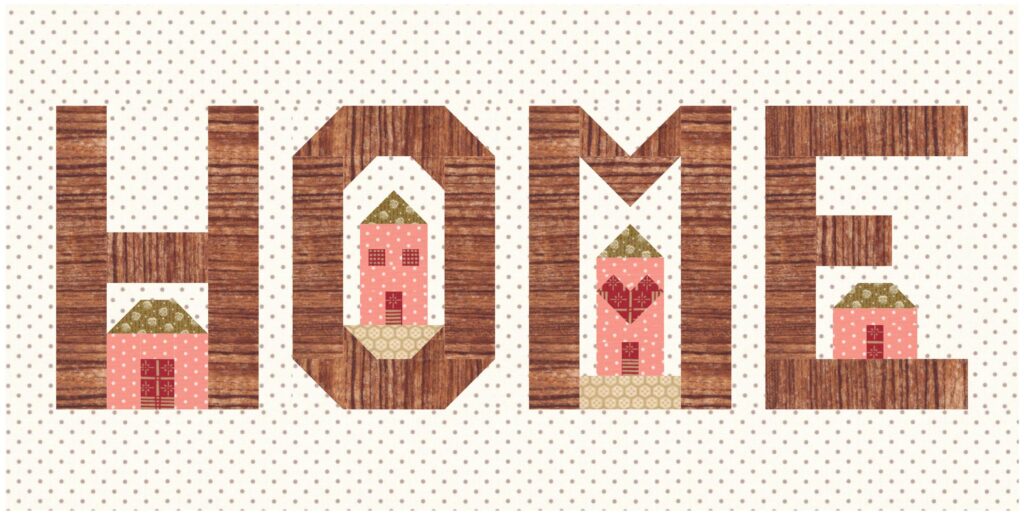
30″ x 15″
Fabric Requirements
Background — 1/2 yard
Letters — 1/3 yard
Houses — 1/8 yard or scrap
Doors/Windows — 1/8 yard or scrap
Roofs — 1/8 yard or scrap
Ground — 1/8 yard or scrap
Pillow Backing — 1/2 yard
Cutting Instructions
From the background fabric, cut:
(2) 3 ½” x Width of Fabric (WOF) strips, subcut into:
(2) 3 ¾” x 31”
(1) 3 ½” x 4 ¼”
(1) 2 ¼” x 5”
(1) 2 ¼” x WOF strip, subcut into:
(2) 2 ¼” x 9 ½”
(1) 2” x 3 ½”
(2) 2” x 2 ¾”
(6) 2” x 2”
(1) 1 ½” x WOF strip, subcut into:
(3) 1 ½” x 9 ½”
(1) 1 ½” x 3 ½”
(6) 1 ½” x 1 ½”
(1) 1 ¼” x WOF strip, subcut into:
(2) 1 ¼” x 1 ¼”
(2) 1” x 5 ½”
(1) 1” x 5”
(2) 1” x 4 ½”
(1) 1” x 3 ½”
(1) 1” x 2 ¾”
(1) 1” x 2 ½”
From the letters fabric, cut:
(3) 2” x WOF strips, subcut into:
(4) 2” x 9 ½”
(7) 2” x 6 ½”
(2) 2” x 3 ½”
(1) 2” x 2 ¾”
(2) 2” x 2”
(4) 1 ½” x 1 ½”
From the houses fabric, cut:
(1) 1 ½” x WOF strip, subcut into
(2) 1 ½” x 2 ¾”
(4) 1 ½” x 1 ½”
(5) 1 ½” x 1 ¼”
(2) 1 ¼” 2 ½”
(1) 1” x 3”
(2) 1” x 2 ½”
(5) 1” x 1”
(2) ¾” x 1”
From the doors/windows fabric, cut:
(1) 1 ½” x WOF strip, subcut into:
(1) 1 ½” x 2 ½”
(1) 1 ½” x 2”
(2) 1” x 2”
(3) 1” x 1 ½”
(2) 1” x 1”
From the roofs fabric, cut:
(1) 1 ½” x WOF strip, subcut into:
(1) 1 ½” x 3 ½”
(2) 1 ½” x 2 ½”
(1) 1 ¼” x 3”
From the ground fabric, cut:
(1) 1 ½” x WOF strip, subcut into:
(2) 1 ½” x 3 ½”
From the pillow backing fabric, cut:
(1) 31″ x 16″
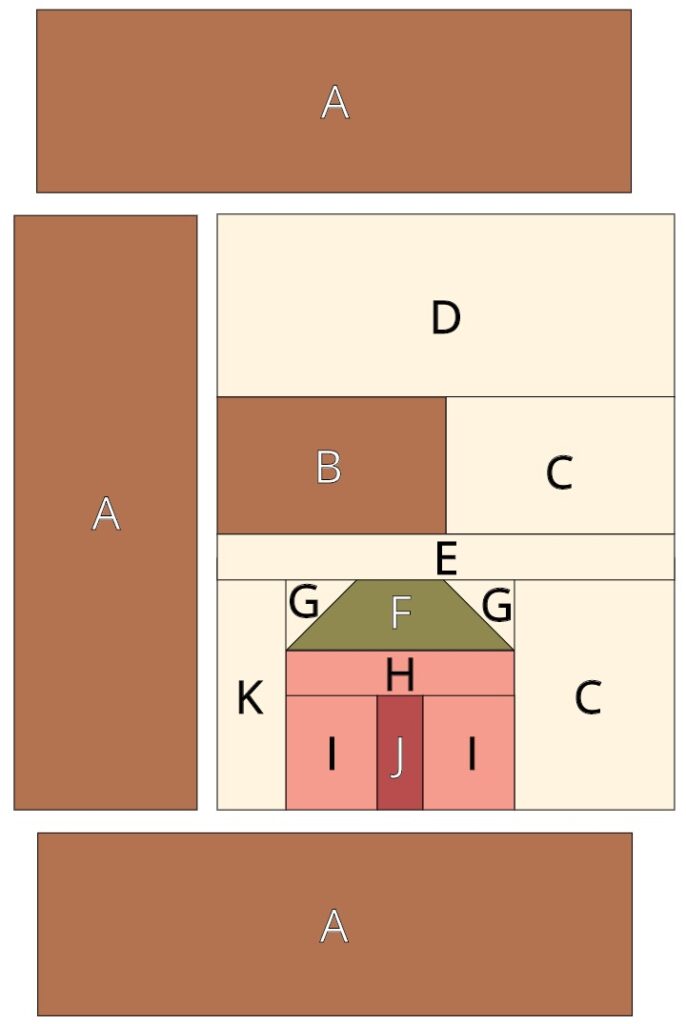
H Block
6 1/2″ x 9 1/2″ unfinished
From the cut fabrics, collect and label the following:
Background
B — (1) 3 ½” x 4 ¼”
D — (1) 1” x 3 ½”
F — (2) 1 ½” x 1 ½”
Letter
A — (2) 2” x 9 ½”
C — (1) 2” x 3 ½”
House
H — (1) 1 ½” x 1 ¼”
I — (2) 1 ½” x 2 ¾”
Door
G — (1) 1 ½” x 2”
Roof
E — (1) 1 ½” x 3 ½”
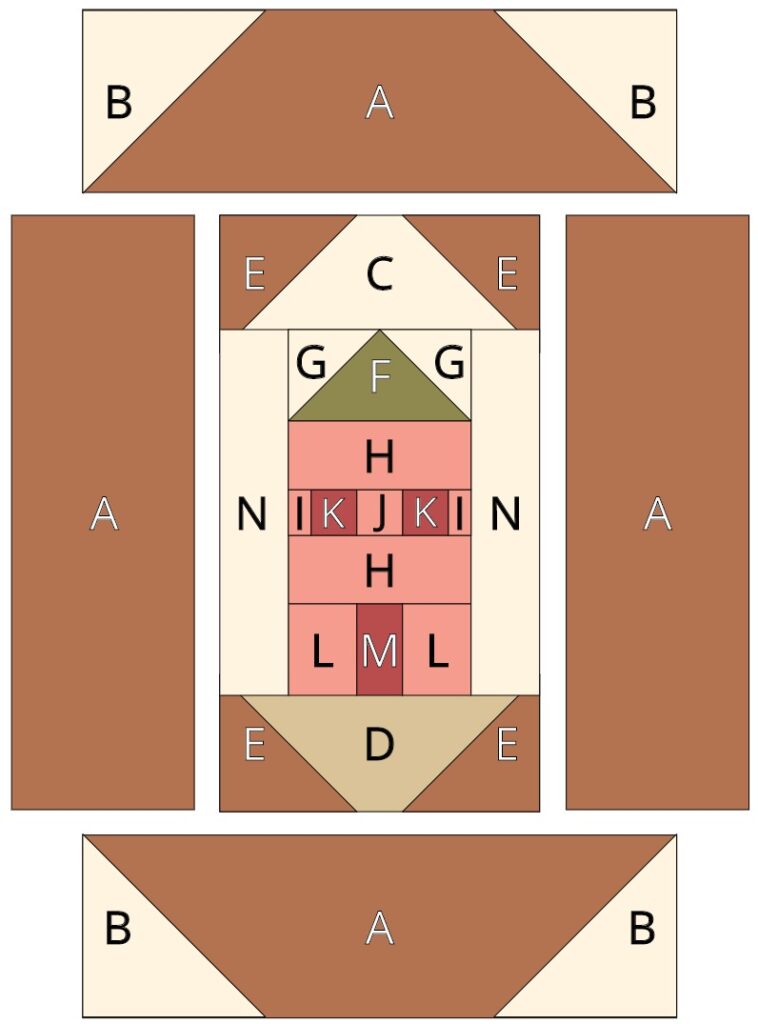
H Units Assembly
Roof
Mark the wrong side of both F squares in half diagonally once. Lay an F square over an E rectangle right sides together and sew on the marked line. Trim 1/4″ from the marked line and press. Repeat on the opposite corner to make the roof.

Watch the video below the see this method in action!
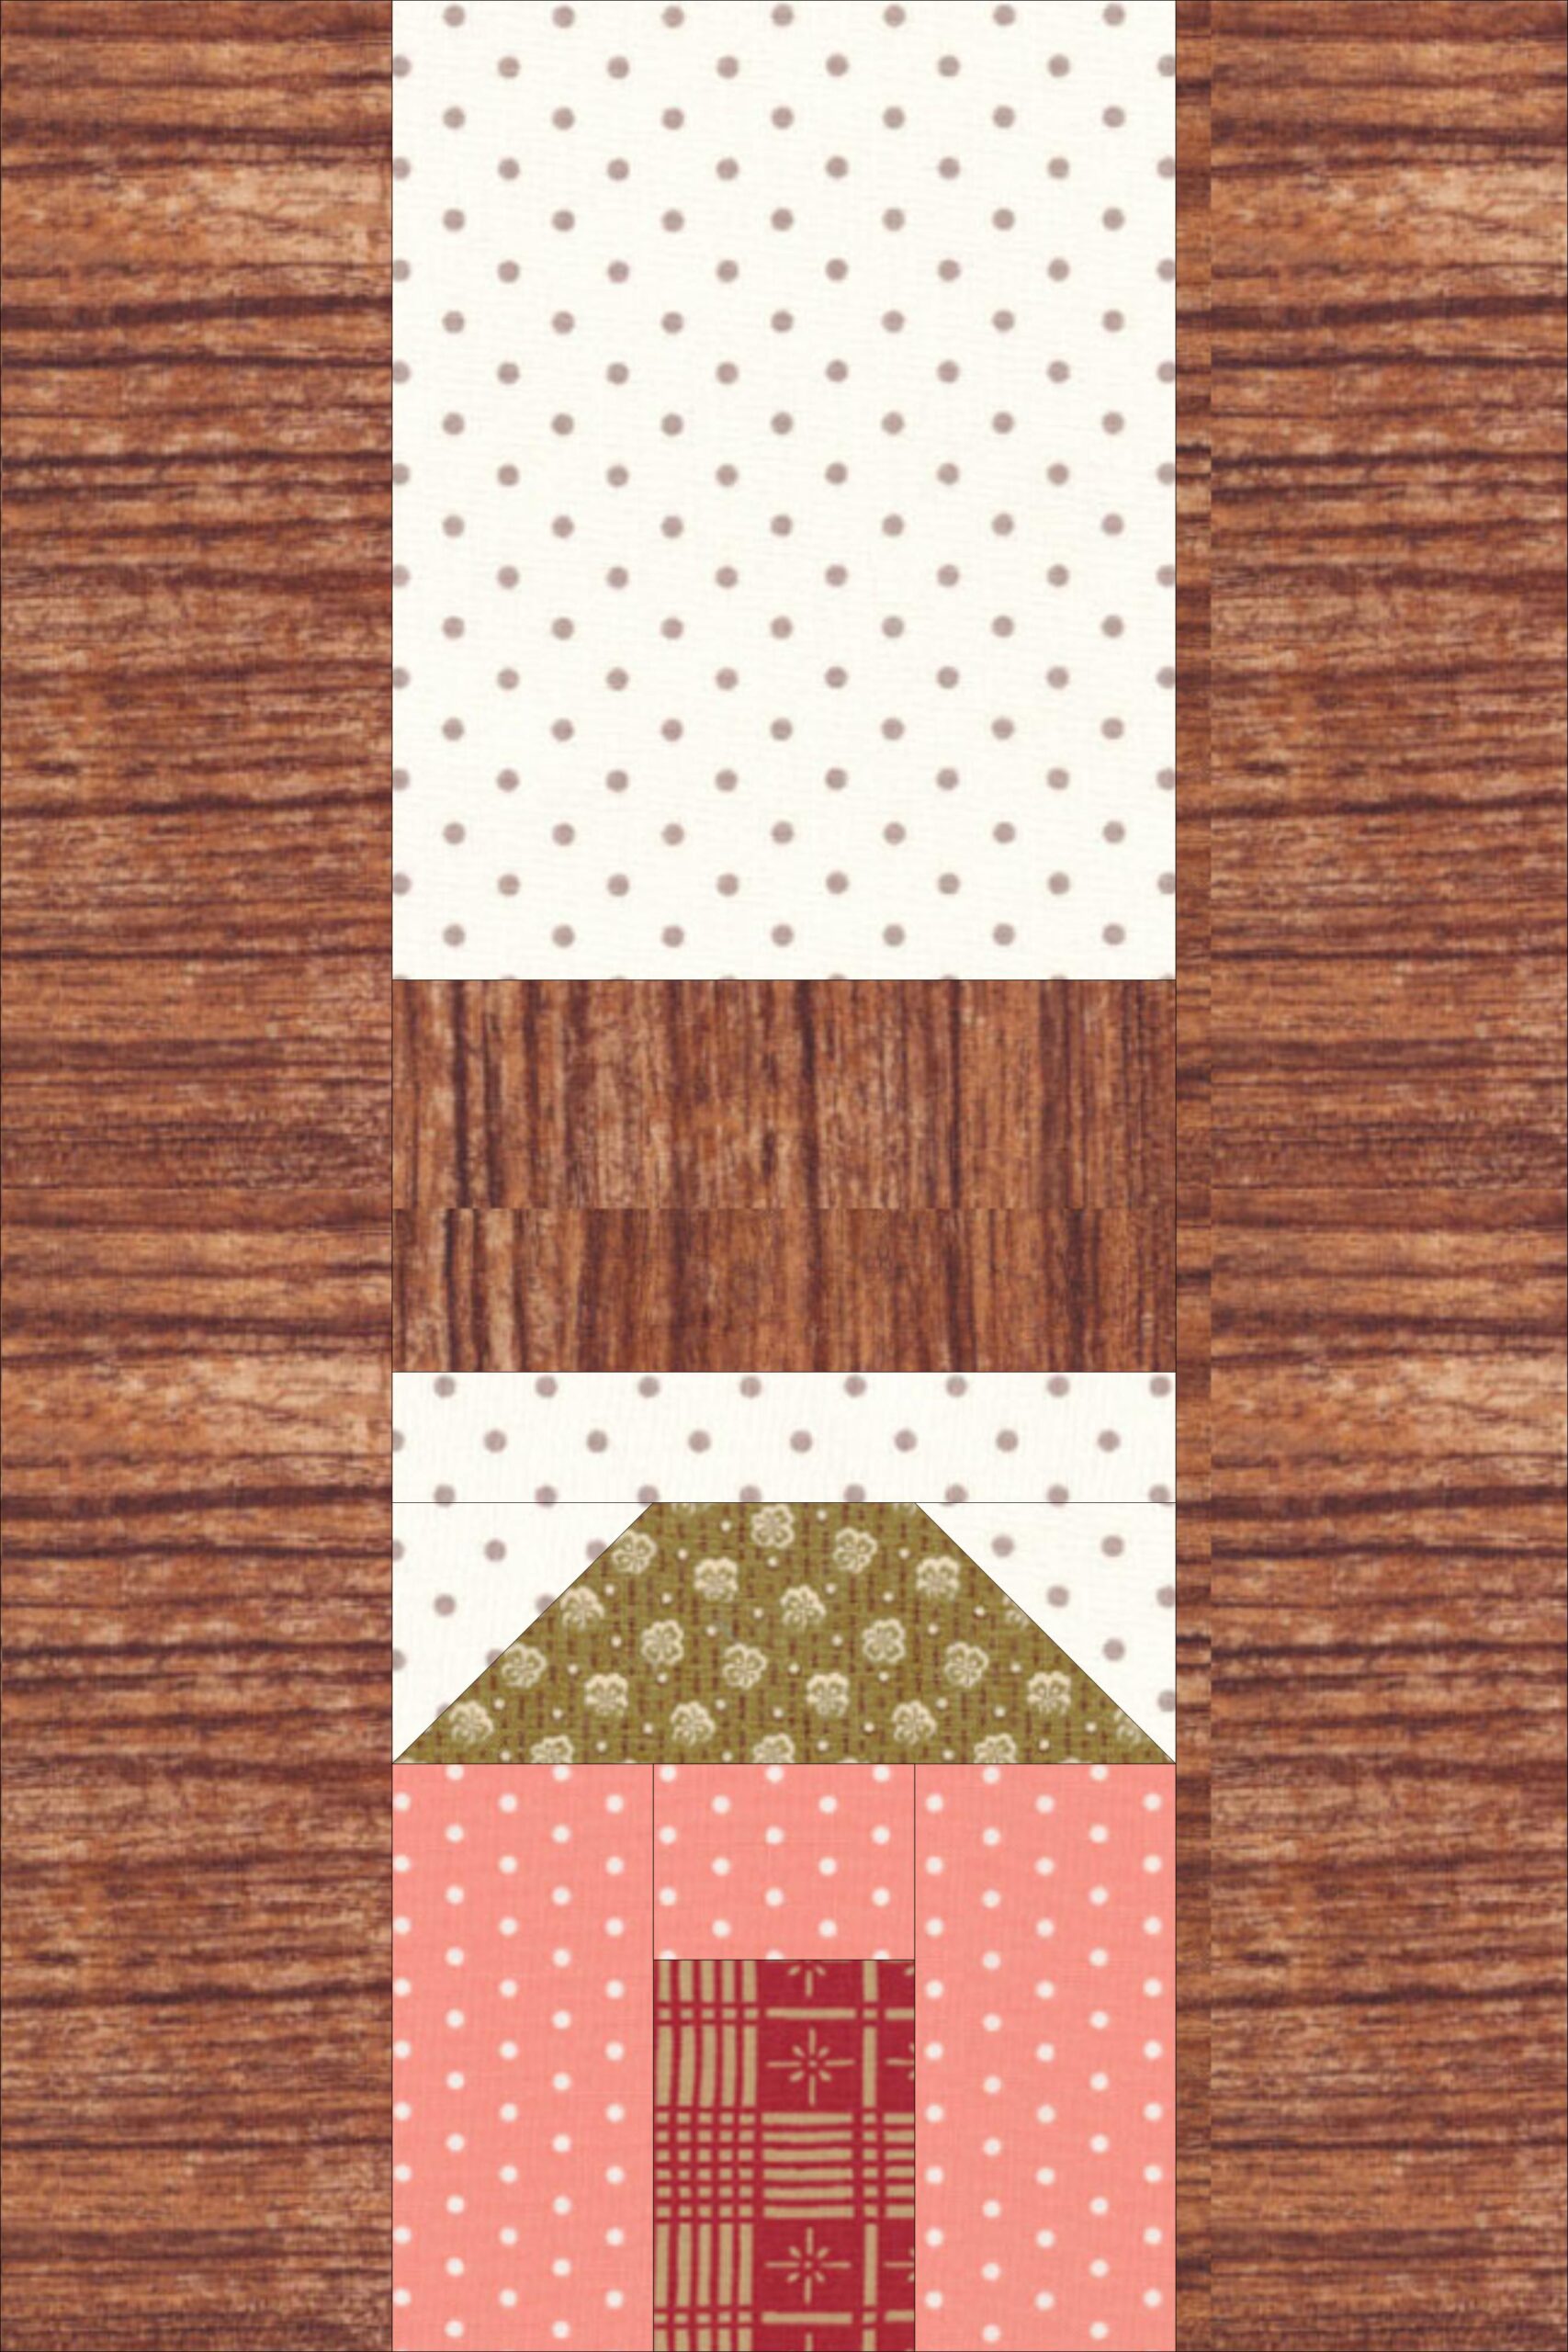
House
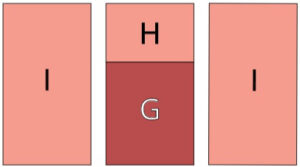
Sew an H rectangle to the top of a G rectangle and press. Sew an I to the left and right sides of the H/G pair to create the house unit.
H Block Assembly
Following the assembly guide below, sew together the middle column, then sew an A rectangle to the left and right sides of the center column to complete the H block.

O Block

6 1/2″ x 9 1/2″ unfinished
From the cut fabrics, collect and label the following:
Background
B — (4) 2” x 2”
C — (1) 1 ½” x 3 ½”
G — (2) 1 ½” x 1 ½”
N — (2) 1” x 4 ½”
Letter
A — (4) 2” x 6 ½”
E — (4) 1 ½” x 1 ½”
House
H — (2) 1 ¼” 2 ½”
I — (2) ¾” x 1”
J — (1) 1” x 1”
L — (2) 1 ½” x 1 ¼”
Door/Windows
K — (2) 1” x 1”
M — (1) 1” x 1 ½”
Roof
F — (1) 1 ½” x 2 ½”
Ground
D — (1) 1 ½” x 3 ½”
O Units Assembly
Outer O Top & Bottom
Mark the wrong side of the B squares in half diagonally once. Lay a B square over an A rectangle and sew on the marked line. Trim 1/4″ from the seam and press. Repeat on the opposite corner to complete the Outer O Top unit.
Repeat the whole process to make the Outer O Bottom unit.
Refer to block diagram for angle placement.
Inner O Top & Bottom
Mark the wrong side of the E squares in half diagonally once. Lay an E square over a C rectangle and sew on the marked line. Trim 1/4″ from the seam and press. Repeat on the opposite corner to complete the Inner O Top unit.
Repeat the whole process with the remaining E squares and the D rectangle to make the Inner O Bottom unit.
Refer to block diagram for angle placement.
Roof Flying Geese
Mark the wrong side of the G squares in half diagonally once. Lay a G square over an F rectangle and sew on the marked line. Trim 1/4″ from the seam and press. Repeat on the opposite corner to complete the Roof Flying Geese unit.
House
Lay out the following pieces as follows: I/K/J/K/I. Sew them all together into a row and press. Sew an H rectangle on top and press to make the top row of the house.
Lay out the following pieces as follows: L/M/L. Sew them all together into a row and press. Sew an H rectangle on top and press to make the bottom of the house.
Sew the two house rows together, and then sew an N rectangle to the left and right side to complete the house unit.
O Block Assembly
Following the assembly guide below, sew together the middle column, then sew an A rectangle to the left and right sides of the center column. Finally, sew the Outer O Top unit to the top, and the Outer O Bottom unit to the bottom to complete the O block.
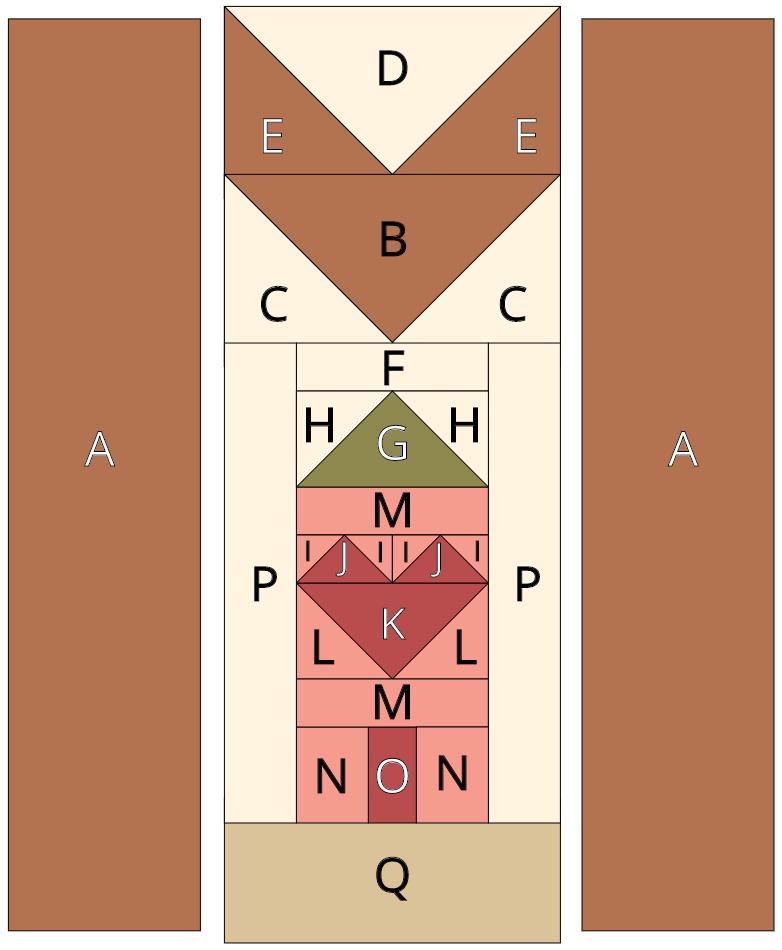
M Block
6 1/2″ x 9 1/2″ unfinished
From the cut fabrics, collect and label the following:
Background
C — (2) 2” x 2”
D — (1) 2” x 3 ½”
F — (1) 1” x 2 ½”
H — (2) 1 ½” x 1 ½”
P — (2) 1” x 5 ½”
Letter
A — (2) 2” x 9 ½”
B — (1) 2” x 3 ½”
E — (2) 2” x 2”
House
J — (4) 1” x 1”
L — (2) 1 ½” x 1 ½”
M — (2) 1” x 2 ½”
N — (2) 1 ½” x 1 ¼”
Door/Window
I — (2) 1” x 1 1/2”
K — (1) 1 ½” x 2 ½”
O — (1) 1” x 1 ½”
Roof
G — (1) 1 ½” x 2 ½”
Ground
Q — (1) 1 ½” x 3 ½”
M Units Assembly
Flying Geese
Mark the wrong side of the E squares in half diagonally once. Lay an E square over a D rectangle and sew on the marked line. Trim 1/4″ from the seam and press. Repeat on the opposite corner with the other E square.
Repeat with the C squares and B rectangle.
Repeat with the H squares and G rectangle.
Repeat with the L squares and K rectangle.
Repeat with the I squares and J rectangle. Make 2.
House
Sew an F rectangle to the top of the H/G Flying Geese to complete the roof. Refer to block diagram for placement.
Sew the I/J Flying Geese together side by side. Sew the L/K Flying Geese to the bottom of the I/J Flying Geese pair. Sew an M rectangle to the top of the I/J Flying Geese pair to complete the house heart. Refer to block diagram for placement.
Lay out the following pieces as follows: N/O/N. Sew them all together into a row and press. Sew an M rectangle on top and press to make the bottom of the house.
Sew the roof, house heart, and bottom of the house together and press. Then sew a P rectangle to the left and right side to complete the House unit.
M Block Assembly
Following the assembly guide below, sew together the middle column, then sew an A rectangle to the left and right sides of the center column to complete the M block.
E Block

6 1/2″ x 9 1/2″ unfinished
From the cut fabrics, collect and label the following:
Background
C — (1) 2 ¼” x 5”
D — (2) 2” x 2 ¾”
E — (1) 1” x 5”
G — (2) 1 ¼” x 1 ¼”
K — (1) 1” x 2 ¾”
Letter
A — (3) 2” x 6 ½”
B — (1) 2” x 2 ¾”
House
H — (1) 1” x 3”
I — (2) 1 ½” x 1 ½”
Door
J — (1) 1” x 1 ½”
Roof
F — (1) 1 ¼” x 3”
E Units Assembly
E Tie
Sew a B and C rectangle together short sides together, and press. Sew a D rectangle on top and an E rectangle on bottom. Refer to block diagram for placement.
House
Mark the wrong side of the G squares in half diagonally once. Lay an G square over an F rectangle and sew on the marked line. Trim 1/4″ from the seam and press. Repeat on the opposite corner with the other G square to make the roof.
Lay out the following pieces as follows: I/J/I. Sew them all together into a row and press. Sew an H rectangle on top and press to make the bottom of the house.
Sew the roof to the top of the H rectangle and press. Then sew a K rectangle to the left side and a C rectangle to the right side to complete the house unit.
Sew the House unit to the bottom of the E Tie unit to make the right middle section. Refer to block diagram for placement.
E Block Assembly
Following the assembly guide below, sew together the right middle section, then sew an A rectangle to the left side and press. Then sew an A rectangle to the top and bottom to complete the E block.
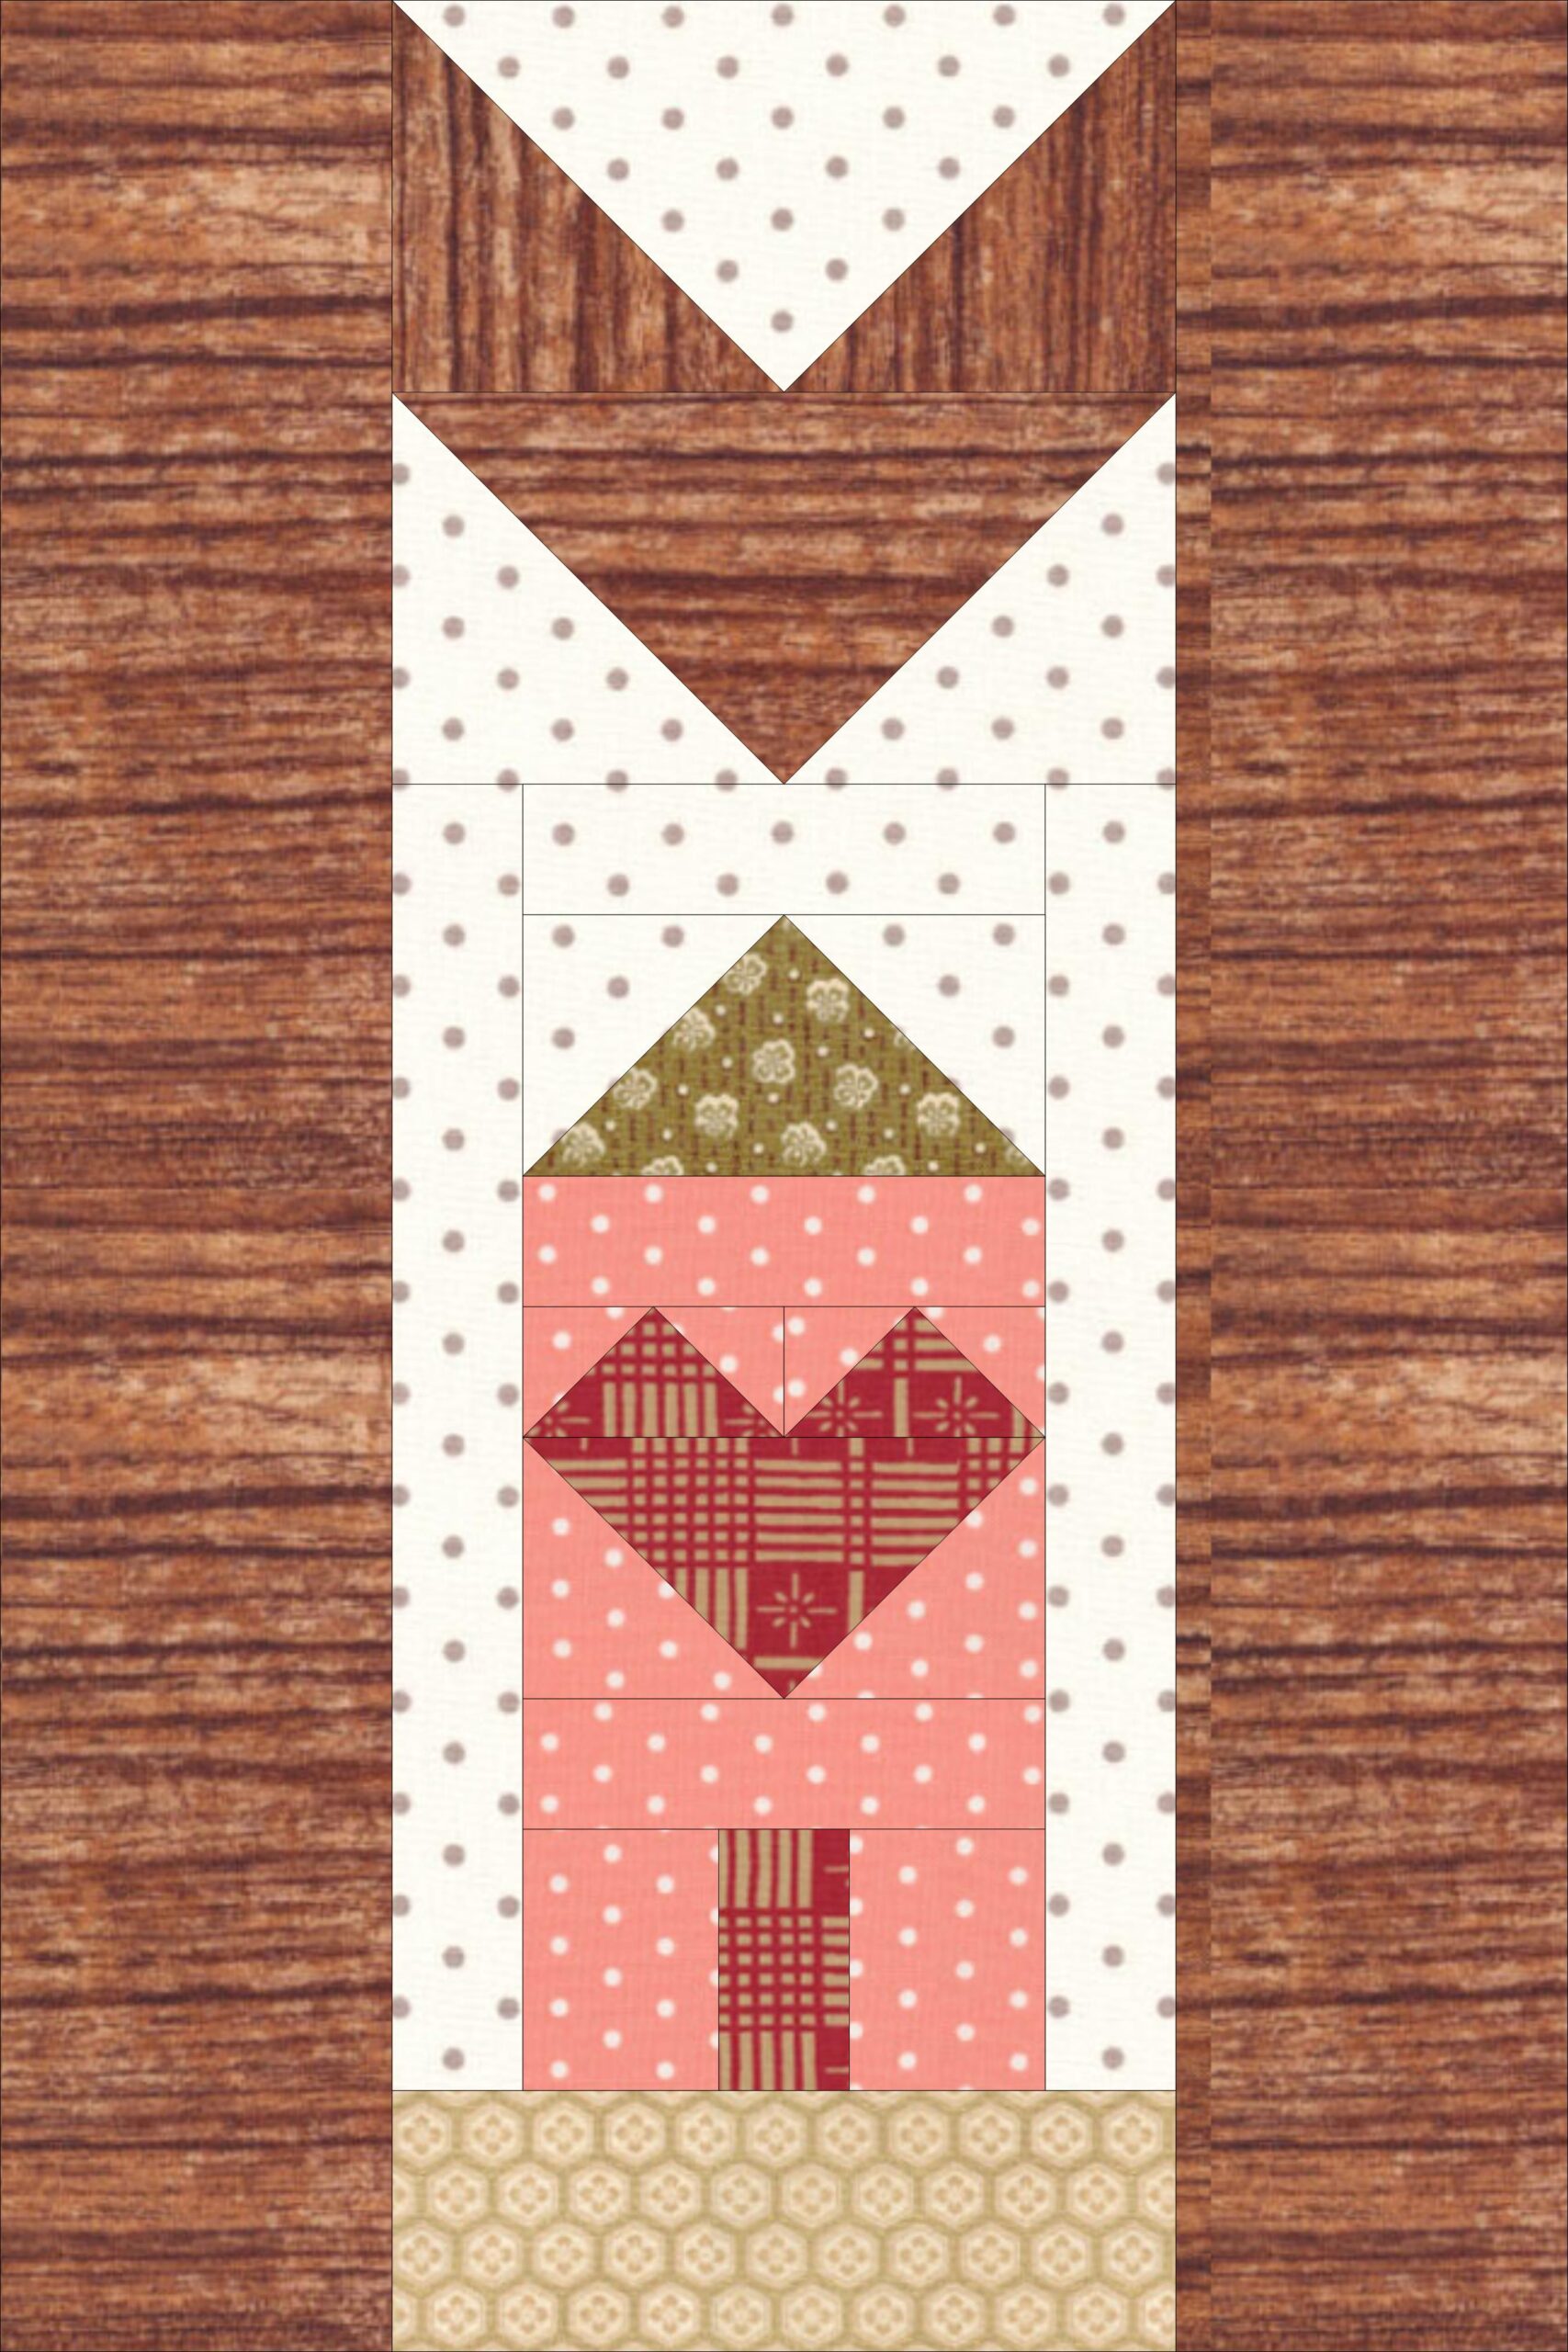
Pillow Assembly
Sew a white 1 1/2″ x 9 1/2″ rectangle between the block letters, 27 1/2″ x 9 1/2″ unfinished.
Sew a white 2 1/4″ x 9 1/2″ rectangle to the left side of the H block and the other white rectangle to the right side of the E block, press to the white rectangles. 31″ x 9 1/2″ unfinished.
Sew a white 3 3/4″ x 31″ rectangle to the top and the bottom of the previous unit to make the Home Pillow Front. 31″ x 16″ unfinished.
Optional: Quilt the Home Pillow Front as desired.
Lay the Home Pillow Front and the pillow backing 31″ x 16″ rectangle right sides together. Sew a 1/2″ seam around the outer edges, leaving a 3-4” opening in the bottom.
Turn right sides out and stuff Home Pillow. Ladder stitch the opening in the bottom closed to complete the pillow.
Show off your progress, connect with other quilters, get ideas, motivation and more!
Join us in the AQS Project Parade Facebook Group and piece along with us!
Members get even more…
AQS Members can access hundreds of patterns and digital issues of American Quilter at any time!
Find quilt along series like Forever & A Day, 30 Days of Birds and more.

Not a member? Join today!