Make a Festive Leaves quilt to celebrate the changing of the seasons!

Festive Leaves
72″ x 72″
Fabric Requirements
Background – 3 yards
Red Leaves – 1 1/4 yards of scraps total
Gold Leaves – 1/4 yard of scraps total
Binding – 2/3 yard
Backing – 5 yards
Cutting Instructions
From the background fabric, cut:
(16) 1 1/2″ x 16 1/2″ rectangles
(16) 1 1/2″ x 15 1/2″ rectangles
(16) 2 1/2″ x 16 1/2″ rectangles
(16) 2 1/2″ x 18 1/2″ rectangles
(32) 3 1/2″ x 12 1/2″ rectangles
From the red fabric, cut:
(32) 5″ x 5″ squares
(48) 4 1/2″ x 4 1/2″ squares
From the gold fabric, cut:
(32) 2″ x 2″ squares
(48) 1 1/2″ x 1 1/2″ squares
Block Assembly
Large Leaf
Half Square Triangles
Mark the wrong side of the red 5″ squares in half diagonally once. Lay a marked white square over a background 5″ square, right sides together. Sew a quarter inch from each side of the marked line. Cut apart on the marked line.
Trim unit to 4½” square. Make 64 total.
Using the diagram below as a guide, layout the Half Square Triangles and red 4 1/2″ squares into rows. Sew the units into rows and the rows into a block.

Large leaf measures 12 1/2″ square. Make 16 total.
Small Leaf
Half Square Triangles
Mark the wrong side of the yellow 2″ squares in half diagonally once. Lay a marked white square over a background 2″ square, right sides together. Sew a quarter inch from each side of the marked line. Cut apart on the marked line.
Trim unit to 1½” square. Make 64 total.
Using the diagram below as a guide, layout the Half Square Triangles and yellow 1 1/2″ squares into rows. Sew the units into rows and the rows into a block.
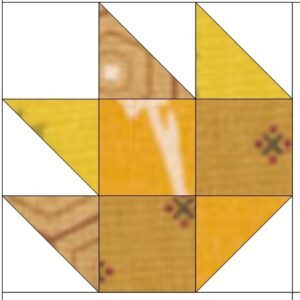
Small leaf measures 3 1/2″ square. Make 16 total.
Putting It All Together
Sew a background 3 1/2″ x 12 1/2″ rectangle to the side of the large leaf. Sew the end of a background 3 1/2″ x 12 1/2″ rectangle to the side of the small leaf.
Using the diagram below as a guide, sew the small leaf row to the top of the large leaf row.
Sew a background 1 1/2″ x 15 1/2″ rectangle to the bottom of this unit.
Using the diagram below as a guide, sew a background 1 1/2″ x 16 1/2″ rectangle to the side of this unit.
Sew a background 2 1/2″ x 16 1/2″ rectangle to the top of the unit.
Sew a background 2 1/2″ x 18 1/2″ rectangle to the side of the unit to complete the block.

Block measures 18 1/2″ unfinished. Make 16.
Quilt Assembly
Using the diagram below as a guide, lay the blocks into rows, randomly turning. Sew the blocks into rows, and then sew the rows together to complete the quilt top.

Layer the quilt top with batting and backing. Quilt as desired and bind.
Show off your creations, connect with other quilters, and get inspired!
Now that you’ve made an ornament or three, join us in the AQS Project Parade Facebook Group and show them off!
Members get even more…
AQS Members can access hundreds of patterns and digital issues of American Quilter at any time!
Find quilt along series like Forever & A Day, 30 Days of Birds and more.

Not a member? Join today!