Medallion quilts start with a center block and grow with a variety of borders around the sides. With pieced, applique, corner block, and every other kind of border being added, things get complicated. Here are some easy steps to simplify the process.
Draft the Quilt Plan
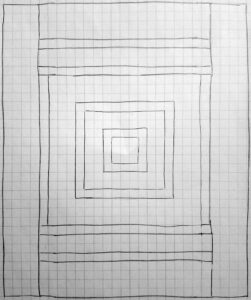
Let’s kick things off old-school. Grab some graph paper and a pencil.
Designate a size for each square to represent. For example, in the drawing below, each square represents two inches.

When drafting on graph paper, it is easy to adjust the size of the project by modifying the size of the squares. This maintains your aspect ratio.
Decide the size of the center block and draw it. Next, have a idea of where the quilt will end. Does it need to be a rectangle to fit on a bed? What size?
Figuring from the center, draw the outline of the outside of the quilt.
Now comes the fun part, start adding borders.
The quilt below is a fun example of working a quilt into a rectangle.
 REMEMBERING WHO I WANTED TO BE by Tracey Sullinger, hand quilted
Play with Fabrics, Color, and Value
Once you have the general guide in place, it’s time to start playing with fabrics, color, and value.
 LITTLE QUILTS MADDER TWO by Cathy Jones, machine quilted by Rogene Fischer
In the quilt above, the same fabric is used in the sashing borders to create continuity. Notice the use of background fabrics to create focus in the blocks. The pieced borders have more of a consistent value, except for the pops of light and dark with the cream and burgundy fabrics. This gives the piece twinkle.
Use the graph-paper diagram to add pieced borders, while leaving others solid. Using the square size as a guide, note the cutting requirements for the blocks. Remember to add a 1/2″ to the finished sizes for the 1/4″ seam allowances.
Common Units used in Medallion Borders
Flying Geese: When drafting Flying Geese, remember that they are twice as wide as they are tall. So a 2″ Flying Geese will be 1″ tall. On graph paper they are often half a square or they use two squares.
Four Patch: When drafting Four Patches, they take one square of graph paper or four since they are square.
Half Square Triangles: Again, these are square units so they take one or four squares.
Use Some Borders to Sash and Frame
 .FROG MEDALLION by Gwen Marston, machine quilted by Robyn House Guettler
Some borders serve the purpose of framing, others create space (sashing), while others produce movement and balance. In Frog Medallion, Gwen Marston uses several corner-square borders. The varying sizes creates a nice chain effect in the corners.
Corner-square borders let you straighten things up when they get out of hand. You can use them to add a little to one direction if things get too tight.
For funky shapes like spiky triangles, draw your block to scale and use foundation paper piecing to assemble. The drawing can serve as the foundation pattern!
Don’t be intimated by the playful nature of Medallion quilts.
Keep Scale in Mind
Use scale to create depth, paying attention to the relationship between the size of the borders to one another, as well as, their relationship to the center block. In Flower Pot with Heart, Robyn Guettler, uses size, color, and value make the center of this quilt shine.
 FLOWER POT WITH HEART by Gwen Marston, machine quilted by Robyn House Guettler
In Medallion with Center Star, Gwen Marston uses a small star block at the center, giving the view the impression that they are looking into the heart of the quilt. Notice how the border sizes grow as they get to the outside of the quilt.
 MEDALLION WITH CENTER STAR by Gwen Marston, hand quilted
Medallion quilts can look scary, but when you simplify the math and throw in a little planning, they are a like eating an elephant…one border at a time.