Celebrate winter and get in the St. Valentine’s Day mood as you learn the creative wonders of machine reverse appliqué and appli-quilting.
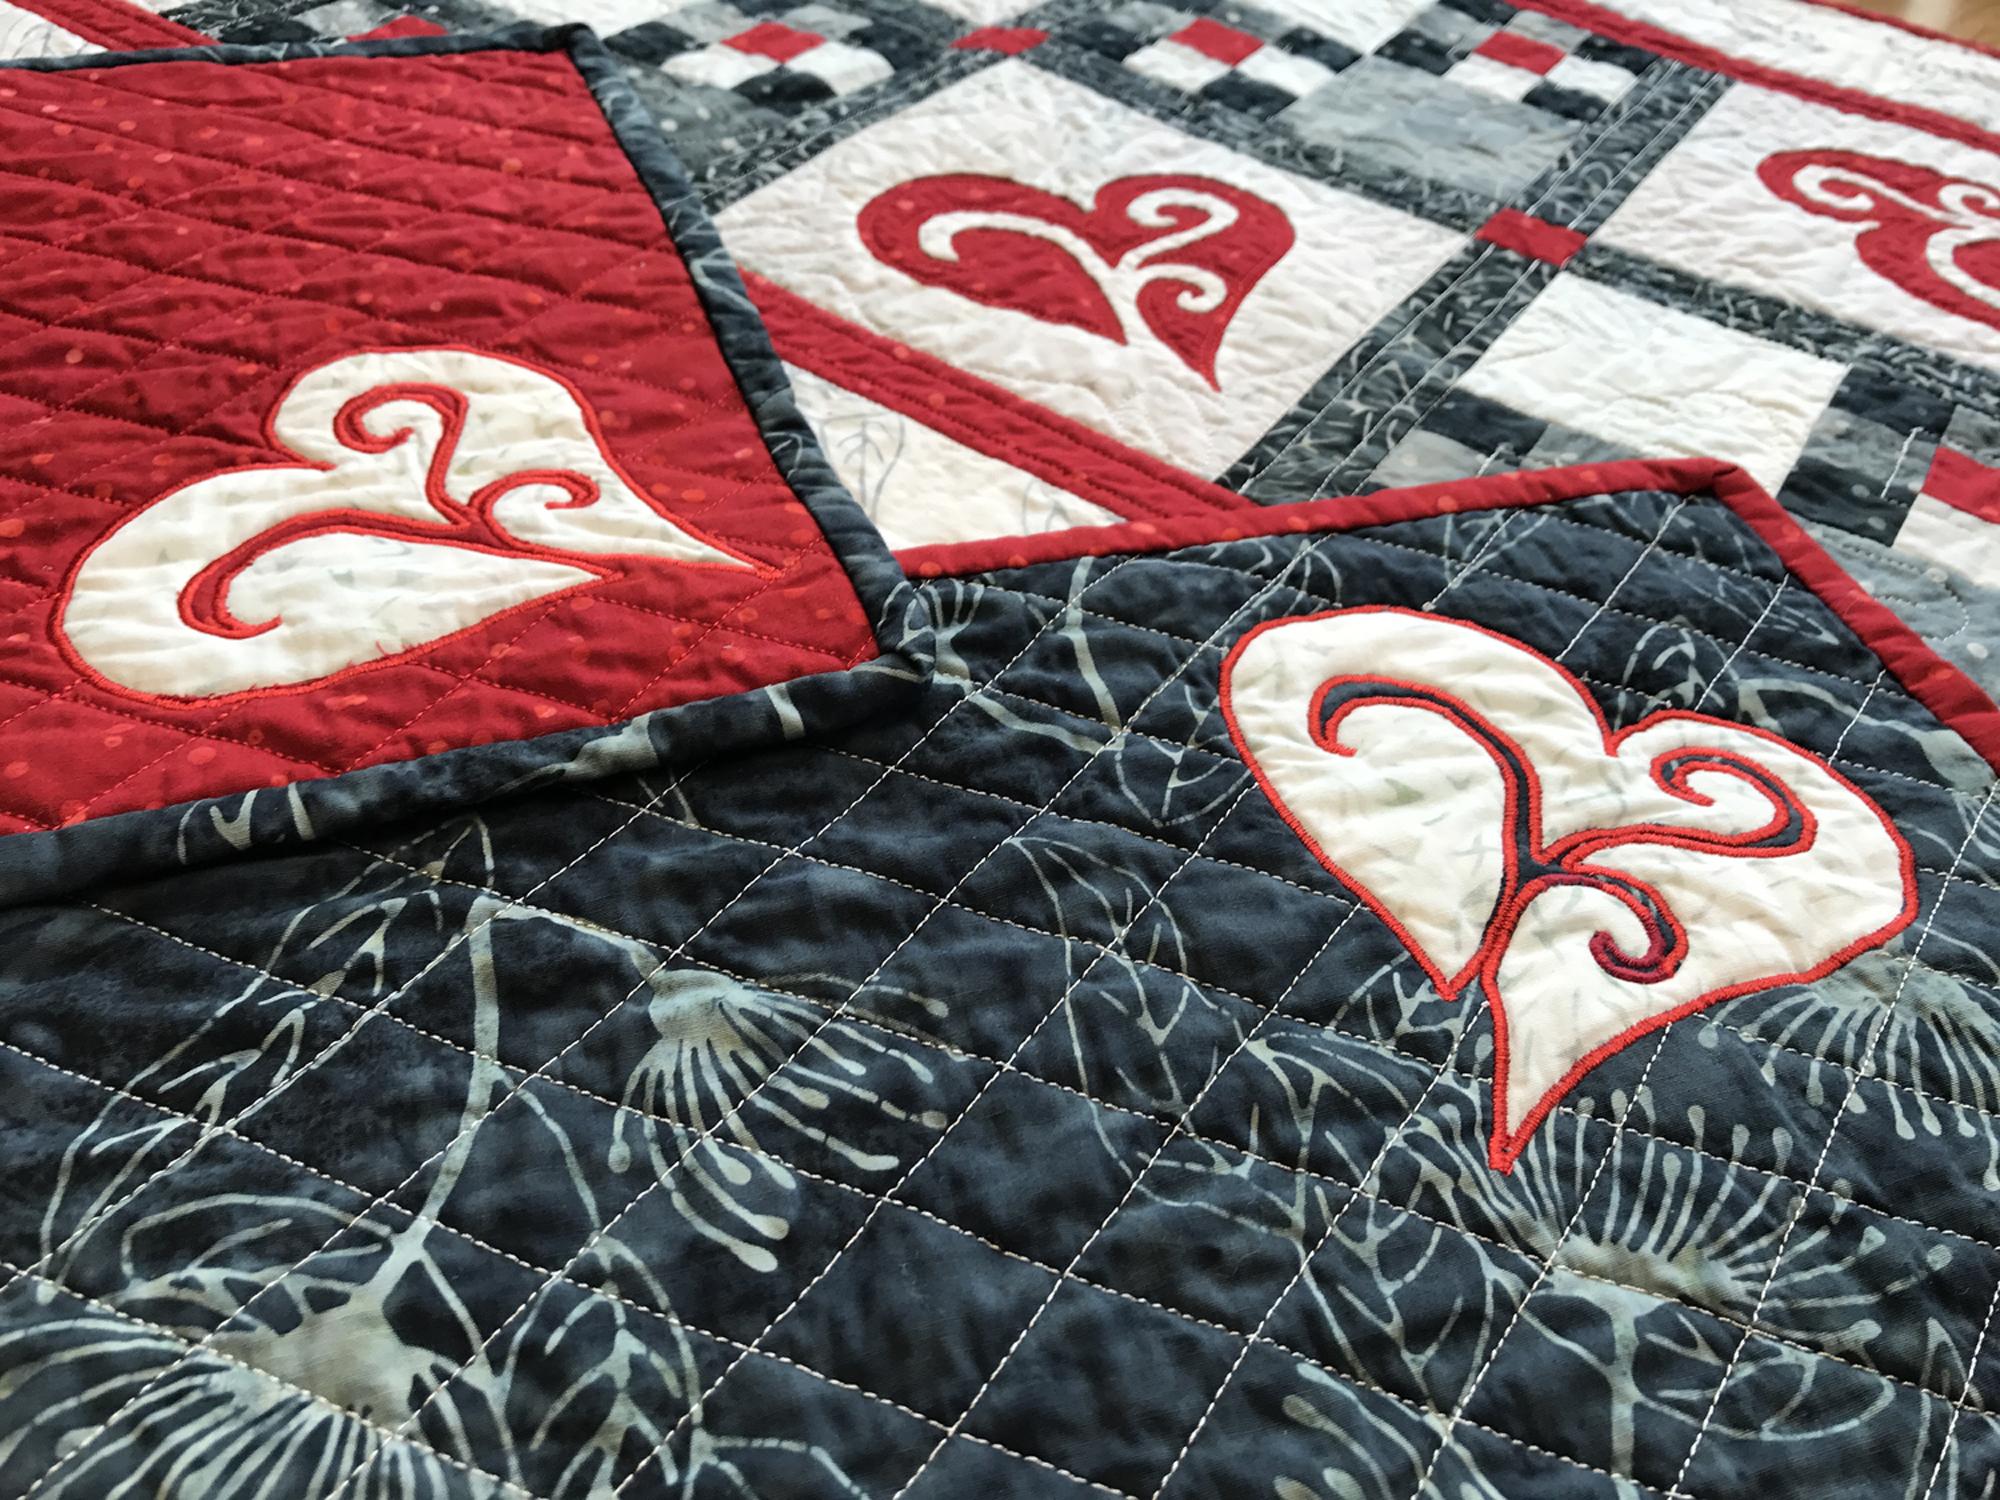
Hone your skills and explore the unique options of Trace, Snip, Iron & Stitch, machine reverse appliqué the Eye of the Beholder Way.
I love reverse appliqué. Your design is created in the negative space by the background fabric peeking out of the top fabric. But did you know you can reverse appliqué by machine?
I thoroughly enjoy stitching reverse appliqué by hand, but sometimes I just don’t have the time, or I want a different look to my finished quilt piece.
Machine reverse appliqué is a nice alternative to hand reverse appliqué. It is faster, 2/3’s faster than hand reverse appliqué, has some unique creative possibilities, and it has a different look. Explore the unique options of machine reverse appliqué, understand the steps of our easy Trace, Snip, Iron & Stitch method, plus highlights and tips for better machine stitching.
Machine Reverse Appliqué with Trace, Snip, Iron & Stitch: The Basics
To machine reverse appliqué, we use our Trace, Snip, Iron & Stitch method. To begin, gather up your pattern, Soft Fuse or another paper-backed iron-on fusible, a top fabric, and a background fabric. We are demonstrating with the heart block from our Snowy Hearts Table Runner IX pattern. Purchase the pattern Here!
To make a similar table décor set, visit the Eye of the Beholder post here.
Trace
Lay the Soft Fuse on top of the pattern with the paper side up. Trace the design onto the paper side. I cut the Soft Fuse the exact size of the finished block.
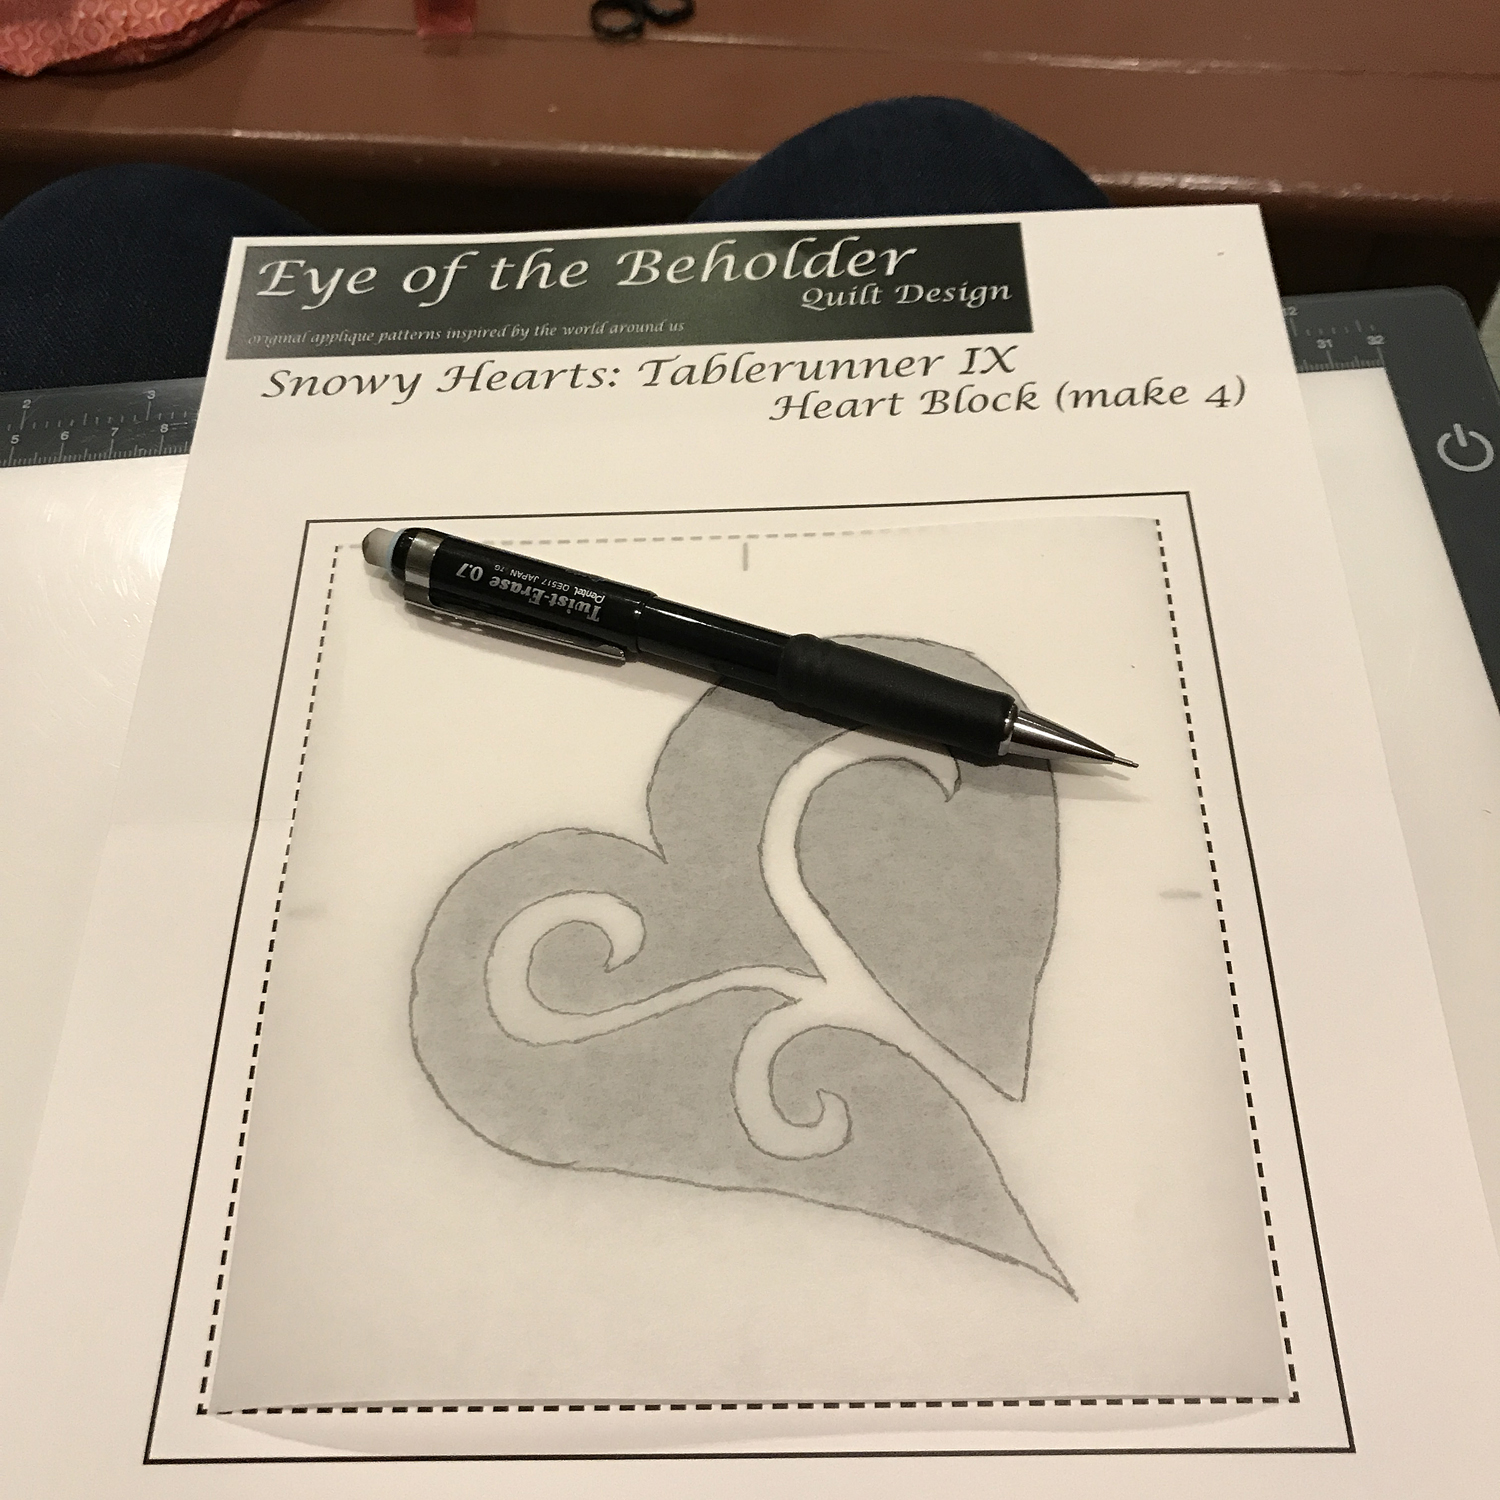
Trace the design onto the paper side of Soft Fuse or other paper-backed iron-on fusible.
Lay your top fabric, right side down, on your ironing board.
I usually cut the top fabric at least 1″ – 4″ bigger than the cut dimensions of my piece. The larger the piece, the more extra top fabric I will have. If I’m doing a Block, like my heart block from Snowy Hearts, I cut my fusible 6″ x 6″, but my top and background fabrics are cut 7.5″ square. If I’m doing a 26″ x 26″ medallion, my Soft Fuse will be cut 26″ x 26″, but my top fabric will be 30″ x 30″.
Center your Soft Fuse square, with the design already traced on it, onto the wrong side of the top fabric. Iron with a dry iron.

Iron the fusible onto the wrong side of the top fabric.
Snip
Use a pair of small, sharp scissors, like my Kai sharp-tipped scissors, and cut the shapes out right on the drawn lines of the design. Peel the paper off the fused top fabric.
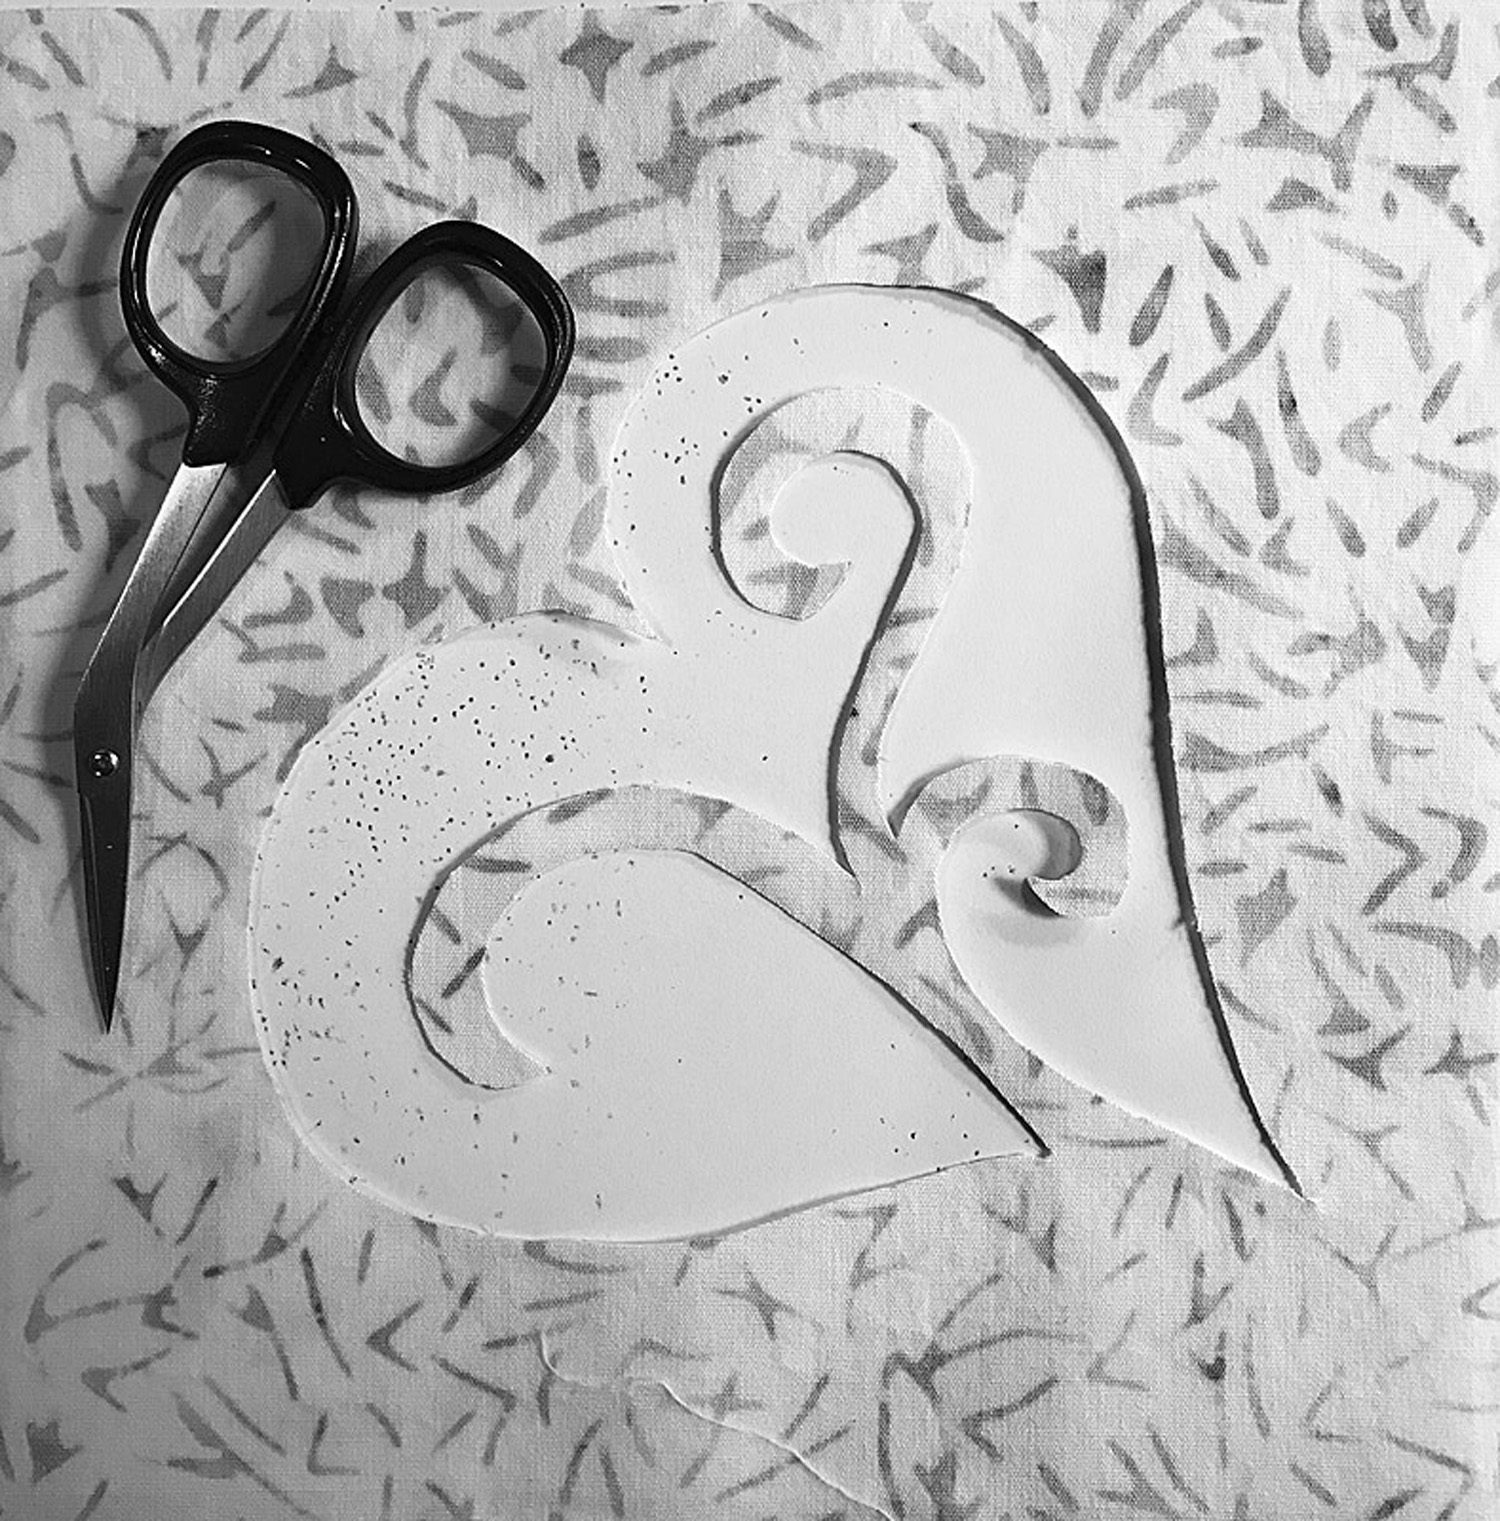
Using small, sharp scissors, cut the shapes out right on the drawn lines of the design.
If you carefully cut the shapes out, you will have fused pieces that you can use to create an appliqué project. You get two projects for the time it takes to make one.
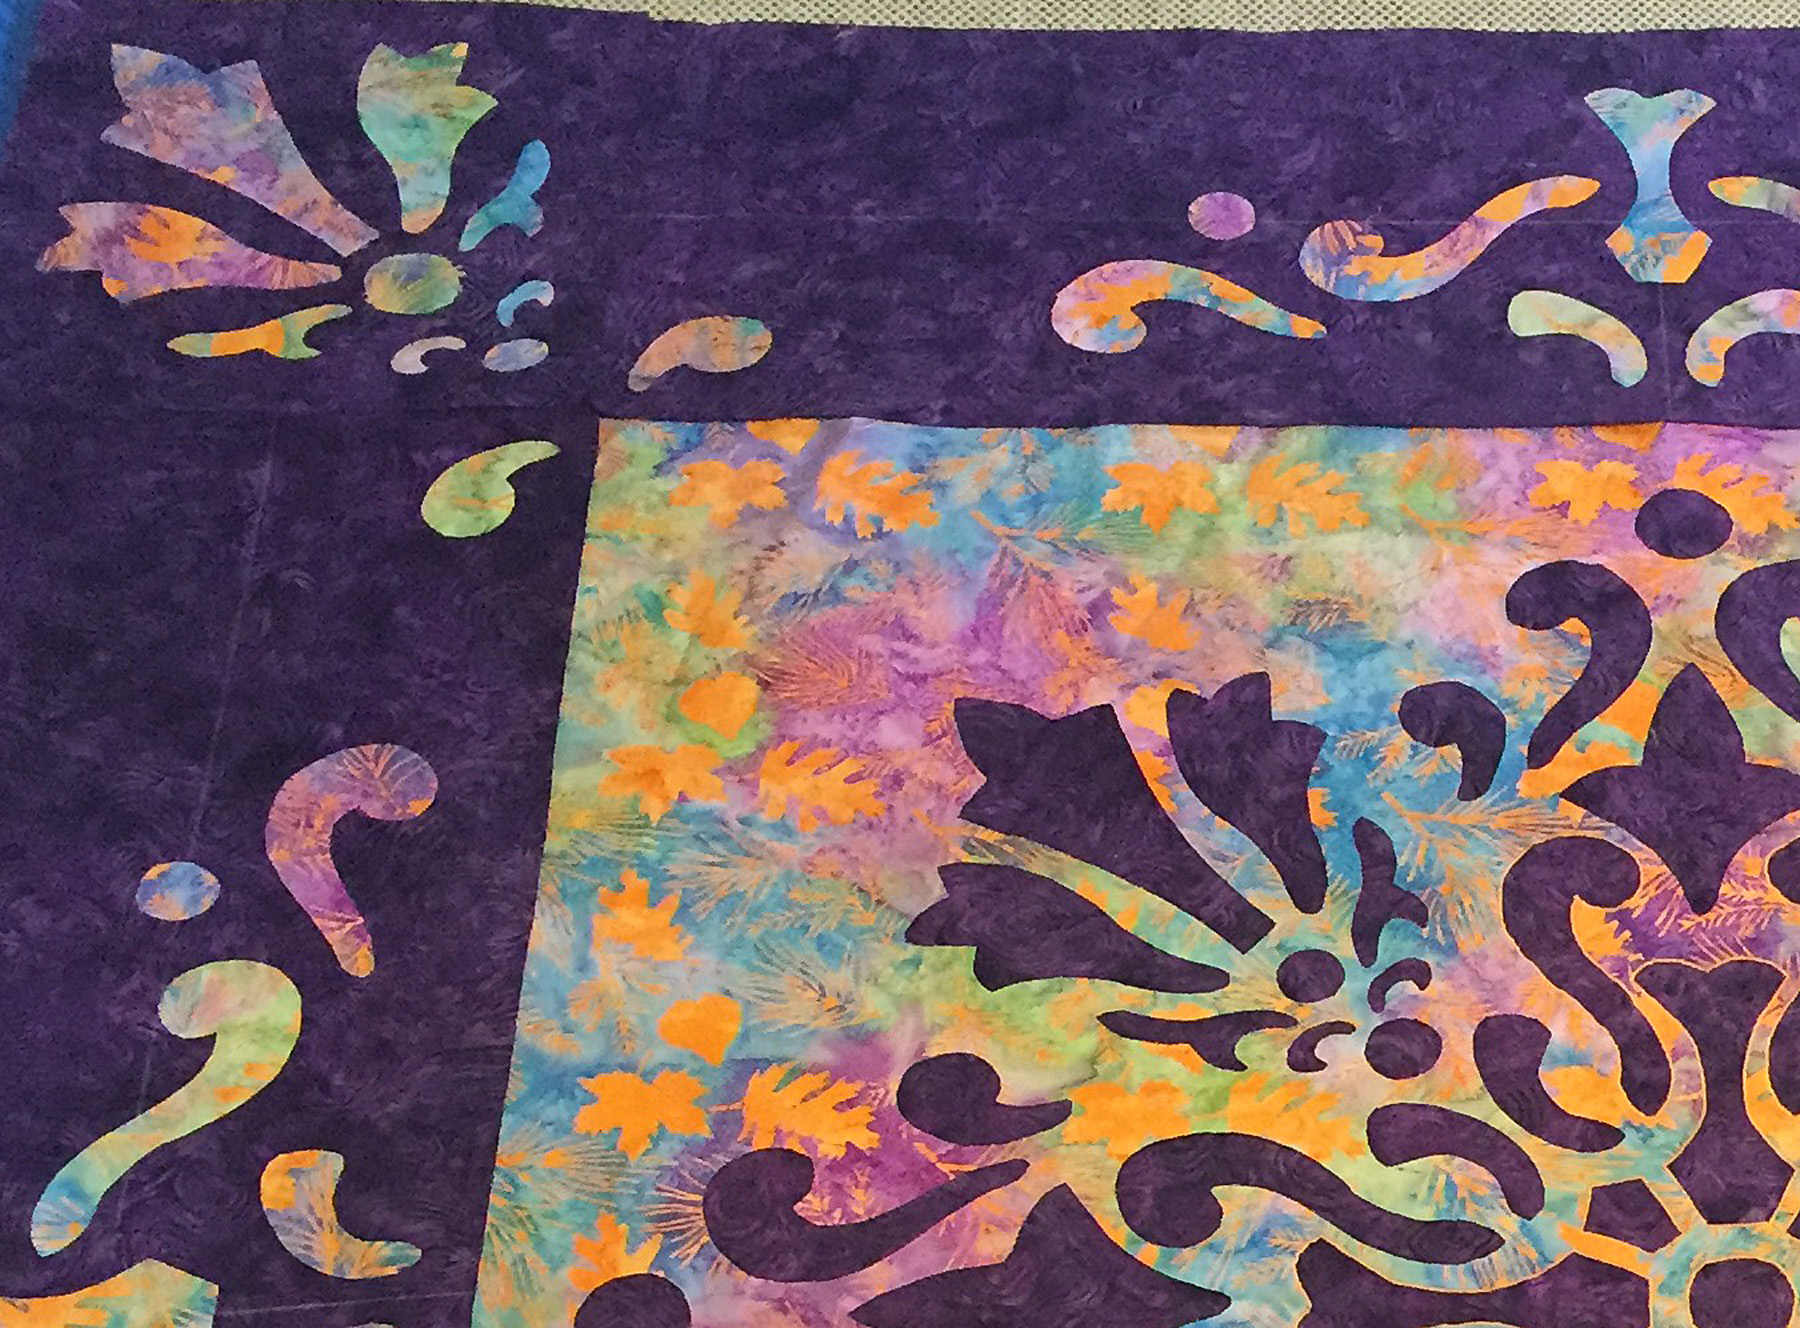
Illumination Medallion X Border was created with appliqué from the carefully cut out shapes from the reverse appliqué center.
Iron
Lay background fabric, with the right side up, on the ironing board and then lay the cut out fused top, fusible side down, onto it. Iron with a dry iron.
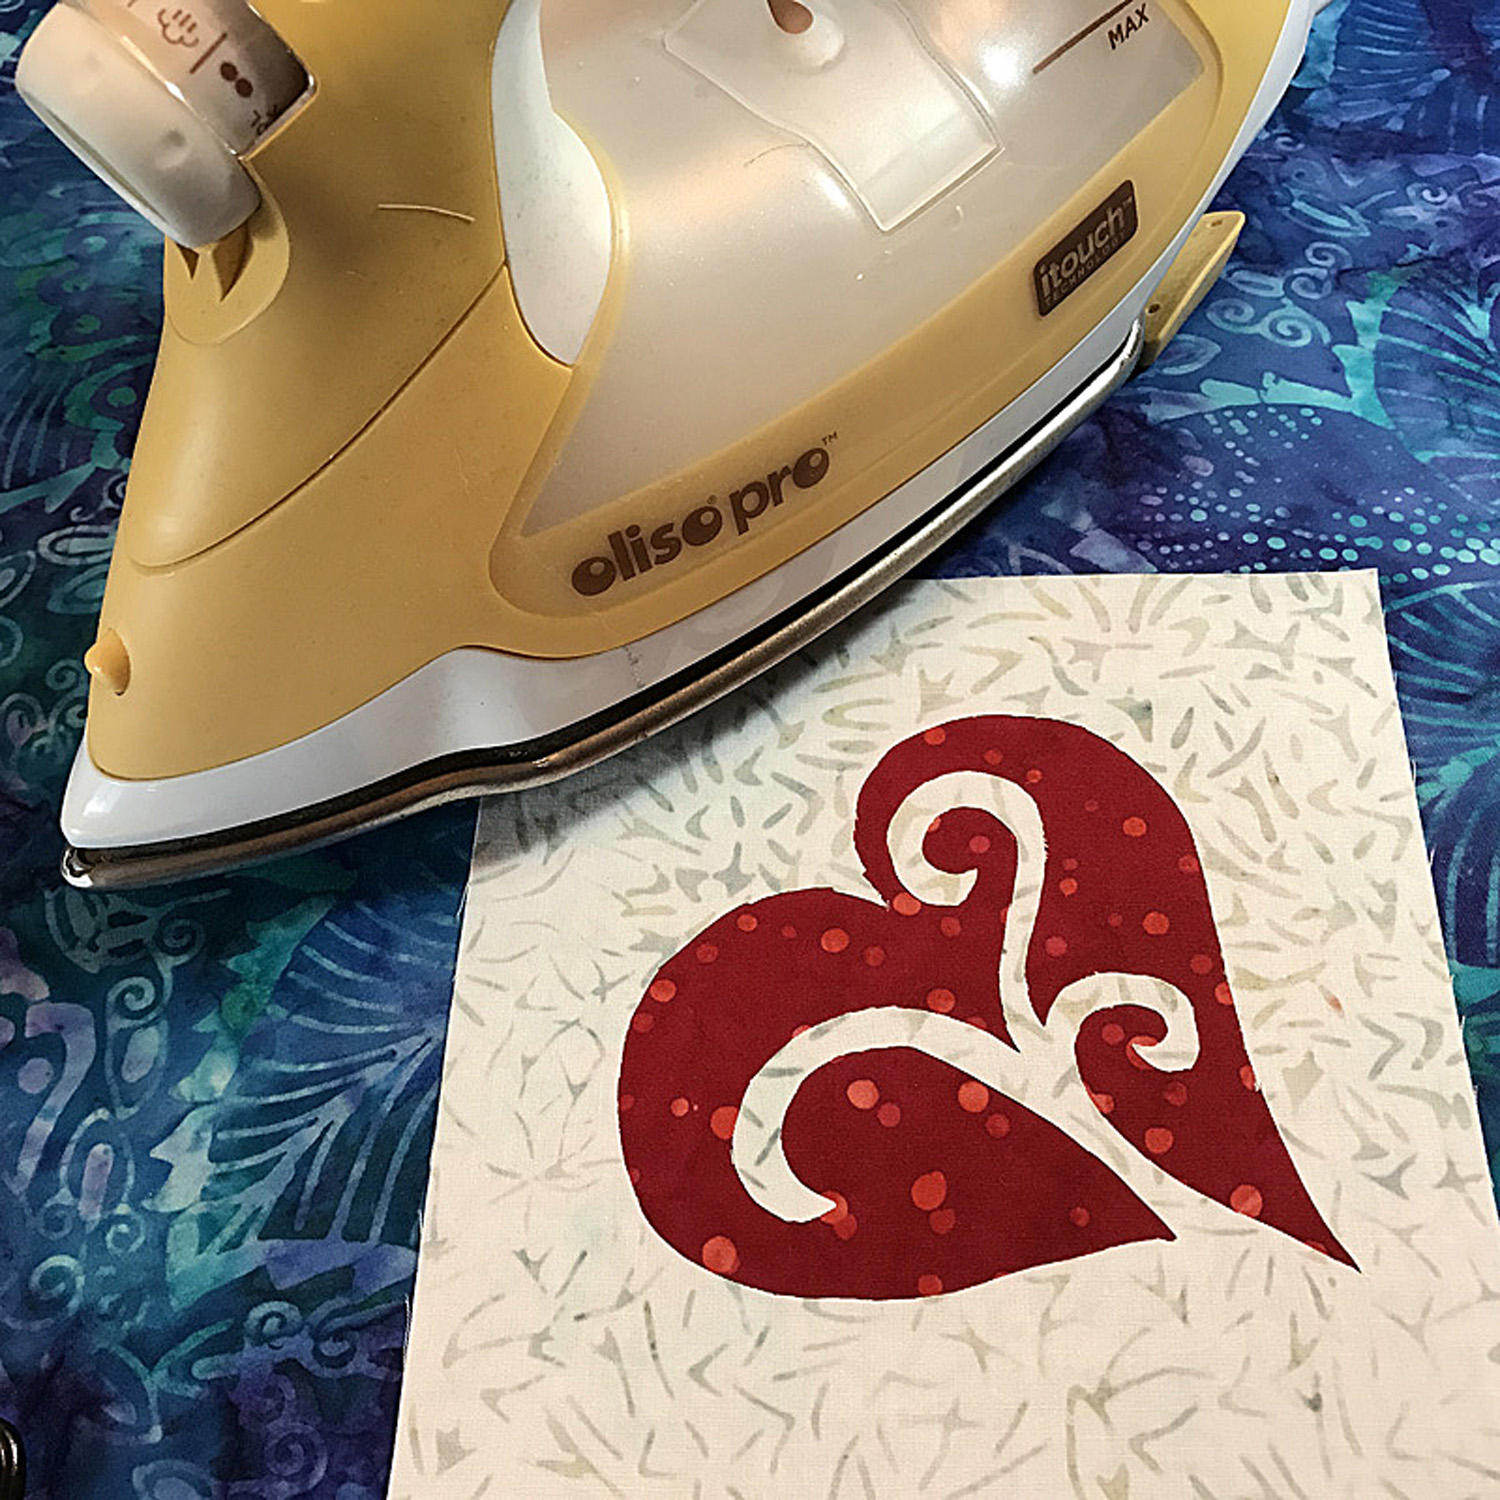
After peeling the paper off the fusible, place the fused, cut out top fabric on the right side of the background fabric. Iron with a dry iron.
When working by machine, you have the creative option of using a dark fabric as background. This is because we trace the design onto the paper side of an iron-on fusible instead of on the background fabric as when making by hand.

Snowy Hearts table runner IX with a dark fabric, the red, as the background fabric in the reverse appliqué heart blocks.
For plain machine reverse appliqué you would do the machine stitching now.
I recommend using a stabilizer so your fabric doesn’t get gathered up into your stitching which shrinks the size of your piece. Without a stabilizer, you run the risk of your piece getting sucked into your stitch plate or creating a stitch mole hill because your piece stalled its forward progress as you stitch. You can use either an add-on product or Terial Magic, a spray-on stabilizer.

Snowflake B from Twinkling Flurries Quilt VI, treated with Terial Magic, being machine reverse appliquéd.
Another alternative that requires no extra stabilizers is our Appli-quilt method. To appli-quilt, make your quilt sandwich now by layering your backing, batting, and fused quilt top. Then go to your sewing machine to machine reverse appliqué through all the layers. The machine reverse appliqué stitching doubles as the first round of quilting, putting you closer to finishing your piece.
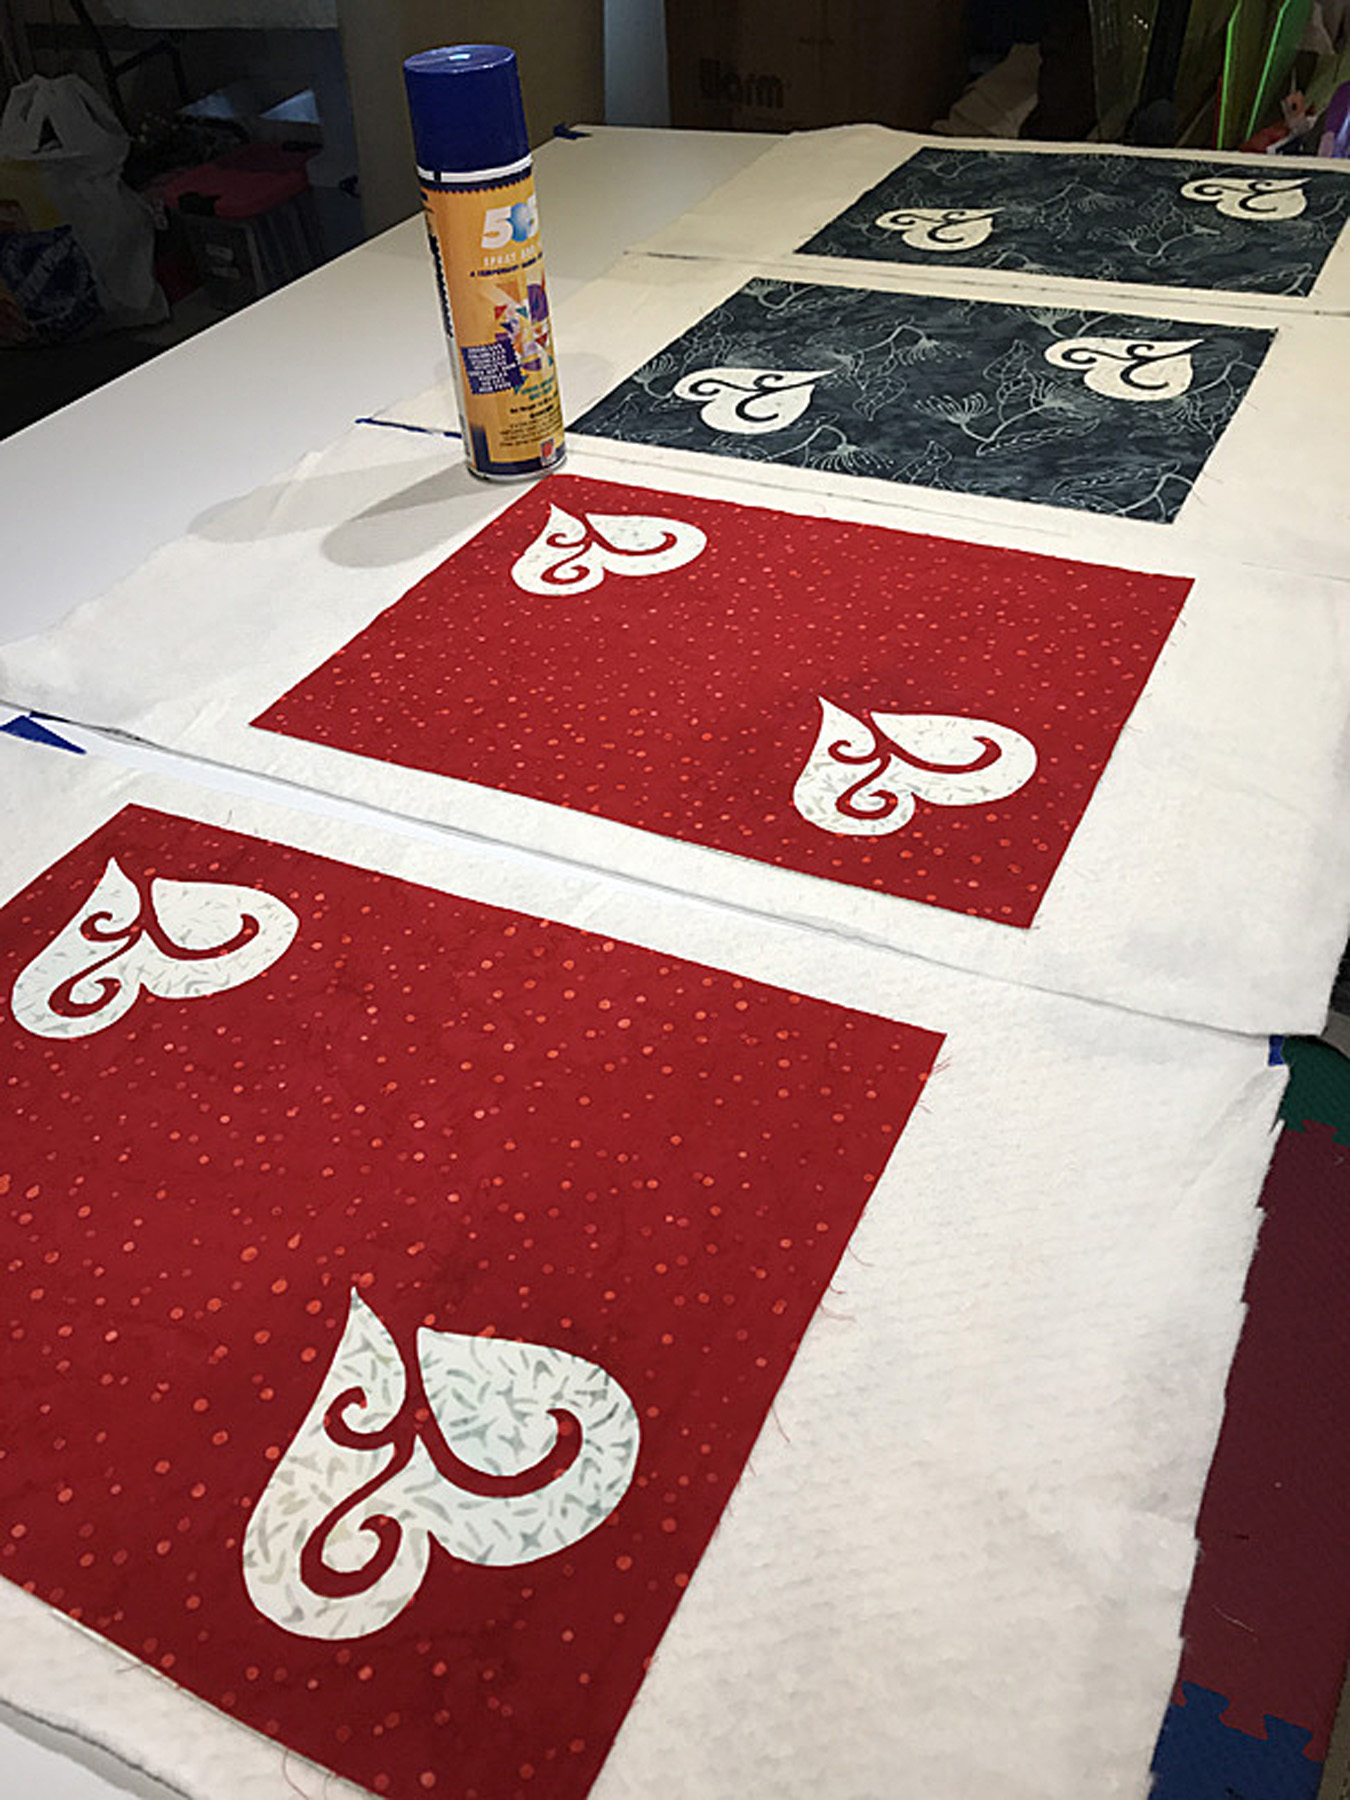
Fused, cut-out tops layered with quilt batting and backing for Appli-quilting.
Choosing a thread color for your machine stitching. The obvious choice of thread color is one that disappears into your top fabric. However, be creative. You can add a spot of color by choosing a complimentary thread color to accent aspects of your design. Either stitch the whole piece in a complimentary thread color or only stitch parts of your design to feature those elements of the design.
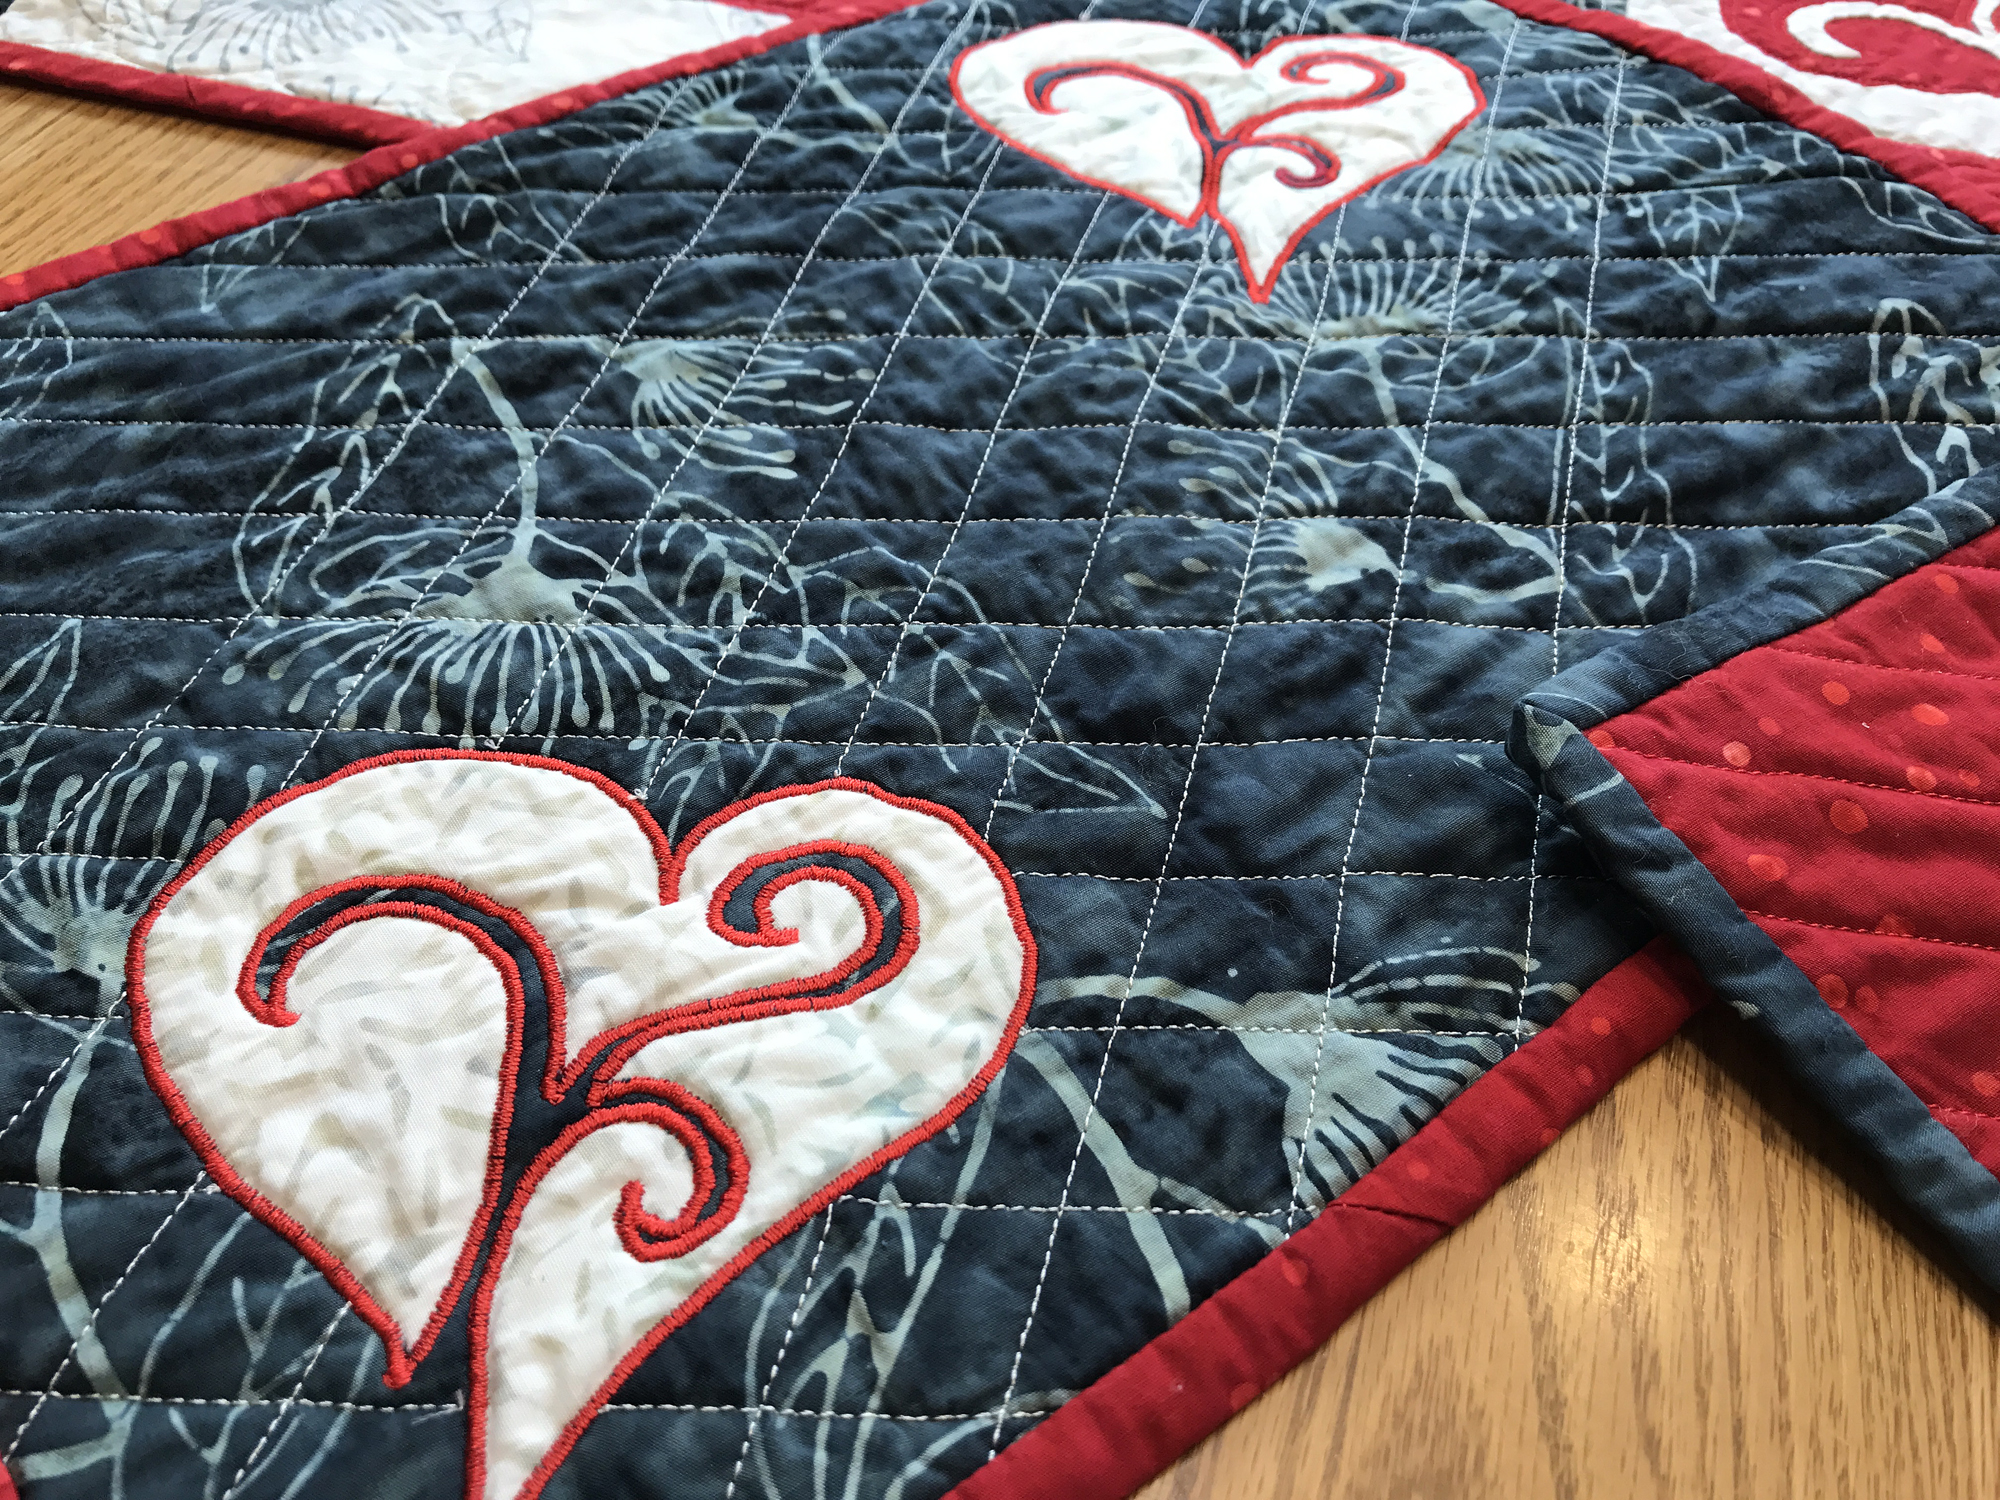
Machine reverse appliqué with an accent thread.
Now that your piece is cut, fused, and perhaps layered, let’s look at how to actually do the machine reverse appliqué.
Getting to know yourself and your Sewing Machine
Successful machine reverse appliqué encompasses you, your sewing machine, the stitch you are using, and needle-eye coordination.
I do most of my machine reverse appliqué with a satin stitch because I love the look. It gives clean edges to my design shapes. I suppose I’m reminded of the black outlines in coloring books when I was a child. I have used my machine’s buttonhole stitch or a straight stitch to do raw edge appliqué, I prefer the satin stitch.
To create a satin stitch, I start with my machine’s zigzag stitch and adjust the stitch width and stitch length to get the desired effect. I can’t really give you the magic numbers for adjusting stitch length and width, because every sewing machine is different.
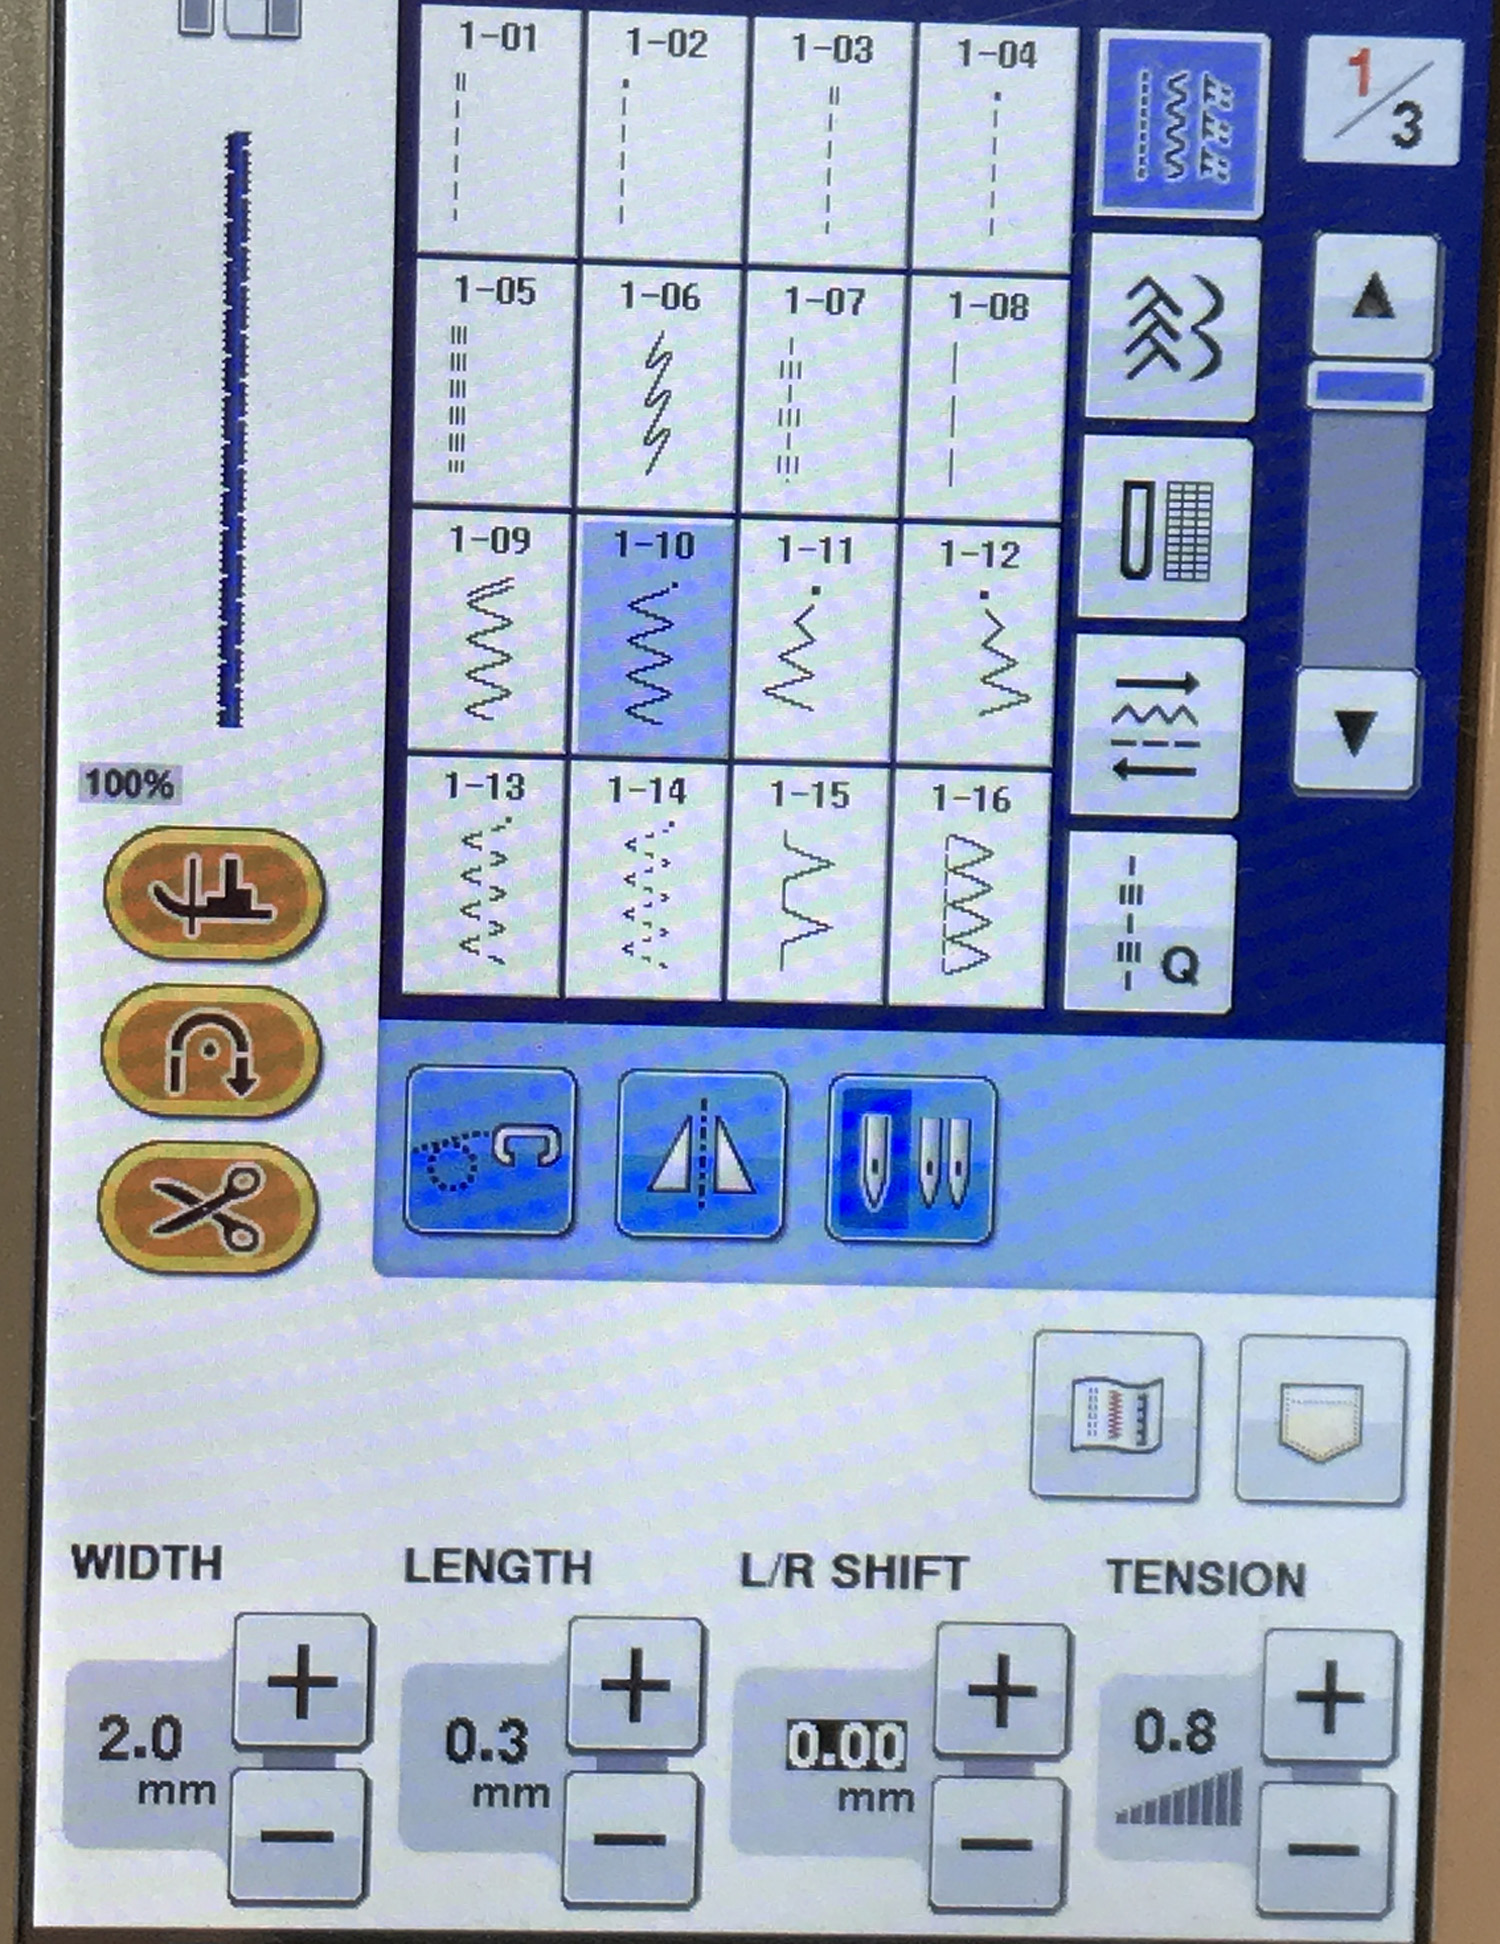
The computer screen on my Babylock Aria set on zig-zag stitch and numbers for stitch width and length.
I have two testers next to my sewing machine to try out my stitch before sewing on my actual project. One consists of a fused top and the other is a layered tester for appli-quilting. The capabilities of your sewing machine, the type of fabric used, and the number of layers you are stitching through will affect how you set your stitch width and length. If I’m not layered for Appli-quilting, I stabilize my fabric with Terial Magic.
When stitching with a satin stitch, you want to cover the raw edge with your stitches and keep the threads of the satin stitch perpendicular to the raw edge.
I do machine appliqué or reverse appliqué with my sewing machine needle in the needle down position. This means that every time I stop sewing, my needle will remain down in the fabric. This gives me an anchored pivot point when doing points and curves.
I use an open-toed foot on my sewing machine so I can see where I’m going. This foot has a notch etched into the middle of it which I line up the raw edge of my top fabric. As I’m testing my stitch, I sight the notch along my raw edge while paying attention to where the left and right needle positions of the satin stitch are in relation to my presser foot. As I’m testing my stitch, I’m also gathering mental information about how wide my stitch is which becomes important when stitching inside points.

An open toed foot showing center notch aligned with raw edge.
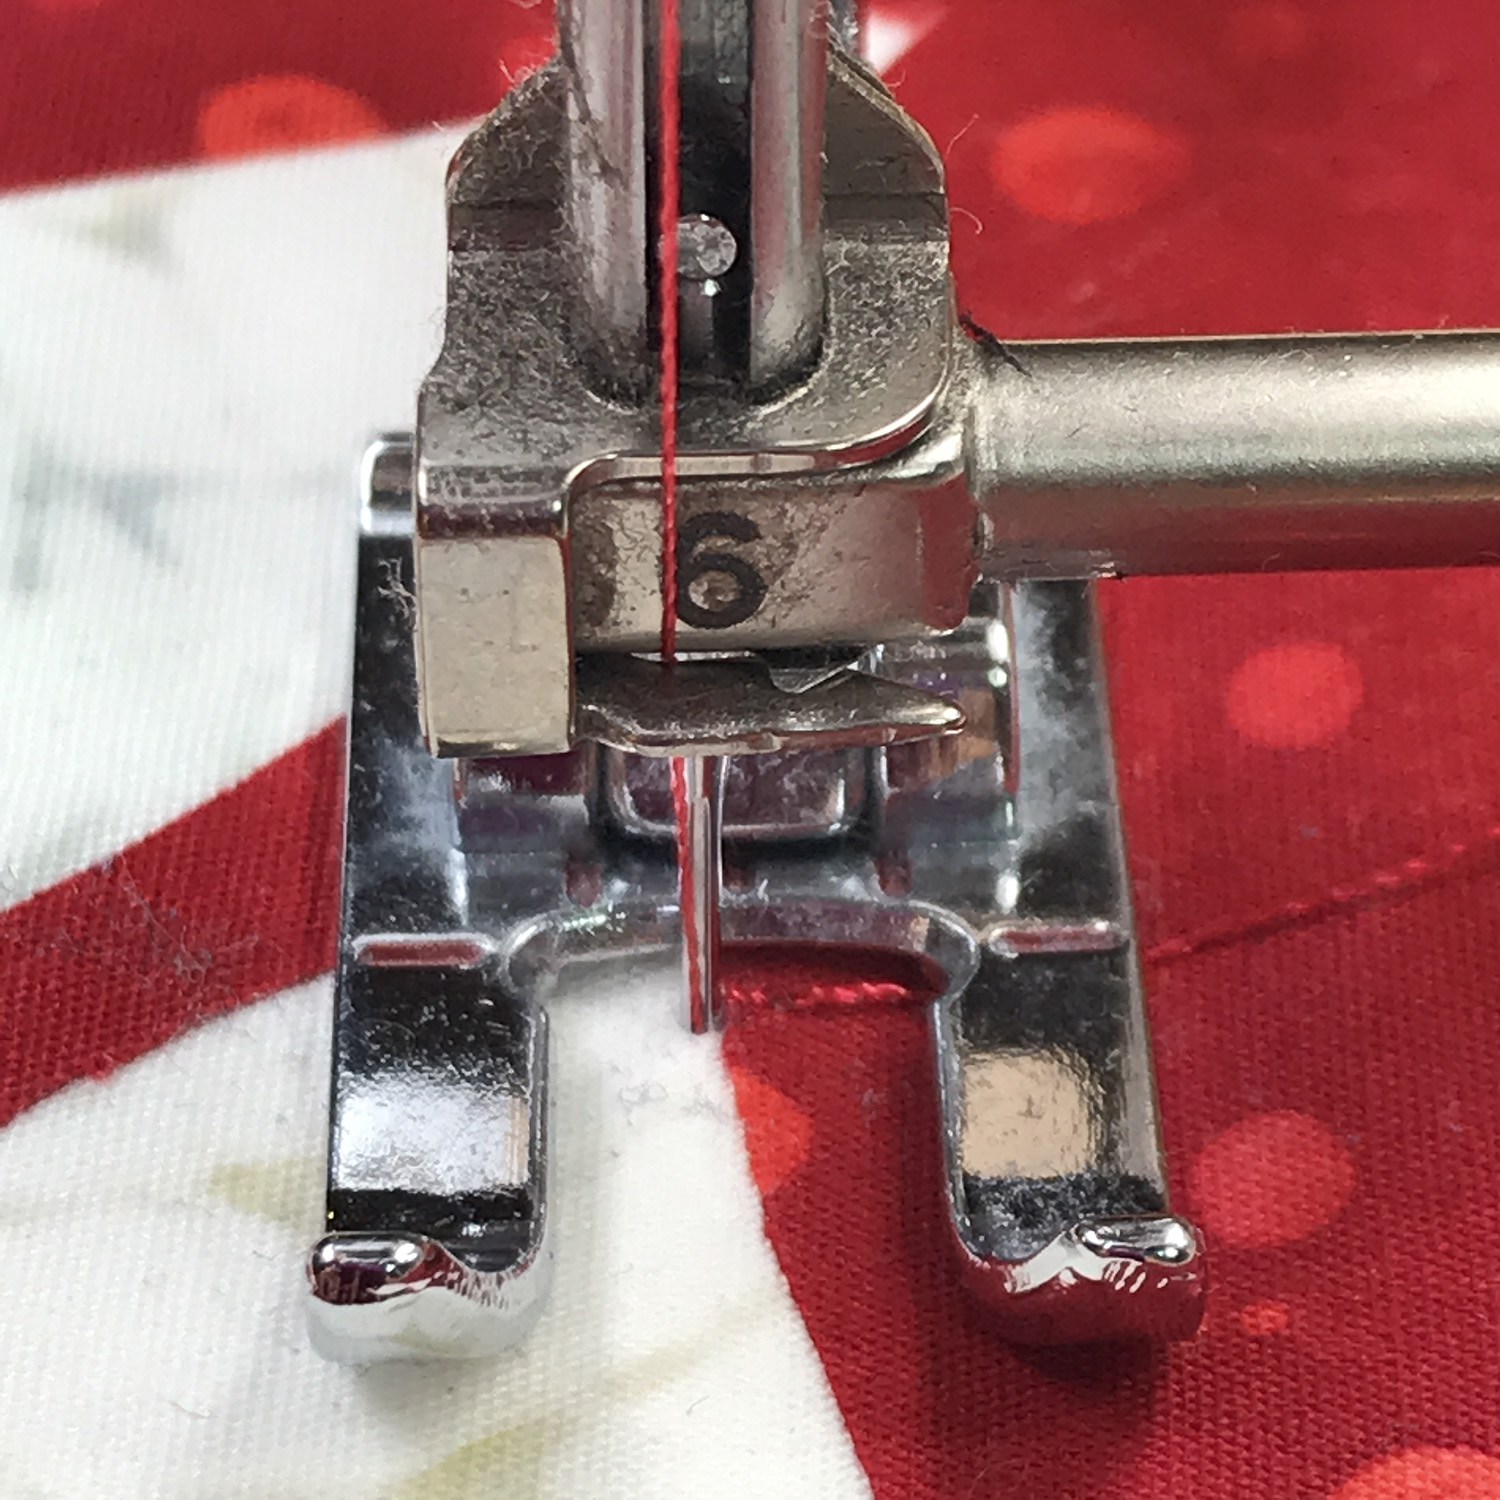
Needle in the left hand position of the satin stitch goes into background fabric right next to the raw edge.
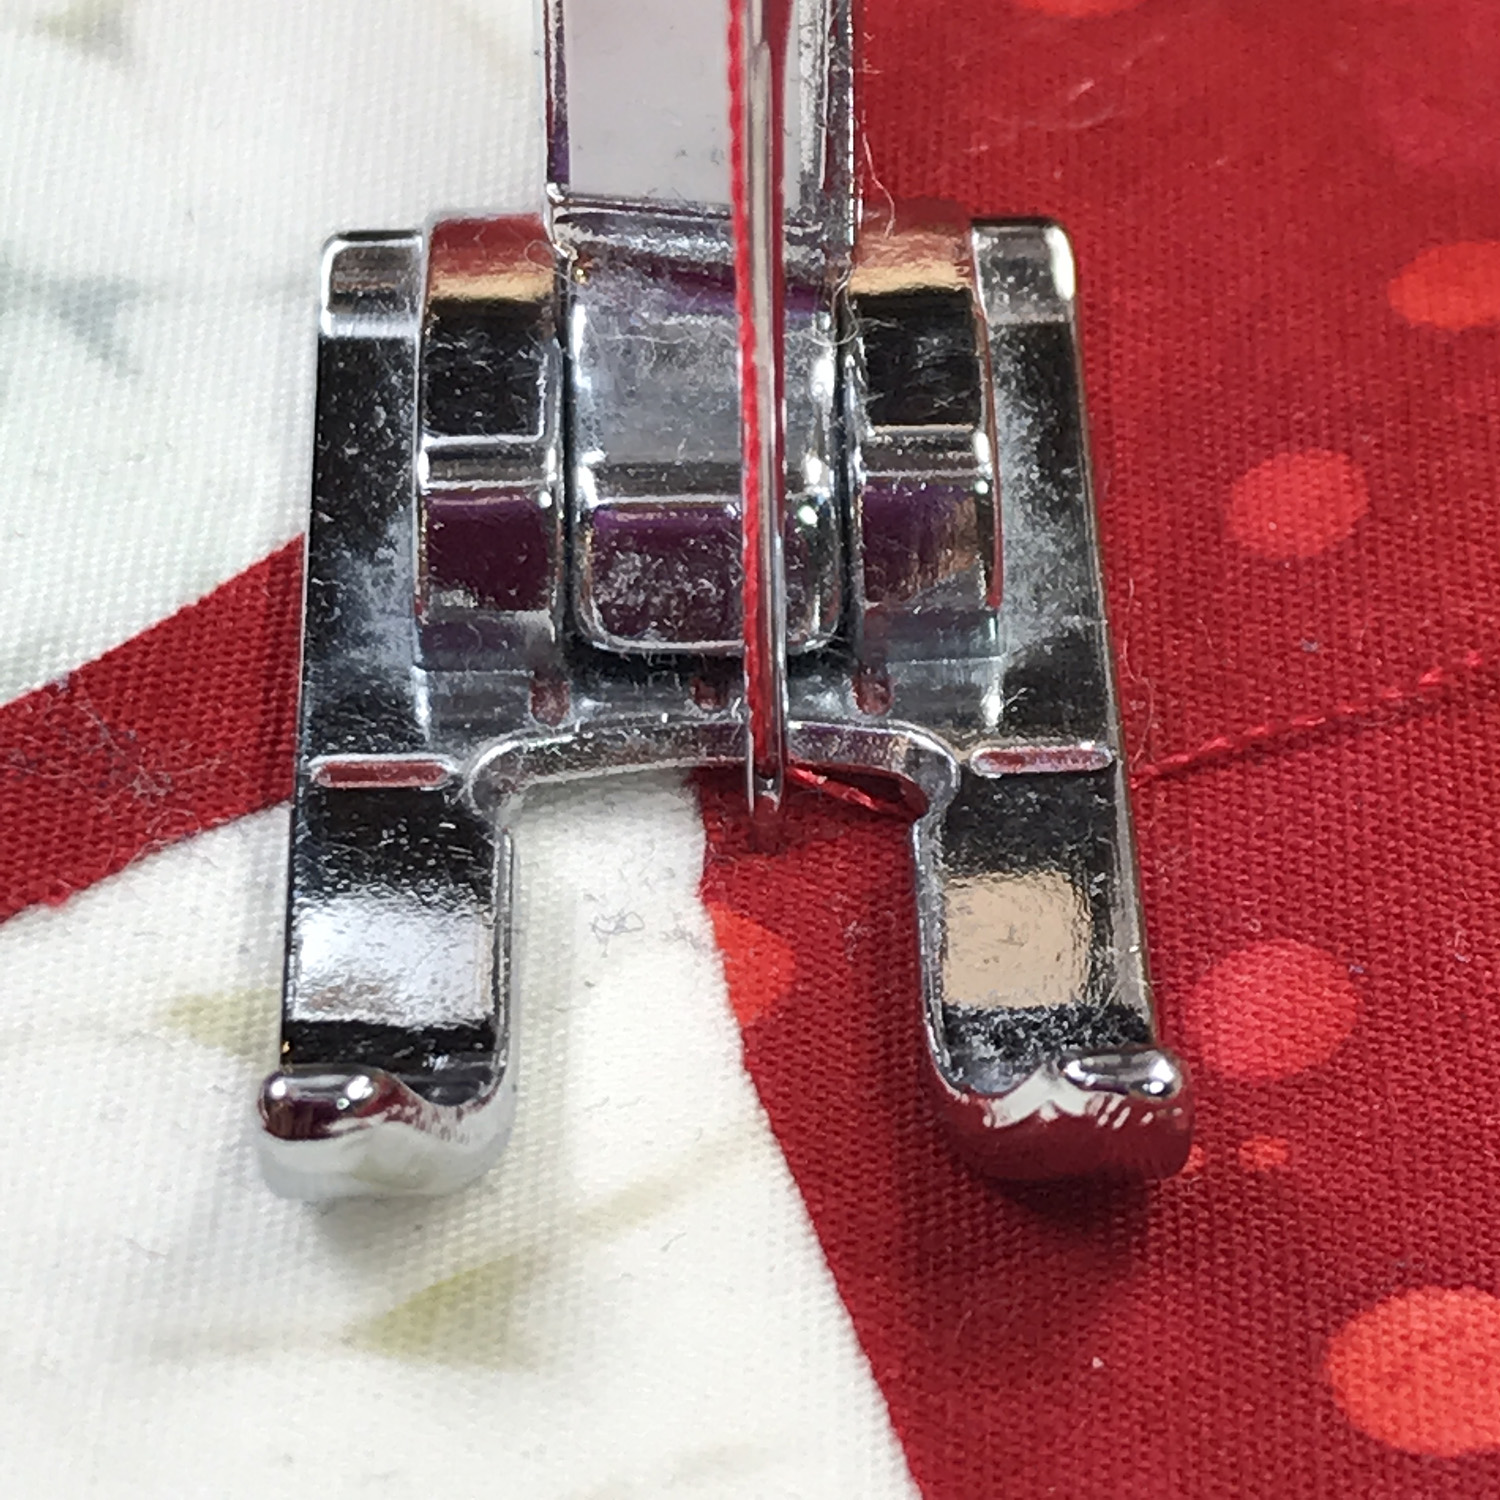
Needle in the right hand position of the satin stitch goes into the top fabric.
Needle-Eye coordination
You want to be aware of how you sight your piece as you stitch. Do you stitch with your top fabric on your right or on your left? Is the left or right hand needle position of the satin stitch along your raw edge? Do you sight your machine reverse appliqué the same way as you sight machine appliqué? As you are stitching on your tester, become aware of what you are doing and how you are doing it.
I machine reverse appliqué opposite to how I machine appliqué. When I machine reverse appliqué, my top fabric is on my right and the background fabric is on my left. I sew with the left needle position of the satin stitch going into the background fabric abutting the raw edge and the right needle position is in the top fabric. You may want to reverse this sewing with the right needle position of the satin stitch going into the background fabric and the left needle position going into the top fabric. Experiment to see what works best for you. However, this blog will look at satin stitching the way I do.
Now let’s explore some satin stitch tips.
It can be a challenge to keep the threads of the satin stitch perpendicular to the raw edge when doing curves and to stitch acute inside and outside points, points sharper than 90 degrees, without getting “x-ed” tails. Let’s learn some ways to successfully machine satin curves and acute points.
Valentine’s Day table décor to hone your machine reverse appliqué
I’m creating something new for my table for February 4: reverse appliqué placemats and 4 reversible appliquéd napkins. I started with the heart pattern from Snowy Hearts table runner IX. The hearts in the placemats have a light background fabric. I used the carefully cut out hearts from my table runner for the appliquéd napkins. To make a similar table décor set, visit the Eye of the Beholder post here.
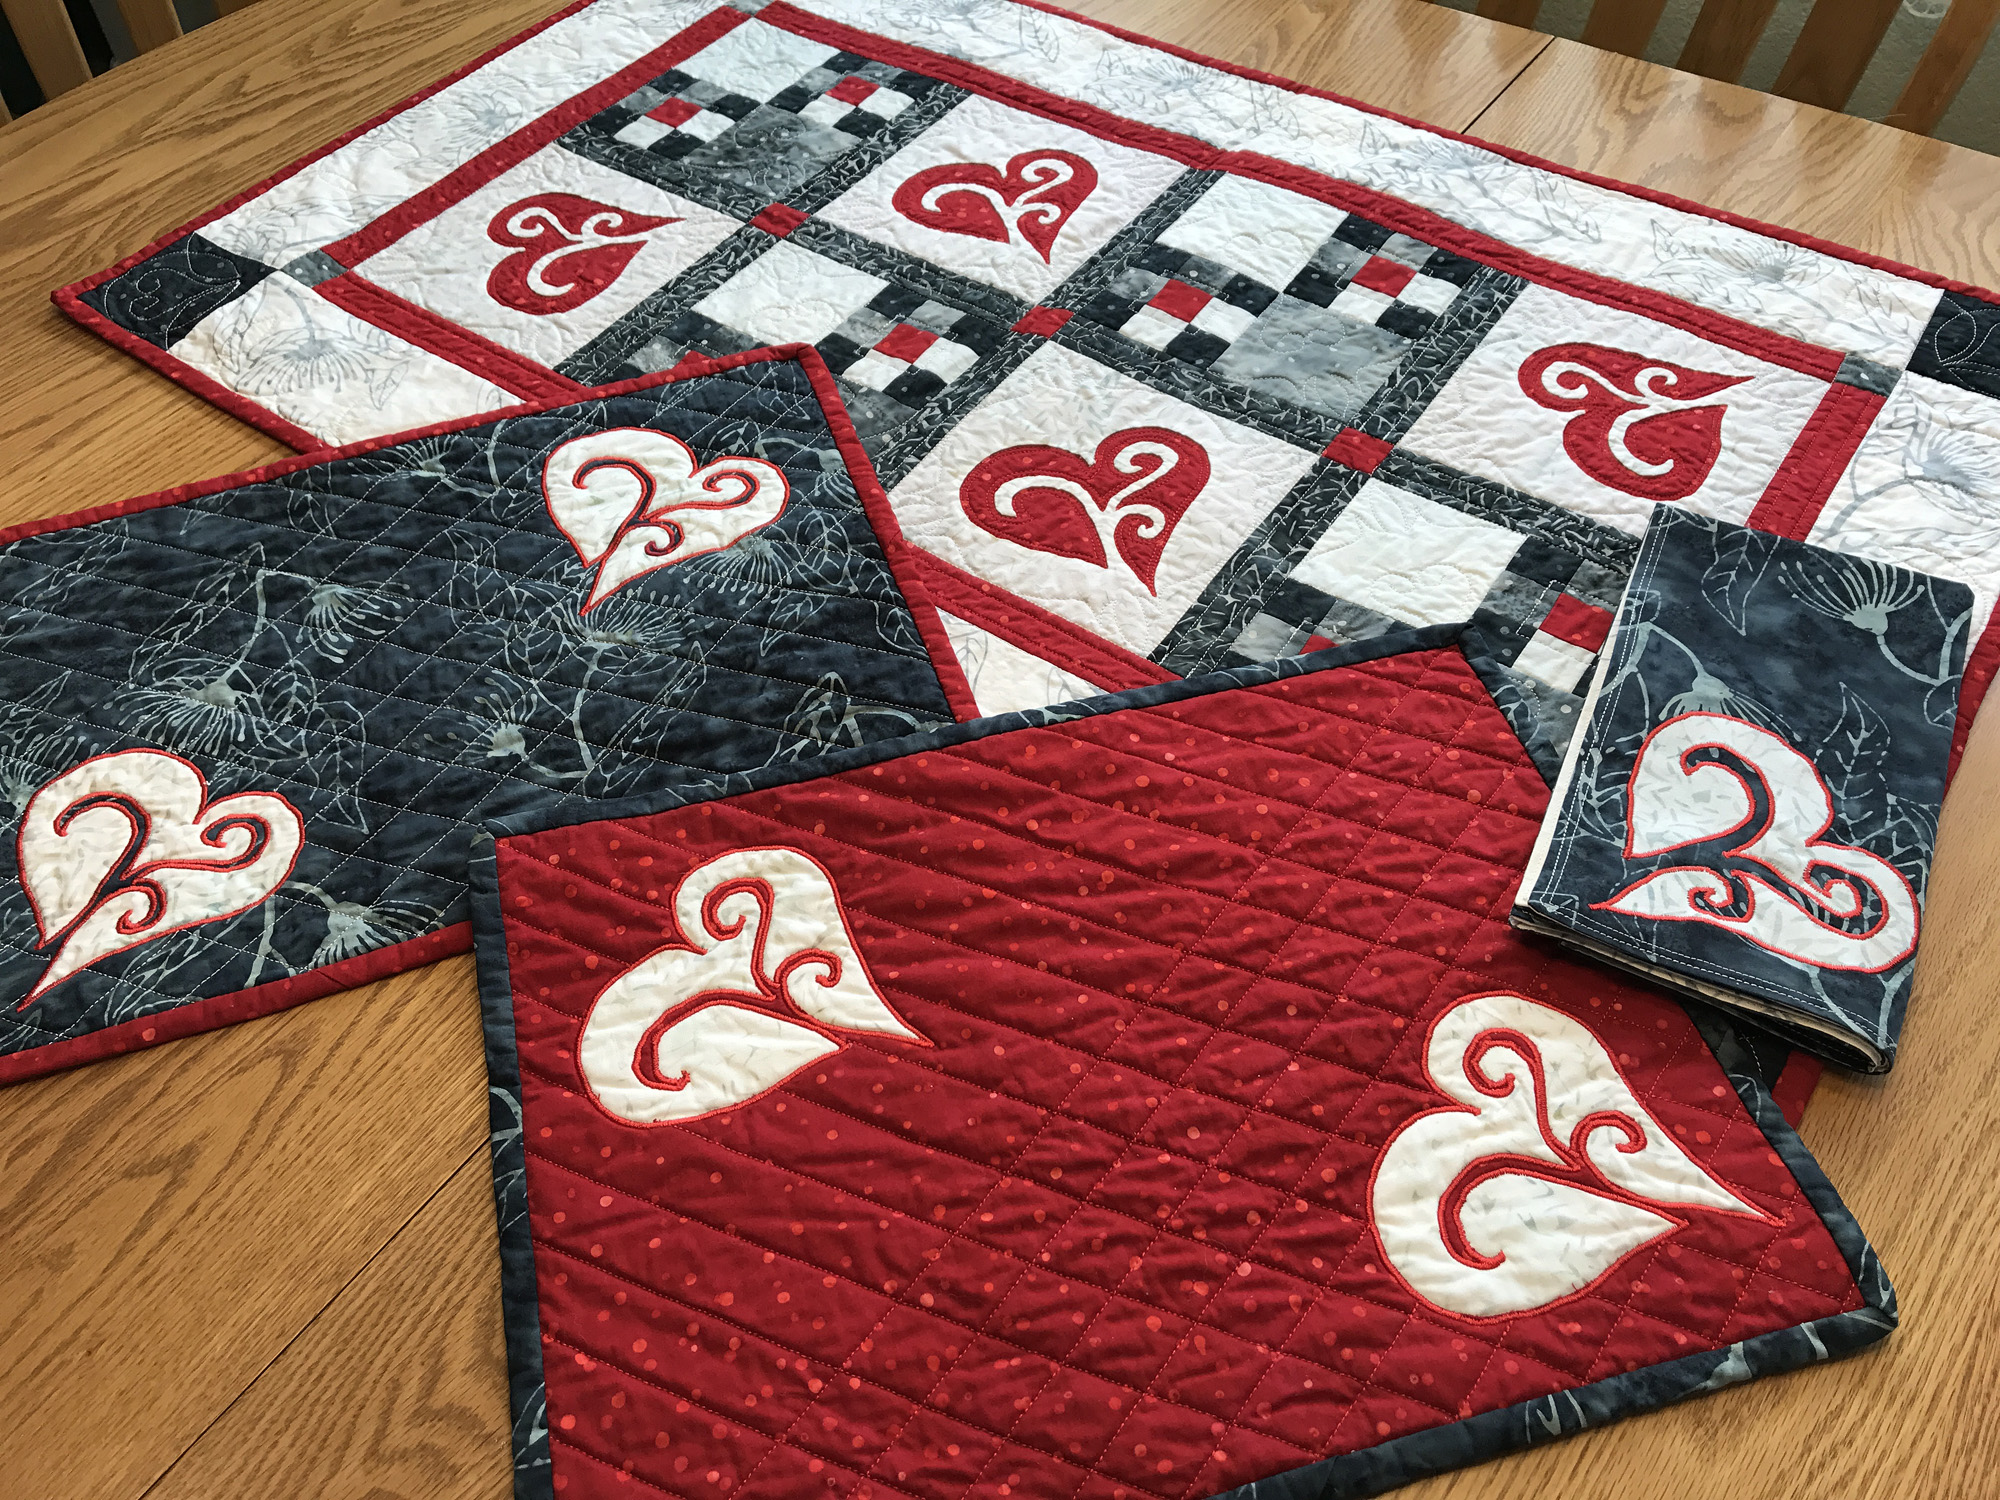
Snowy Hearts table runner IX with two placemats and a napkin.
Curves: Inside and Outside

I stitch the two humps of the heart continuously and the curves of the center swirls with the stop and start system.
The goal when satin stitching a curve/ circle is to keep the threads of the satin stitch perpendicular to the raw edge. You want your stitches evenly spaced with no gaps on the outside edge. I always stitch with my needle in the needle down position so every time I stop my needle is down in my fabric. Whether you leave the needle down in the right or left of the satin stitch depends upon which way you are curving. I find the size of the circle and the sharpness of the curve determines whether I stitch continuously as I slowly turn my piece or whether I stop, slightly pivot, and then begin again.
Small circles/ tight curves
The smaller the circle or tighter the curve, the more I stop, pivot and stitch. Essentially, I stitch straight for 2 +/- stitches, stop and pivot ever so slightly. Stitch again and repeat.
Medium-large circles/ broad sweeping curves
For medium – large circles and broader sweeping curves, like the humps of the heart, I usually stitch continuously but sometimes start and stop as I do for small circles. For continuous stitching, I’m coordinating the movement of my hands and arms turning the piece in relation to the arc and the sound of the speed of my sewing machine. I aim to turn my piece steadily, slowly, and smoothly until I need to re-position my hands. I always stop, with the needle in the down position, when I re-position my hands. Then stitch again.
Inside Curves
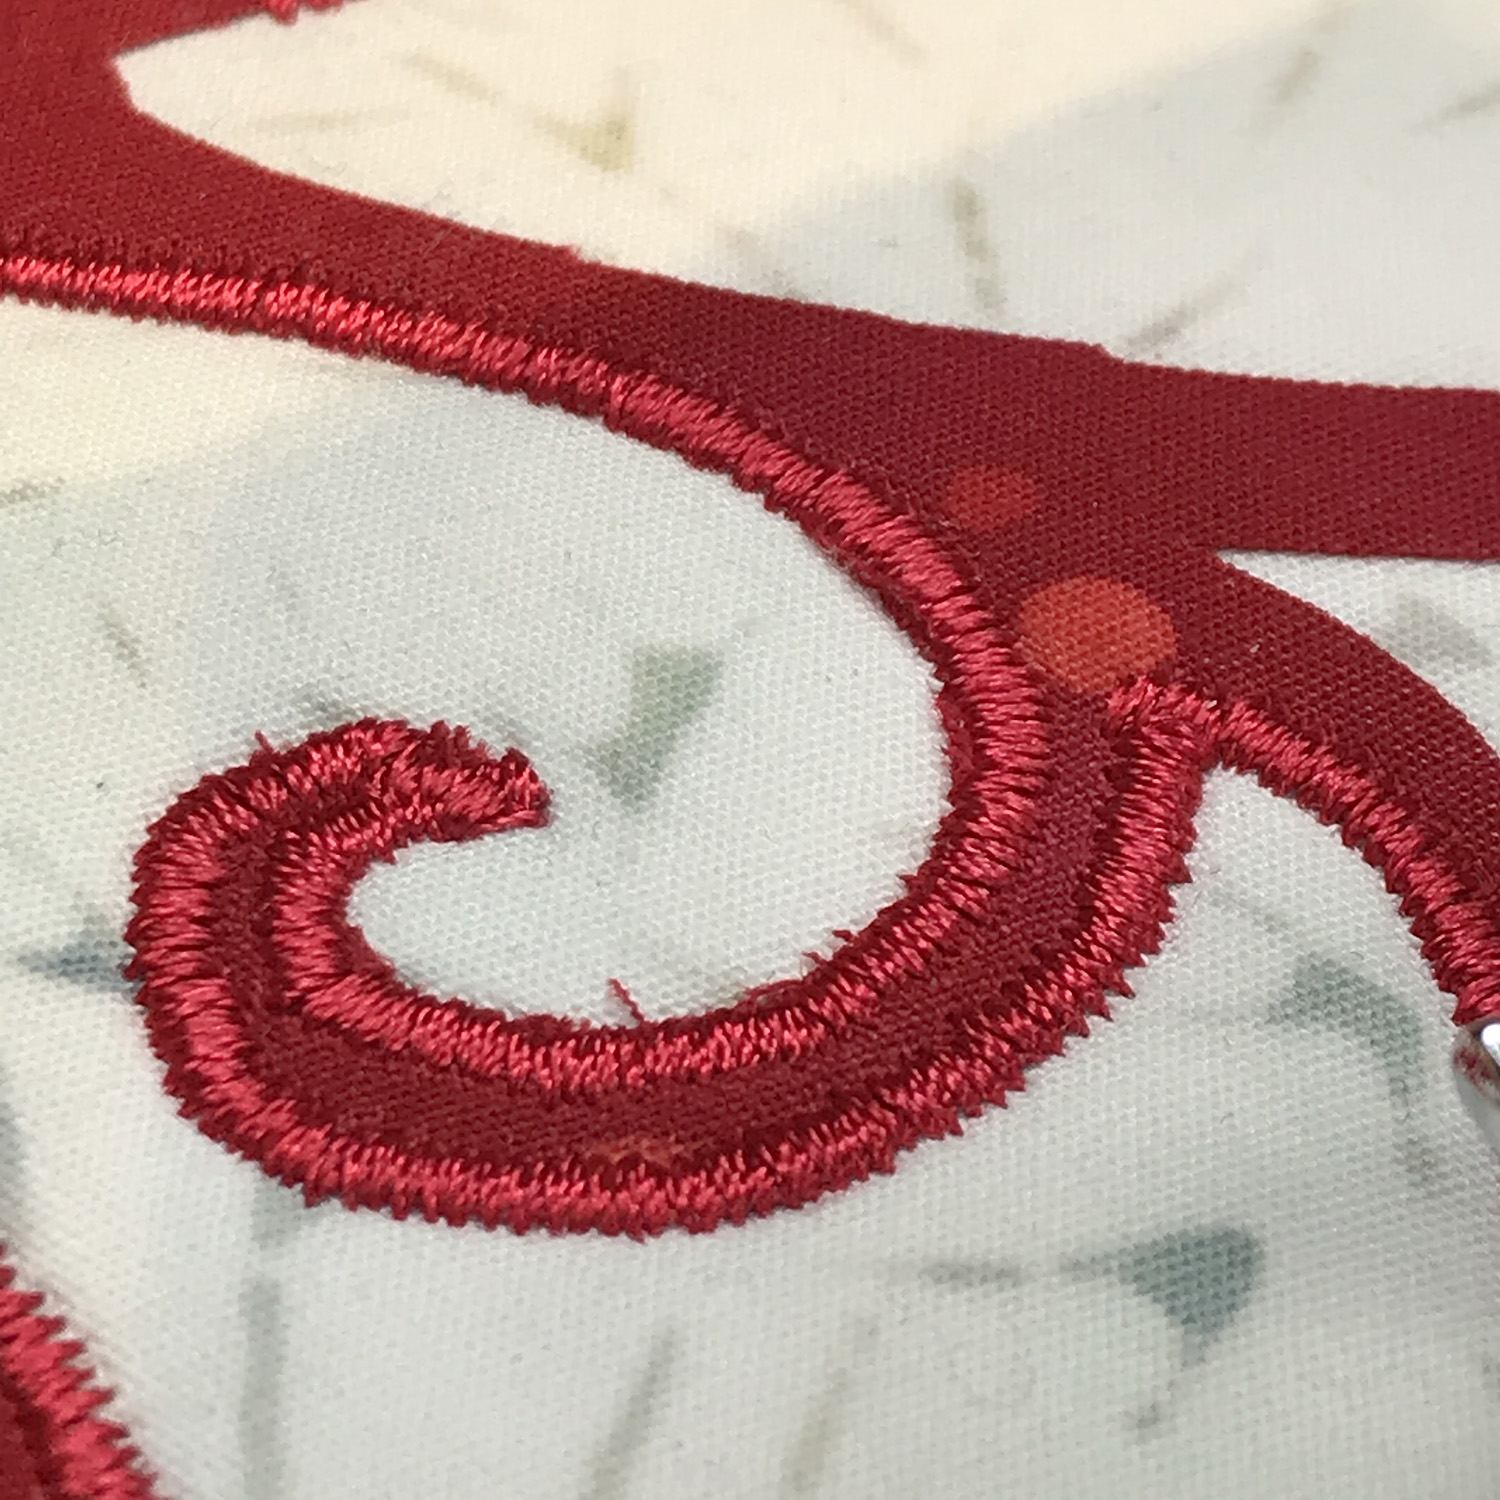
The inside edge of the fabric swirl is a tight inside curve. The outside edge of the fabric swirl is a tight outside curve.
For the inside curve, I stitch straight for 2 +/- stitches and end with the needle down in the top fabric in the right hand position of the satin stitch, pivot my fabric ever so slightly counter-clockwise so the presser foot is again perpendicular to the raw edge and sew again. You may notice as you are sewing that the left needle position gets closer to the raw edge of your inside curve as you stitch straight. When it is next to it, it’s time to stop with your needle in the right hand position of the satin stitch in the top fabric and pivot again.
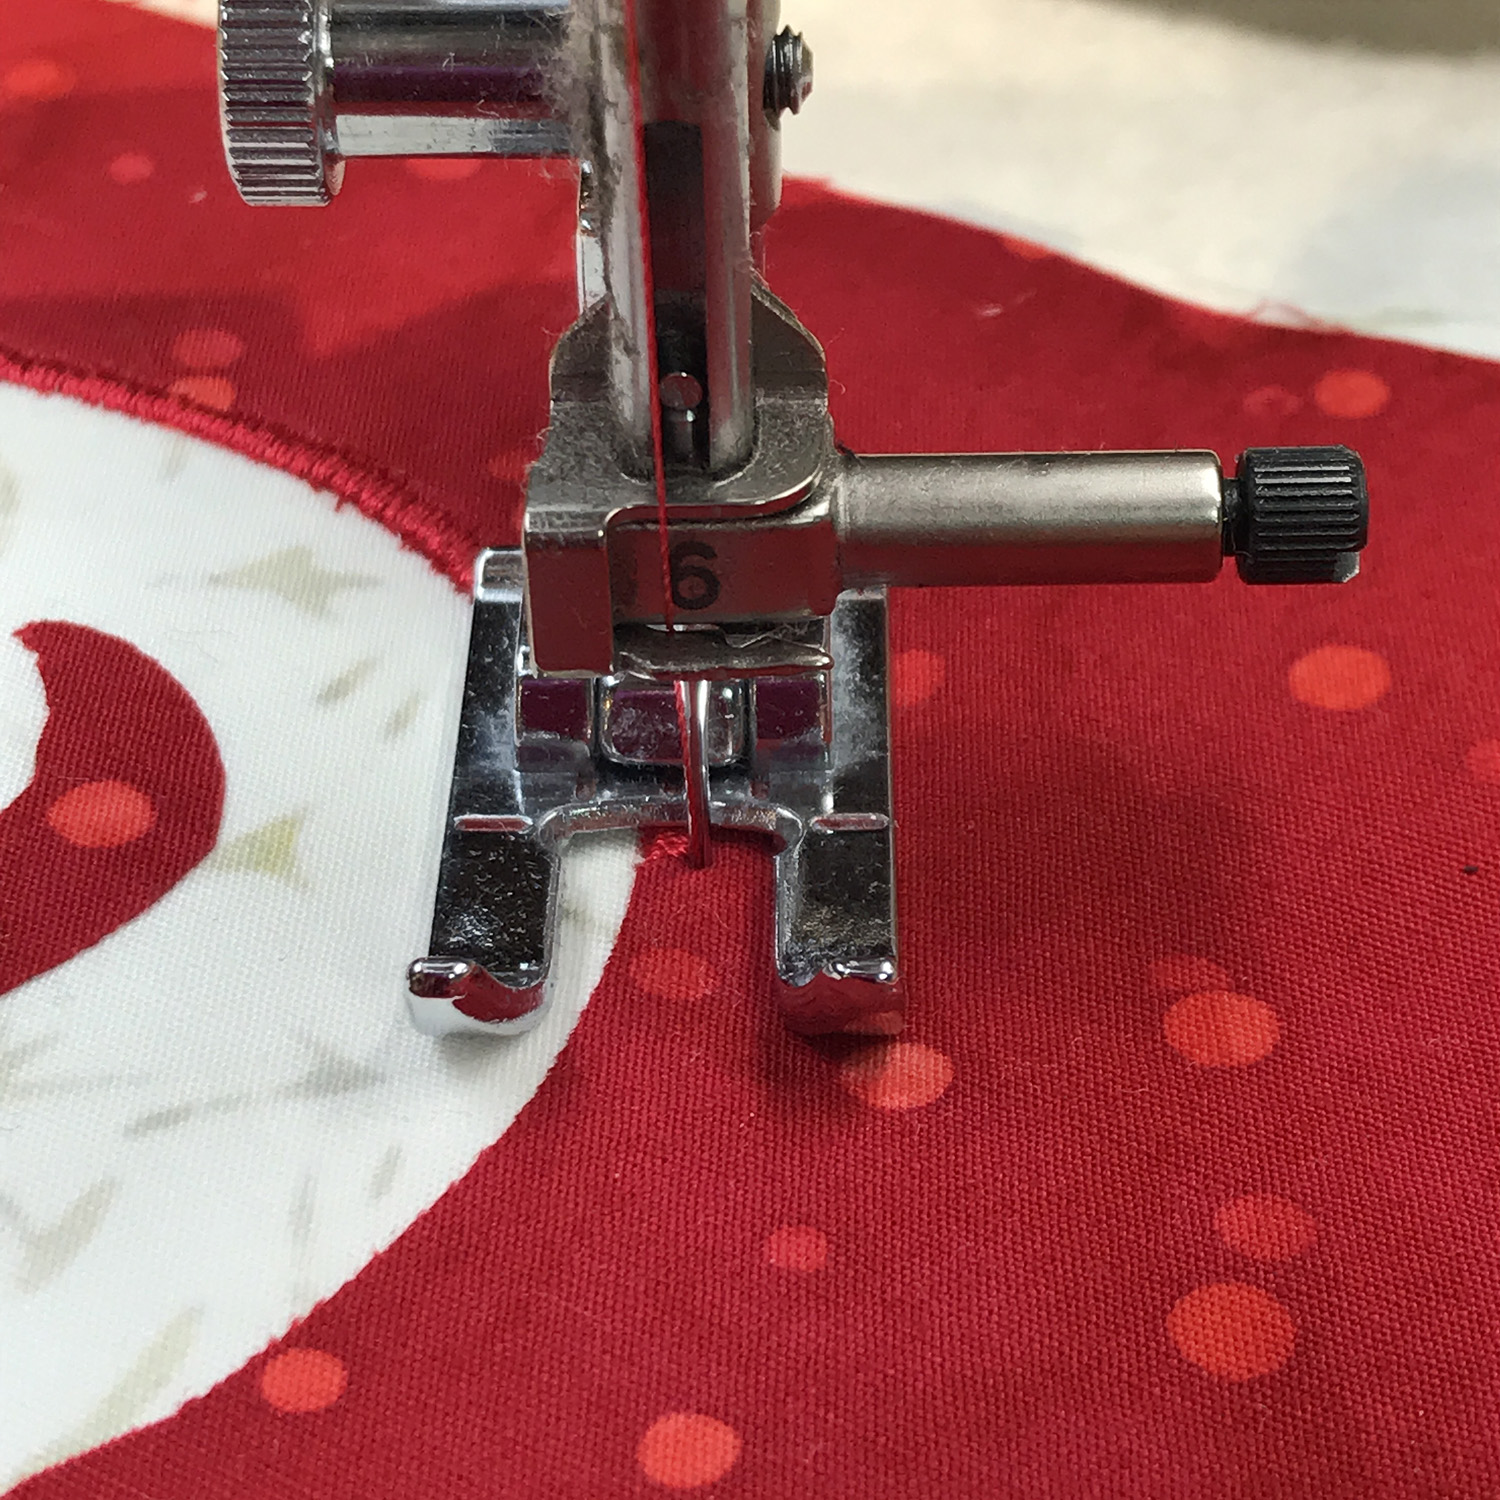
Ready to sew. Presser foot is perpendicular to raw edge and center notch is aligned with the raw edge. Needle is in the right hand position.

After stitching straight for 2 +/- stitches, the left needle position is hugging the raw edge and the presser foot is no longer perpendicular to my raw edge. It’s time to stop with the needle in the right hand position of the satin stitch, pivot ever so slightly, and then sew again.
Take note that all reverse appliqué circles are inside curves. Therefore, the same steps apply stitching circles as well as inside curves.
Outside curves
I stitch the tight curves of the heart’s inner swirls with the stop & start system. But now, every time I stop, my needle will be in the left hand position of the satin stitch in my background fabric. I stitch straight 2 +/- stitches. As the left hand needle position of the satin stitch begins to creep away from the raw edge, stop with needle on the left into the background fabric, pivot your piece ever so slightly clockwise so the presser foot is perpendicular to the raw edge and sew. Repeat.

Needle is in the left hand position of the satin stitch in the background fabric. Presser foot is perpendicular to the raw edge. Ready to sew straight 2 +/- stitches.
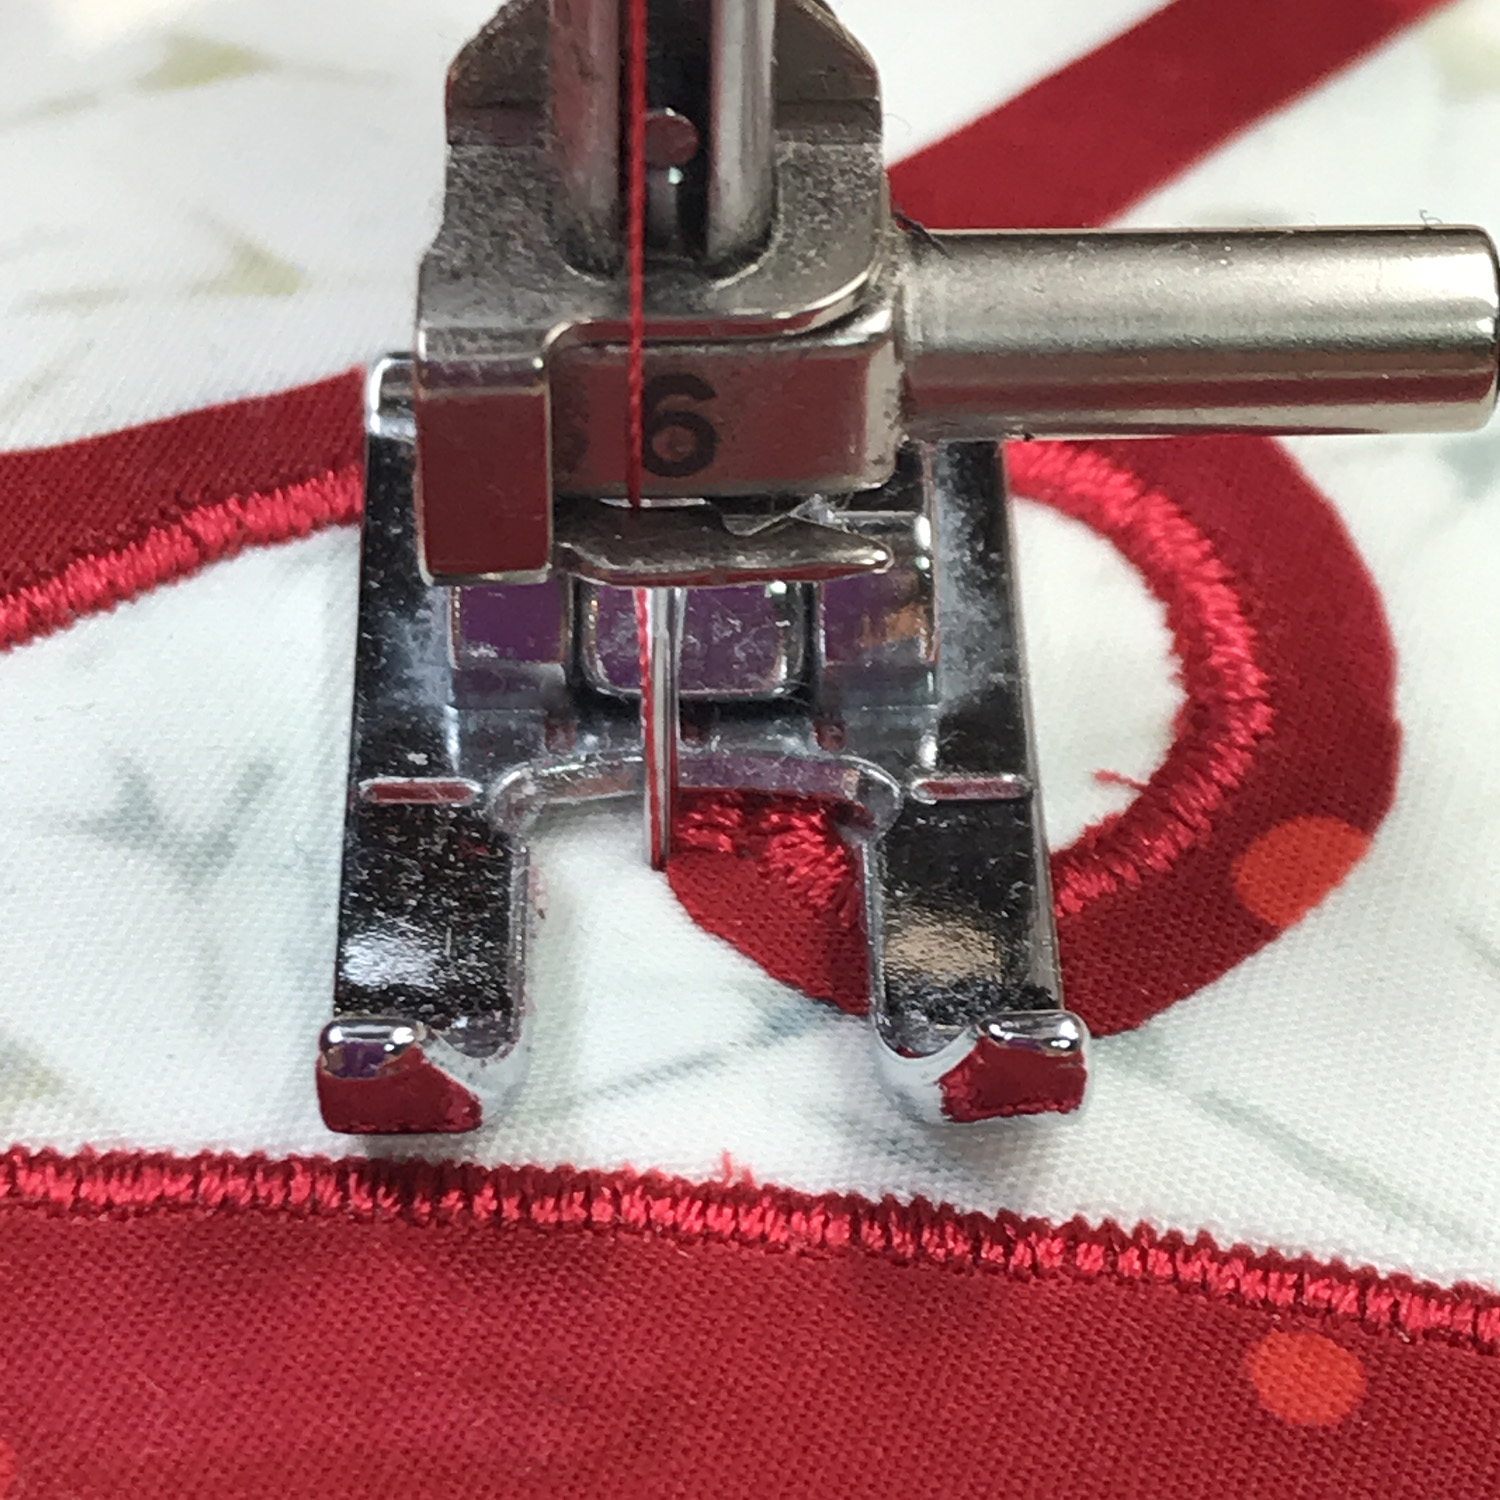
Needle is the left hand position of the satin stitch in the background fabric is beginning to move away from the raw edge. Presser foot is not quite perpendicular to raw edge any longer. Time to pivot slightly before sewing again.
Corners: Inside and Outside
Corners are 90 degree angles. Each corner has two legs. The first leg goes into it and the second goes out from it. I’m going to switch our example to our Thistle, 7 of 9 pattern, as it has lots of corners to stitch and our Feel the Love placemats do not.

Thistle, 7 of 9 pattern has several corners to stitch.
Inside corners
Inside corners are like the corner on the inside of a box.
I stitch beyond the corner the same length as the width of my stitch. This is where having a feel for how wide your stitch is comes in handy. Typically you stitch 3 – 5 stitches +/- beyond the raw edge of your inside corner. End with your needle down in the right hand position of the satin stitch. I raise my presser foot and pivot my piece so my presser foot is parallel to the stitched leg of my inside corner, or perpendicular to the un-stitched leg, lower the presser foot and sew.

Stitch beyond the corner the same length as the width of your stitch. End needle down in the right hand position of the satin stitch.
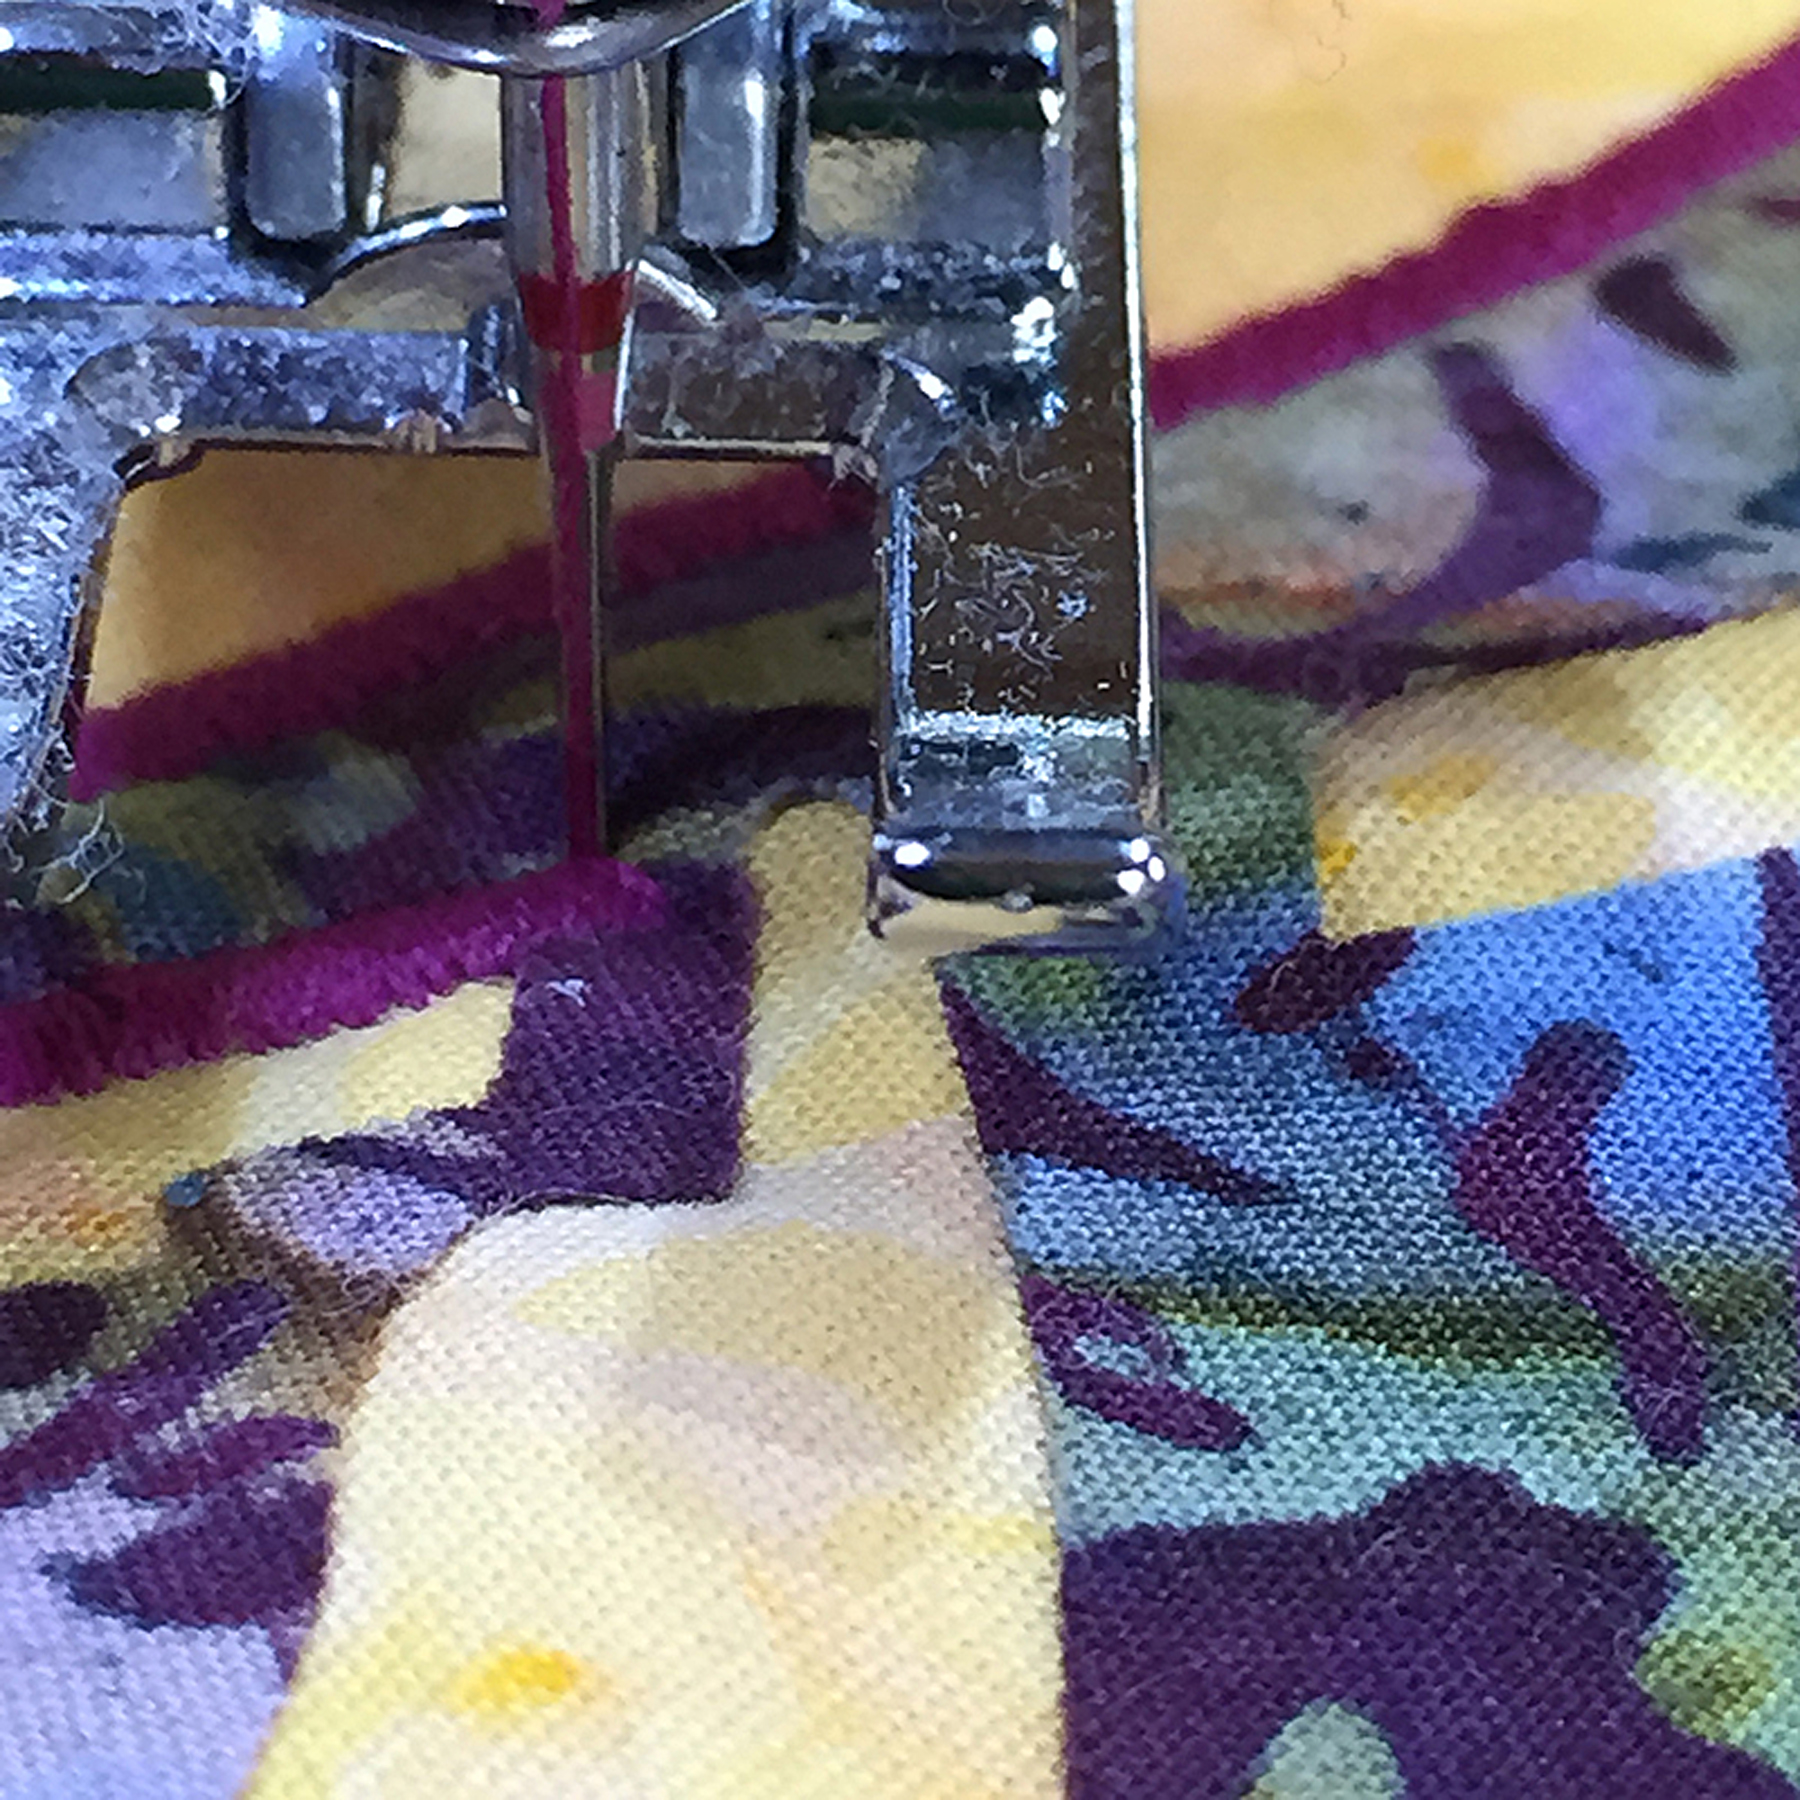 Raise the presser foot and pivot so the presser foot is parallel to the stitched leg, or perpendicular to the un-stitched leg.
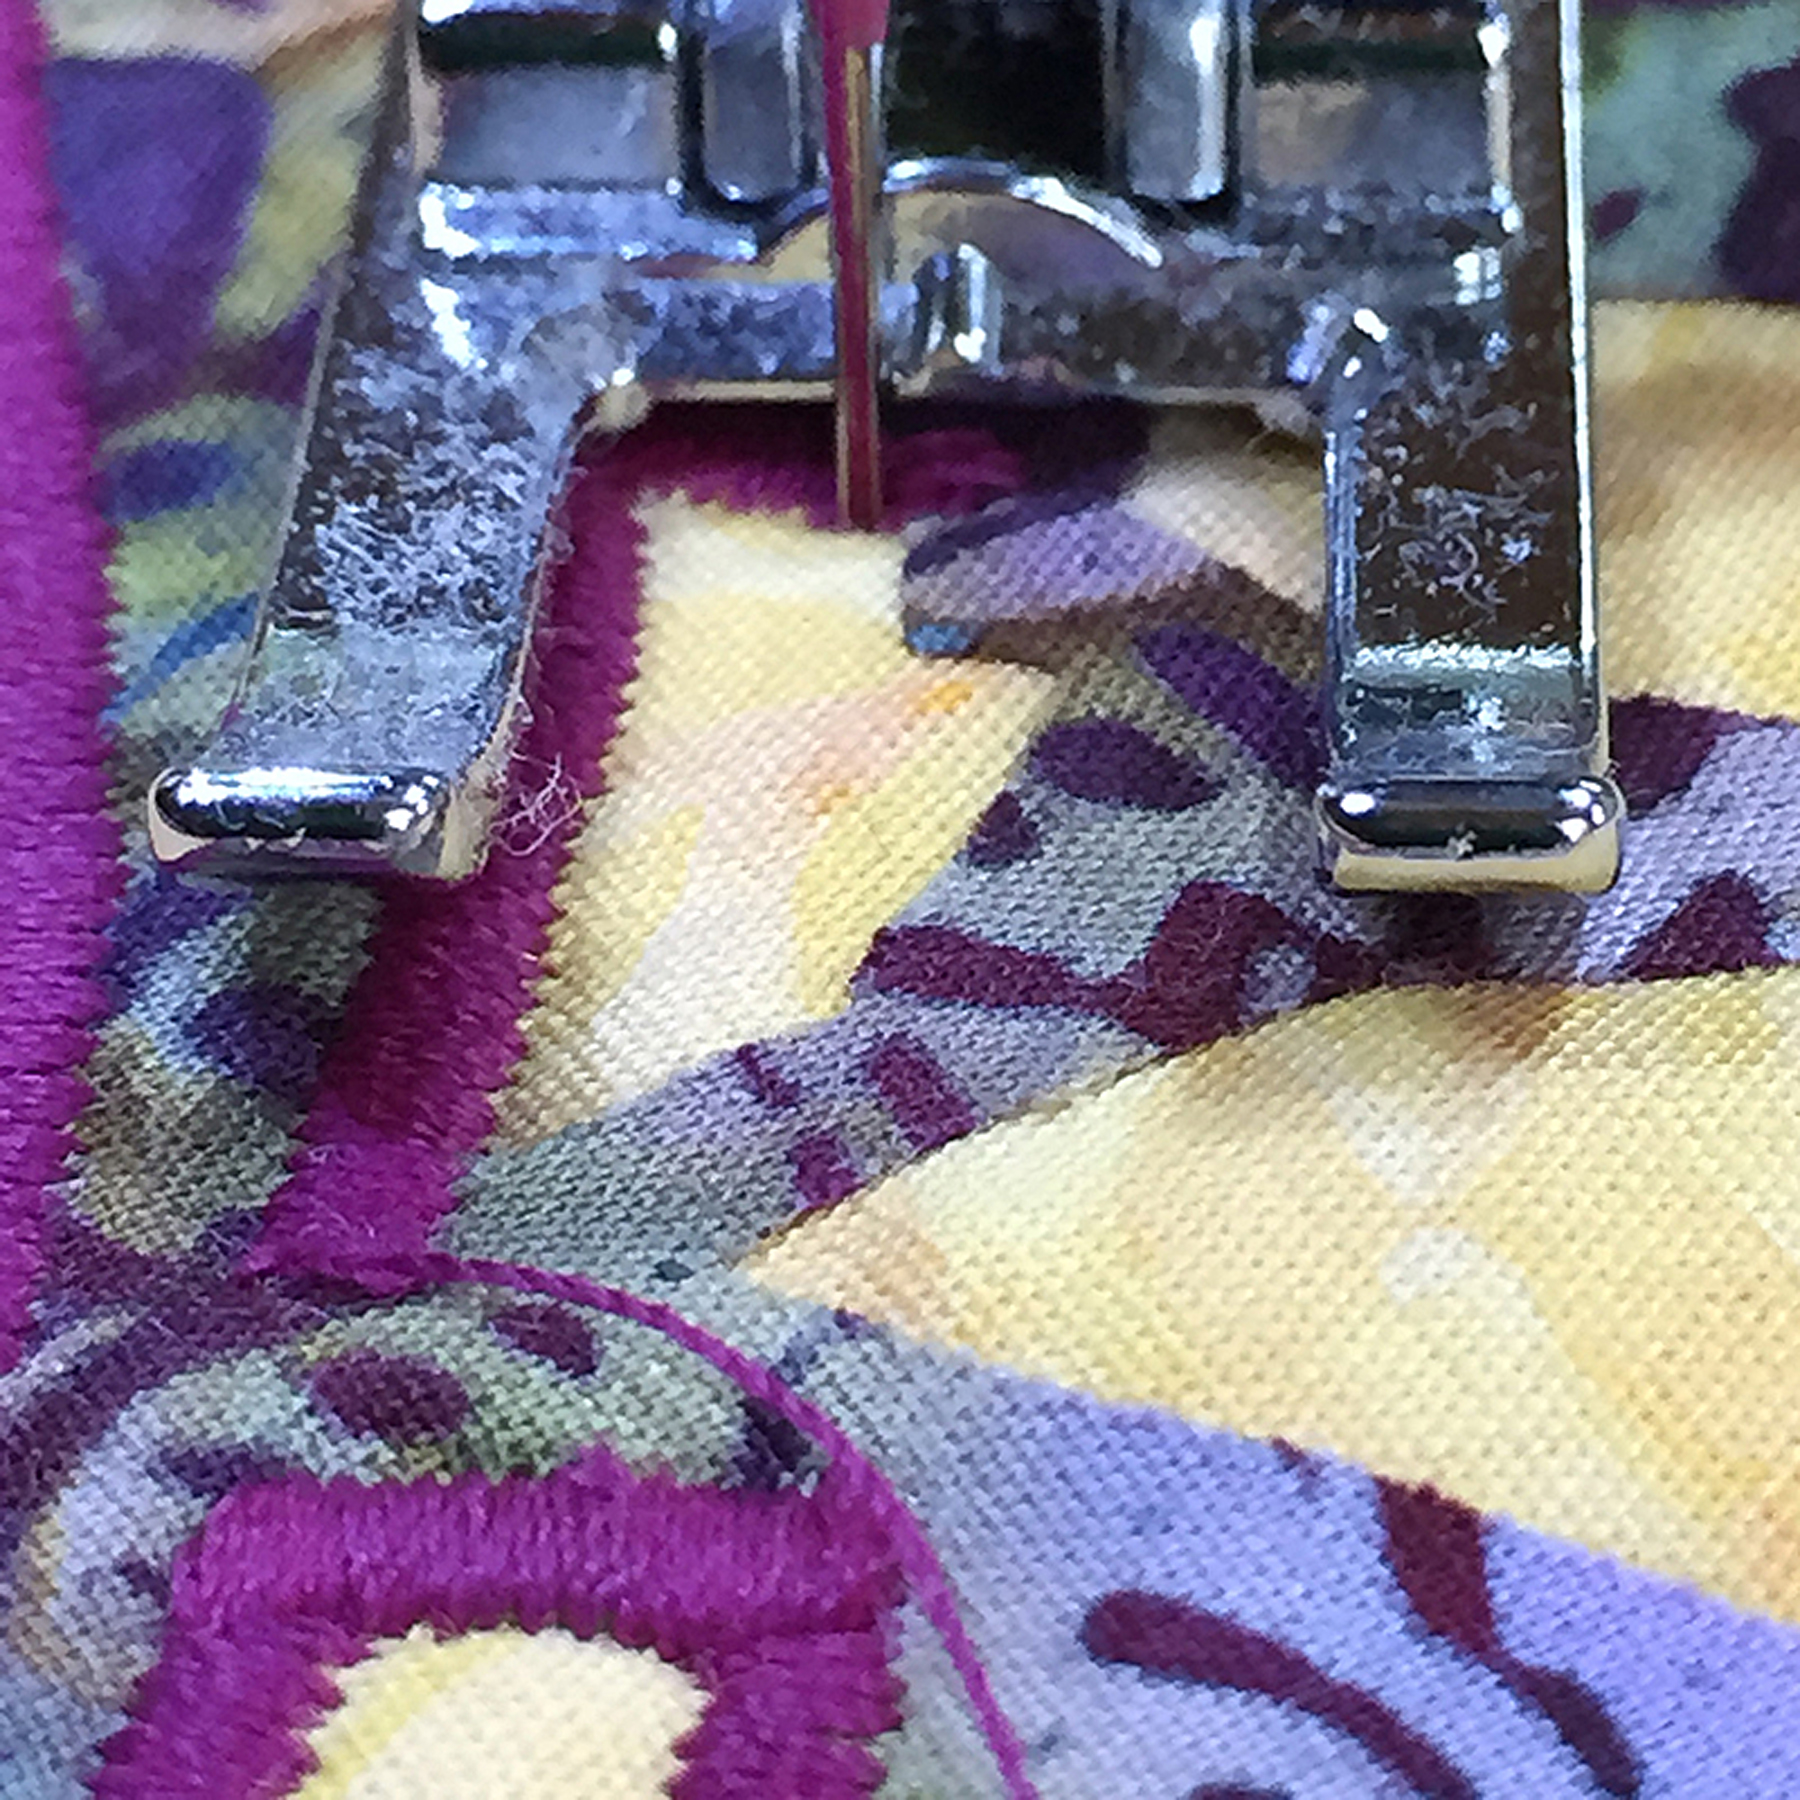
Lower your presser foot and sew.

Inside corner all done.
Outside corners
Outside corners are 90 degree corners like the outside of a box.
I stitch to the corner leaving the needle down in the fabric in the left hand position of the satin stitch. Raise the presser foot. Turn your piece so the presser foot is parallel to the stitched leg and perpendicular to the un-stitched leg of the outside corner. Lower the presser foot down and sew.

Stitch to the corner leaving the needle down in the left hand position of the satin stitch. Raise the presser foot.

Pivot your piece so the presser foot is parallel to the stitched leg, or perpendicular to the un-stitched leg. Lower the presser foot and sew.

Outside corner all done.
Acute Points: Inside and Outside
Acute points are less than 90 degrees. Each acute point has two legs. One goes into it and the other goes out from it. We stitch into the acute point on the first leg, pivot, and then stitch out from the acute point on the second leg.
Acute Inside Points

Acute Inside Point
I stitch beyond the acute inside point the same length as the width of my stitch. This is where having a feel for how wide your stitch is comes in handy. Typically that’s about 5 stitches +/- beyond the raw edge of your acute inside point. End with your needle in the right hand position of the satin stitch.
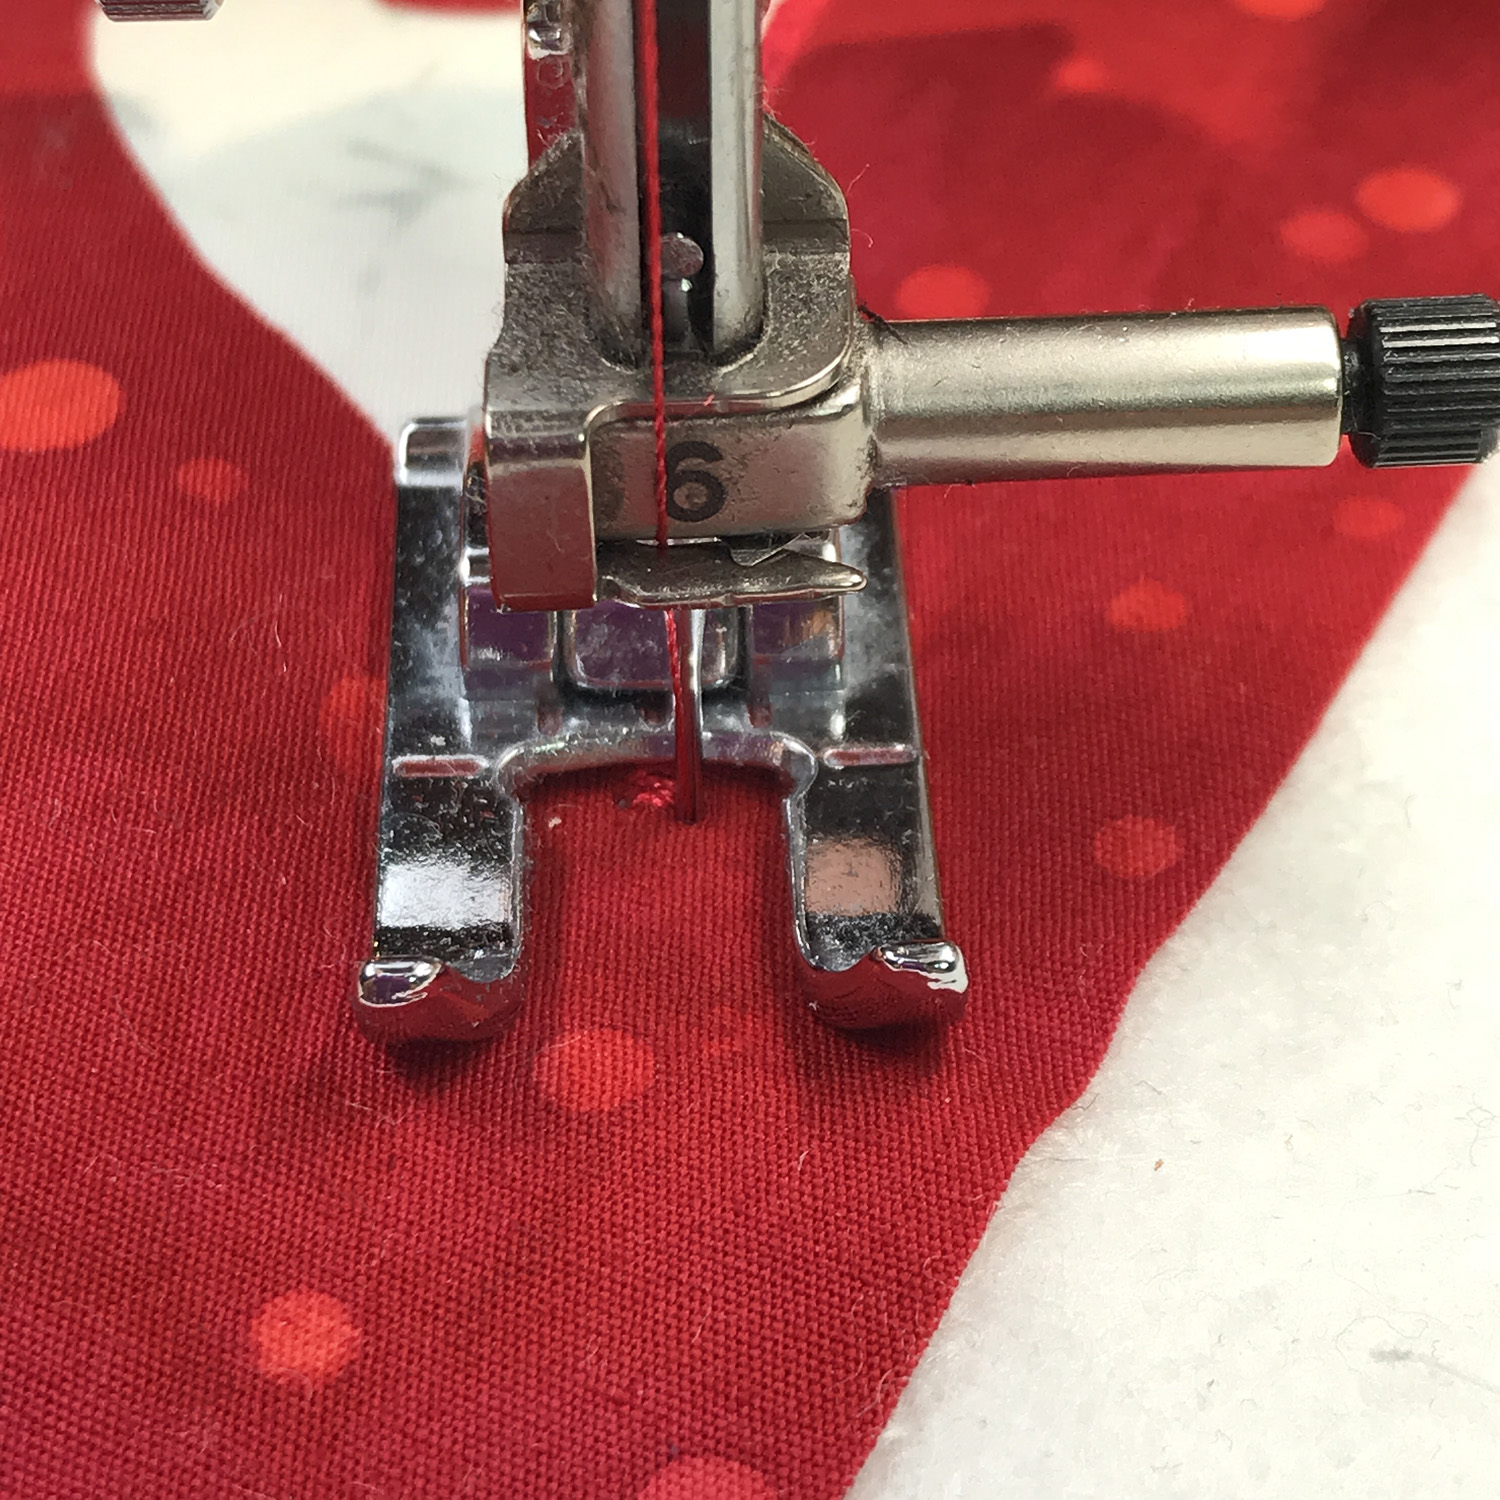
Stitch beyond the acute inside point the same length as the width of your satin stitch. End with the needle down in the right hand position of the satin stitch.
Raise your presser foot and pivot your piece to the right, counter-clockwise, so the presser foot is parallel to the stitched leg.

Raise presser foot and pivot your piece counter clockwise so the presser foot is parallel to the stitched leg.
Take one stitch so the needle ends in the left hand position of the satin stitch.
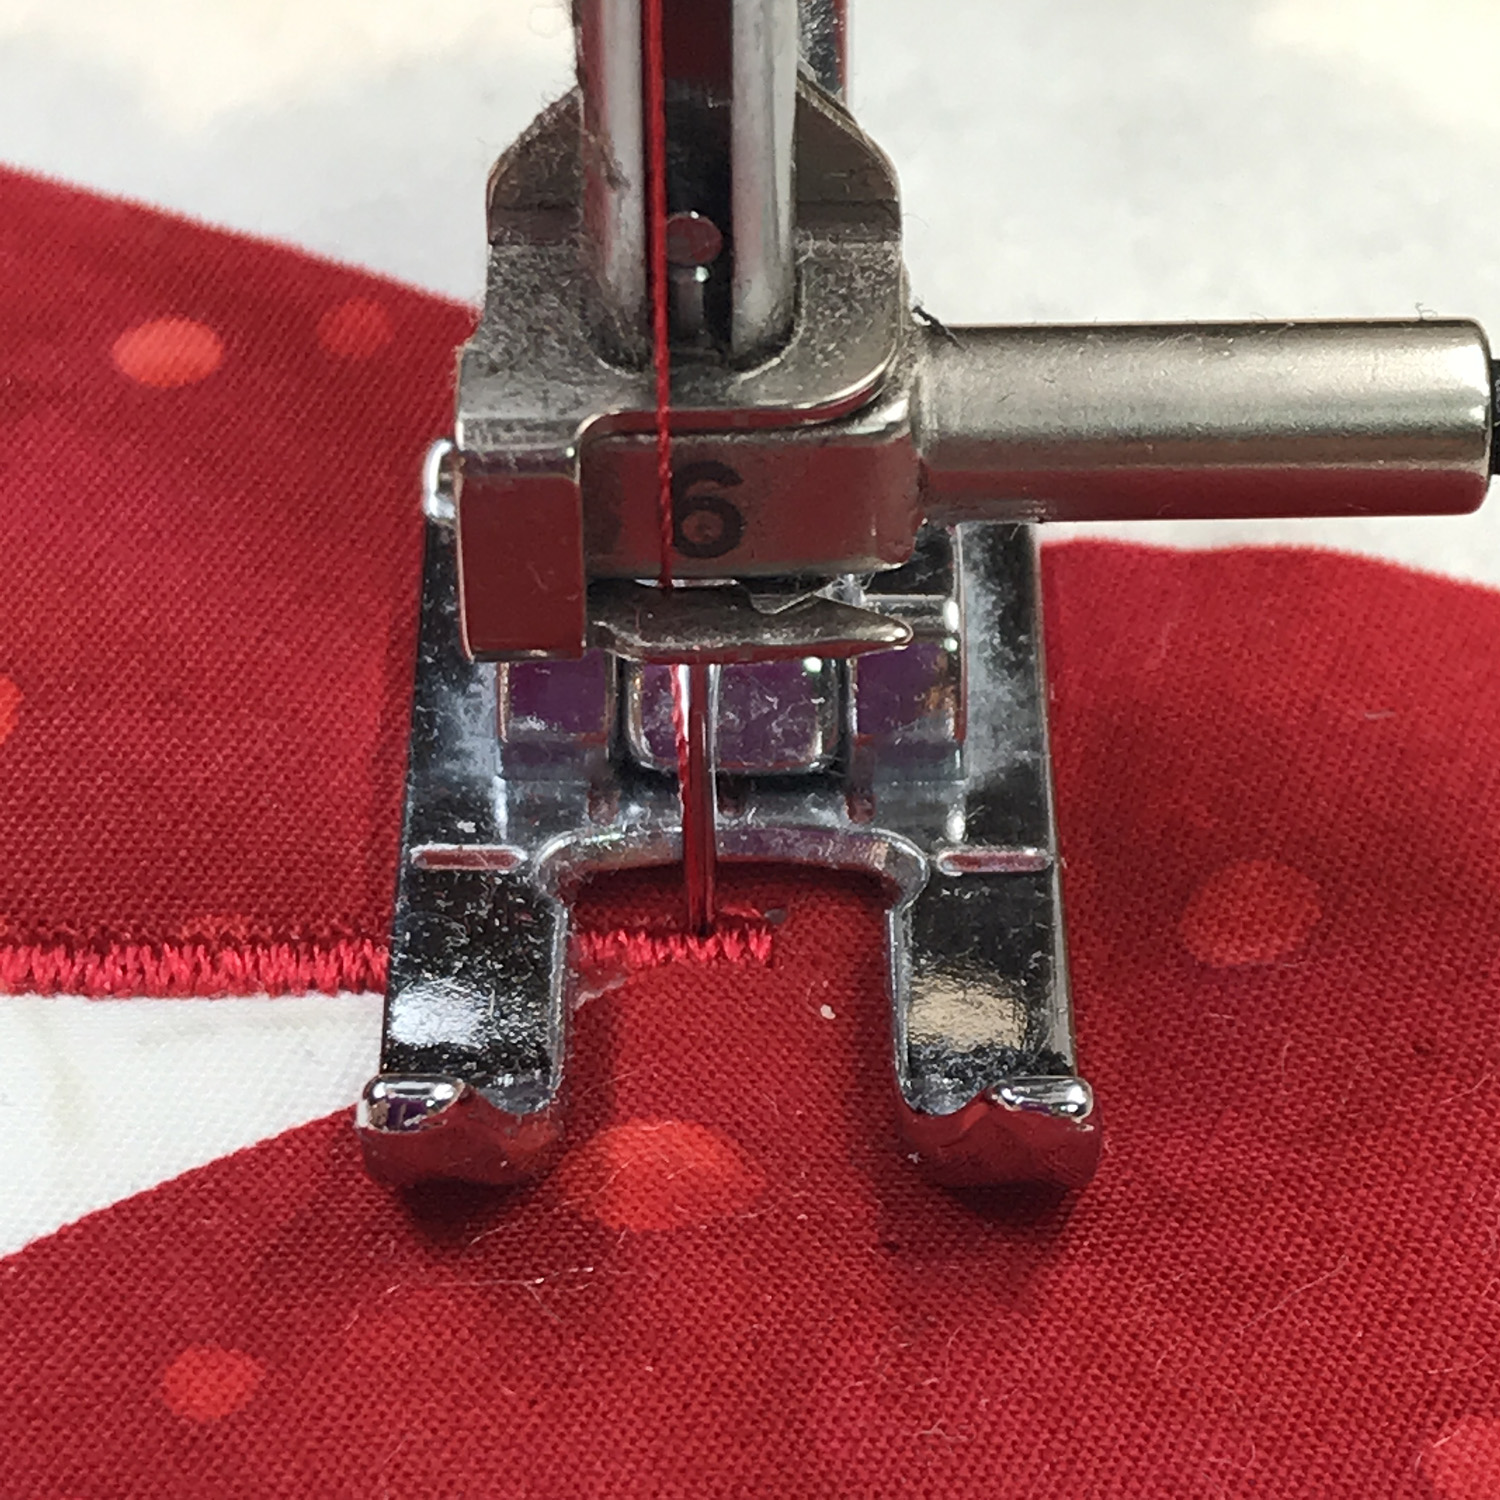
Take one stitch so the needle ends in the left hand position of the satin stitch.
Raise your presser foot and pivot your piece to the right, counter-clockwise again, so the presser foot is perpendicular to the second leg, the un-stitched leg, of the acute inside point.

Raise presser foot and pivot counter clockwise again so the presser foot is perpendicular to the un-stitched leg.
Put your presser foot down and sew.

Acute inside point done.
Acute Outside Points
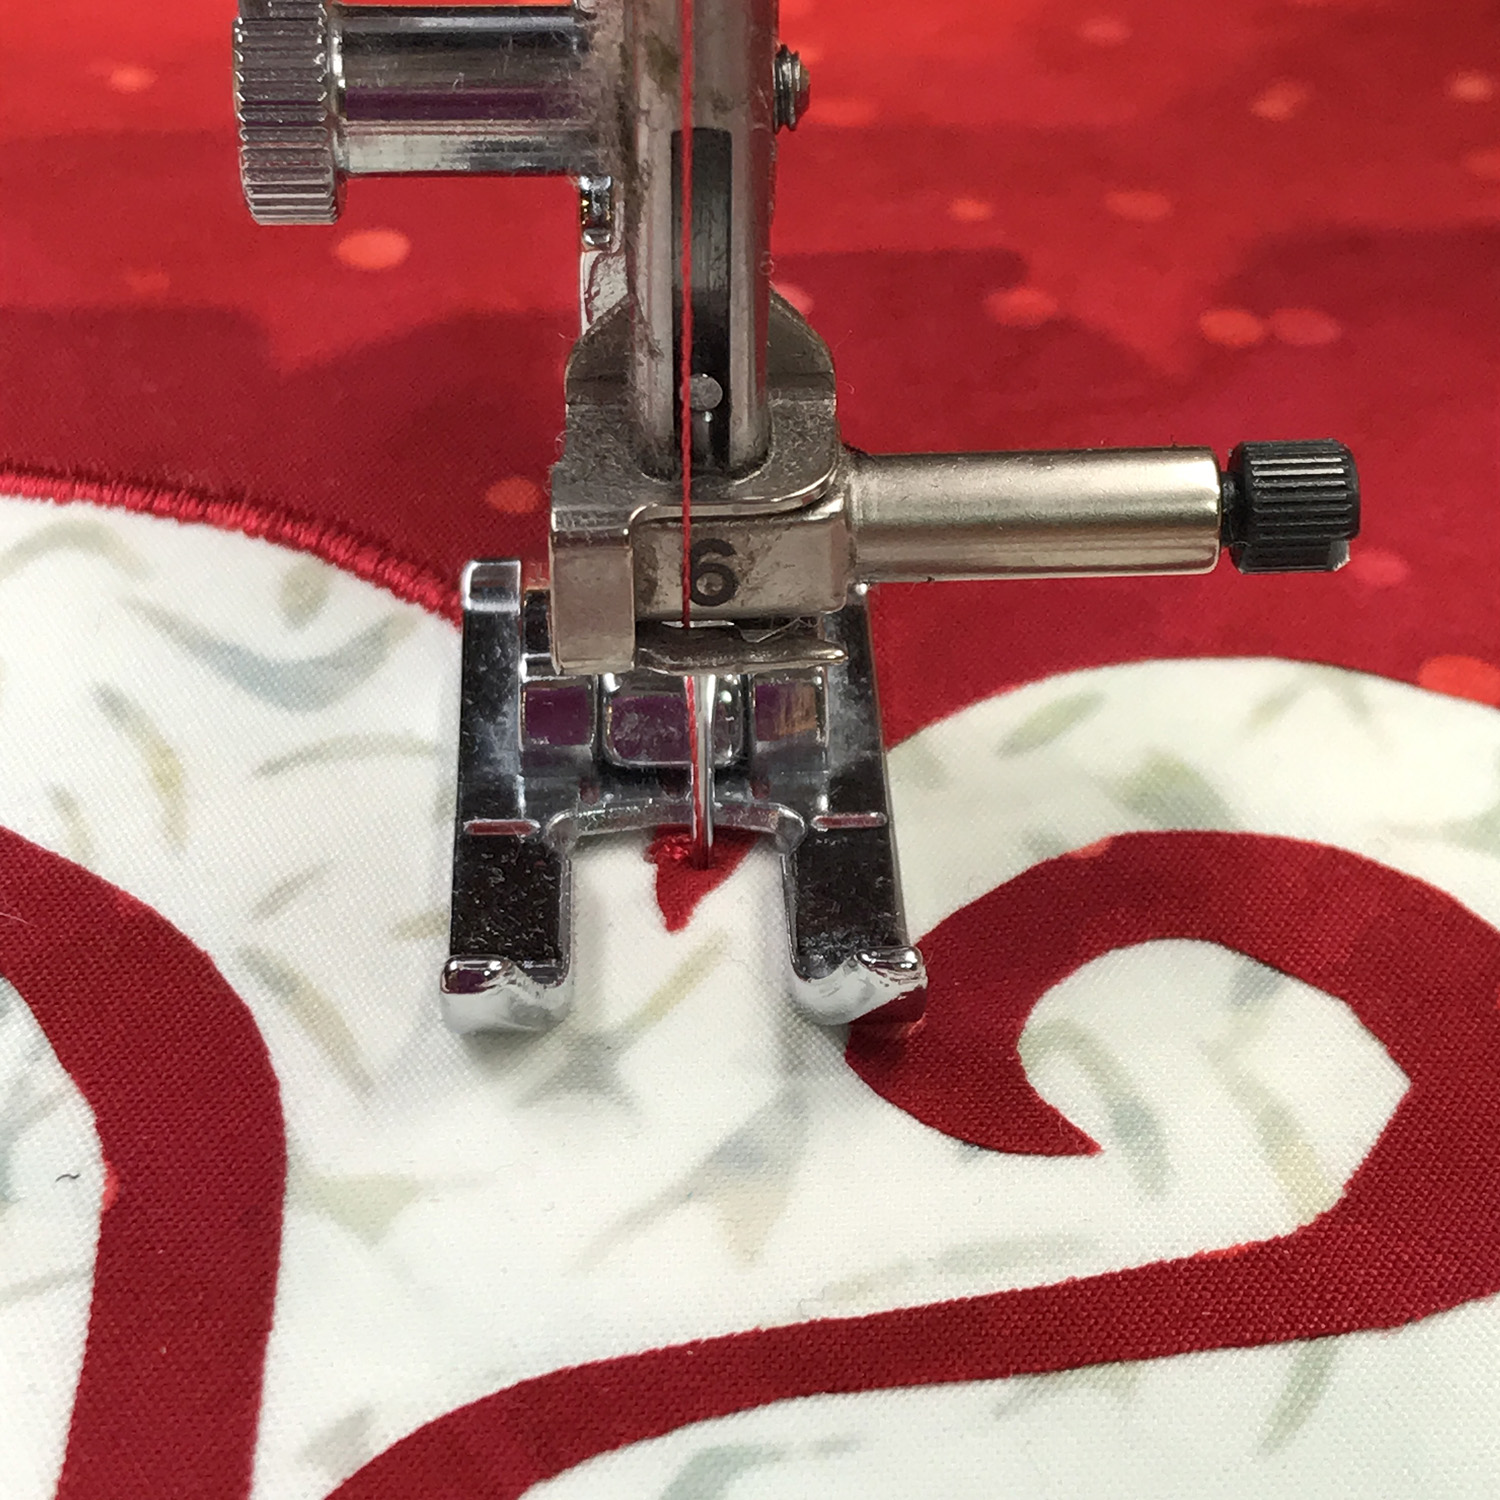
Acute Outside Point
I stitch right to the acute outside point and end with the needle down in the left hand position of the satin stitch. The needle will be in the background fabric.

Stitch to the acute outside point and end with the needle down in the left hand position of the satin stitch. Needle will be in the background fabric.
Raise your presser foot and pivot your piece to the left, clockwise, so the presser foot is parallel to the stitched leg.
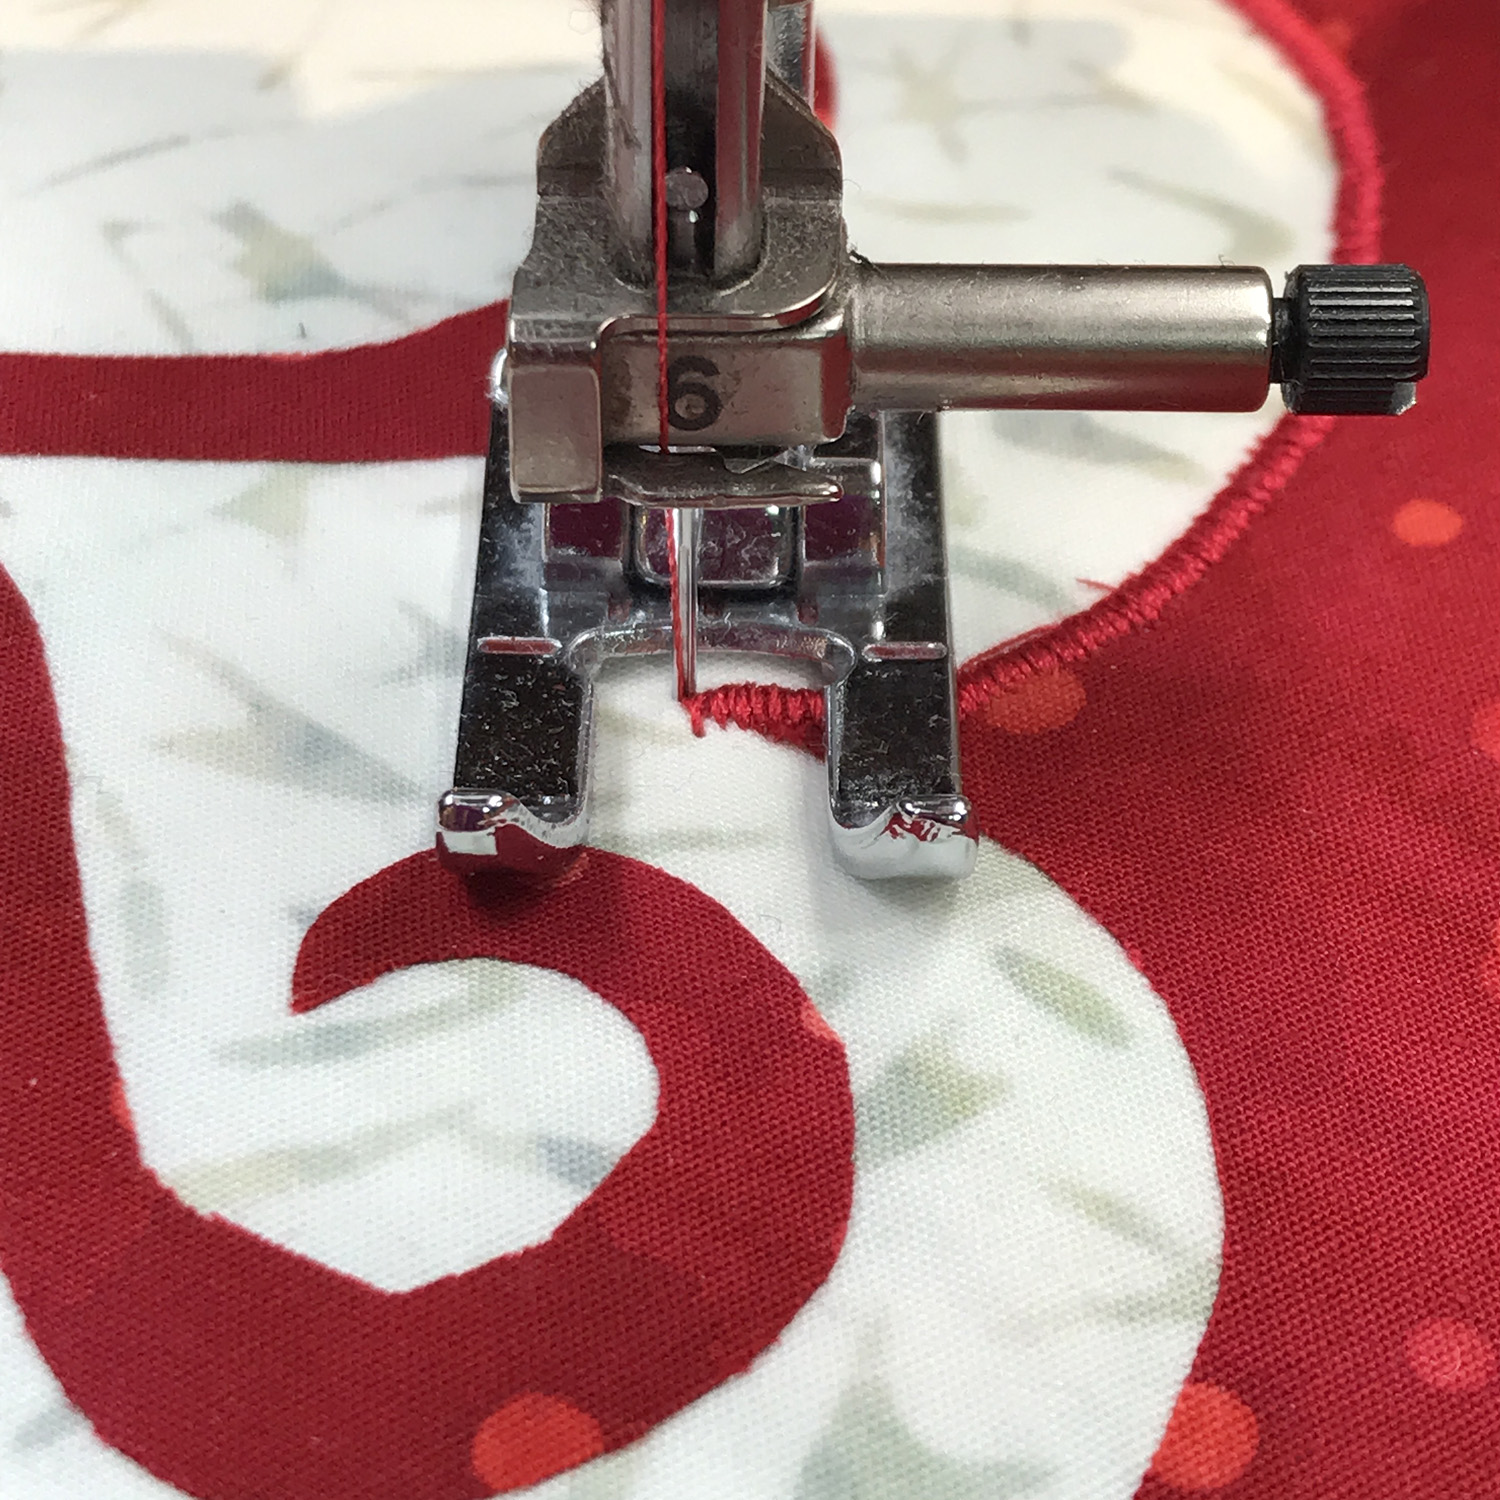
Raise presser foot and pivot your piece clockwise so the presser foot is parallel to the stitched leg.
Take one stitch so the needle ends in the right hand position of the satin stitch.

Take one stitch so the needle ends down in the right hand position of the satin stitch.
Raise your presser foot and pivot your piece to the left, clockwise, again, so the presser foot is perpendicular to the second leg, the un-stitched leg, of the acute outside point.

Raise your presser foot and pivot your piece clockwise so the presser foot is perpendicular to the “un-stitched leg.”
Put your presser foot down and sew.

Lower presser foot and sew.

Acute outside point done.
Our trace, snip, iron, and stitch process gives you an easy, speedy way to create reverse appliqué by machine. If you’ve never done it before, give it a try. It’s FUN!
Don’t forget to check out our blog, “Feel the Love with Snowy Hearts” to practice your new machine reverse appliqué skills.

Feel the Love table décor set. Celebrate St. Valentine’s Day in style.
And remember, be gracious with yourself. You are practicing something new.
Happy Quilting!
If you have more questions or need some extra pointers, check out the Technique Tutorials on our Home page and blogs.
We have a unique variety of original reverse appliqué patterns in our web store for all levels, for hand and machine reverse appliqué. Medallions. Table runners. Quilts. Blocks.
Check us out, and
…….Enjoy a Touch of Elegance.

Margaret Brewster Willingham is a national teacher and the creative force behind Eye of the Beholder Quilt Design. Contact Eye of the Beholder to book her for a workshop and trunk show.
Sign up for the Eye of the Beholder Newsletter and receive a FREE pattern.