If you love the look of stained glass and are up to the challenge of sewing with silk charmeuse, this lovely pattern will have your heart soaring.
Click here to download the PDF version.
Free Pattern reprinted from American Quilter magazine
Pattern by Laura C. Martin
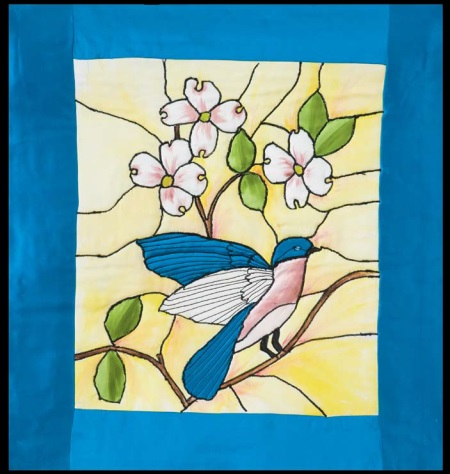
 Tiffany Bluebird, 17″ x 21″, by Laura C. Martin
Getting started
 Enlarge the Appliqué placement diagram to the left 200%. Make sure you click the image to view the full pattern.
With a water-soluble marking pen, trace all the lines of the design onto A.
Trace B thru K, including patch letters, onto tracing paper.
Turn the tracing over and use the reversed tracing to trace B thru K onto the paper side of the fusible web.
Cut out the shapes, leaving ¼” margin all around.
Appliqué and stitching
Following manufacturer’s directions, fuse B thru D to the back of the blue silk. Cut the shapes out on the drawn line.
Repeat the process for E with the pink silk, and F thru K with the green silk.
Tip: I left my dogwood blossoms white and added a little pink paint. If you want pink blossoms, cut them out of the same light pink fabric as the bird’s breast, E.
Remove the paper backing from the fused patches and place each colored piece exactly on top of the corresponding piece on A. Fuse in place. Using a watersoluble pen, trace the feather and eye markings onto the blue silk appliqué.
 Layer the fused quilt center over the stabilizer. Using black thread and a narrow satin stitch, machine sew around the appliqué. Be sure to cover all raw edges with stitching. Continue stitching on all of the drawn lines, including those on the wings. When you’re done, the piece should look like a coloring book page.
The image to the right shows the stitching in progress.
Do not remove the stabilizer after stitching.
Adding color
Use fabric dyes to add color to the design. Silk charmeuse takes dyes and paints beautifully, allowing you to enhance the design with shading and highlights. I use Jacquard® Textile Colors because they are thick enough that the satin stitching generally stops the colors from spreading. If the paint is too thin (mixed with too much water), it may run, so lay in the paint carefully. Follow the manufacturer’s directions to prepare the dye.
Mix equal amounts of yellow and goldenrod to paint the background. I added small streaks of pink at one corner of several sections to make it look more like colored glass. Mix pink with a tiny amount of white for the petals and the bird’s breast. Mix yellow with green for the center of the flowers. Paint green over the green silk of the leaves for shading. Use a small brush to paint brown on the legs in between the lines delineating the tree branch. The blue silk on the bird’s back and wings was already so beautifully vibrant that it didn’t need enhancement. If any of the pen lines still show after painting, use a clean brush and water to remove them.
Set the dye according to the manufacturer’s directions. Remove the stabilizer.
Quilting
Layer the backing and batting. Center the quilt top. Baste the layers together. Quilt on top of the black satin stitching. Referring to the quilt photo, quilt the feathers on the wings and tail, and the eye on the head.
Borders
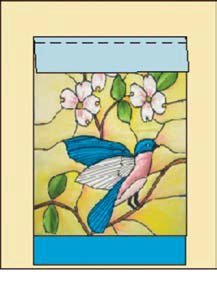
 Following the image to the left, straighten the edges of the quilt sandwich, leaving at least 2½” of backing and batting around the quilt center.
Measure the width of the quilt center, not including batting, and cut 2 border strips to this measurement. Sew them to the top and bottom of the quilt using a ½” seam allowance. Press all seam allowances toward the border.
Measure the vertical length of the quilt center, including the borders you just added. Cut 2 strips this length and sew them to the sides using a ½” seam allowance.
Finishing
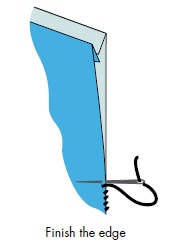
 Trim the backing and batting to match the quilt top. Press under ½” of the quilt top and batting. Press under ½” of the quilt back. Match the folded edges and whipstitch together as seen in the image to the right.
To display your quilt, make a sleeve and sew it to the back of the quilt.